Updated April 2024: Stop getting error messages and slow down your system with our optimization tool. Get it now at this link
- Download and install the repair tool here.
- Let it scan your computer.
- The tool will then repair your computer.
Your network may not work properly because the DNS server cannot be reached. There are several reasons for this network error. One of them is that the DNS server does not respond. Another is the DNS server, which is not available. Even the IP address of the server could not be found, is a cause. After all, your DNS server cannot be contacted.

How to correct a DNS error:
Run Network Troubleshooter
- Press Windows + R, then type ncpa.cpl and press Enter to open network connections.
- Right-click on your Wifi connection and select Diagnostics.
- Start the network troubleshooting and you will get the following error message: DHCP is not enabled for “Wireless Network Connection”.
- Now click on Next to solve the problems. Also click on “Try this repair as an administrator”.
- At the next prompt, click Apply this correction.
- Restart your PC to save the changes.
April 2024 Update:
You can now prevent PC problems by using this tool, such as protecting you against file loss and malware. Additionally it is a great way to optimize your computer for maximum performance. The program fixes common errors that might occur on Windows systems with ease - no need for hours of troubleshooting when you have the perfect solution at your fingertips:
- Step 1 : Download PC Repair & Optimizer Tool (Windows 10, 8, 7, XP, Vista – Microsoft Gold Certified).
- Step 2 : Click “Start Scan” to find Windows registry issues that could be causing PC problems.
- Step 3 : Click “Repair All” to fix all issues.

Changing the DNS server on Windows 10
Step 1: View network connections
To change the DNS server on Windows 7, Windows 8 or Windows 10, you must access the properties of your network connection. Click the Windows button on the taskbar and search for “Network Connections”, then select “View Network Connections” from the menu. You can also simply type the command ncpa.cpl.
On Windows 10, you can simply right-click on the Windows icon and select ‘Network Connections’ from the menu.
Step 2: Select the network adapter
In the second step, you must select the Internet adapter you are using. If you use a wireless network to access the Internet, you must select the Wireless Network Connection (WLAN) adapter. If you connect to the Internet by cable, the LAN adapter is the right choice (LAN connection). Once you have identified the correct network adapter, right-click and select Properties from the menu.
Step 3: Select Internet Protocol
This is the time to choose the Internet protocol you want to use. Internet Protocol version 4 and Internet Protocol version 6 are generally the options specified here. In most cases, version 4 is used. Select them, then click on ‘Properties’.
Step 4: Change the DNS server address
- The fourth and last step is to change the DNS server address on Windows. The options ‘Get IP address automatically’ and ‘Get DNS server address automatically’ should be selected by default. If this is not the case, you must note which DNS server is used before changing the server address so that you can cancel the changes in case of a future problem and return to the original settings.
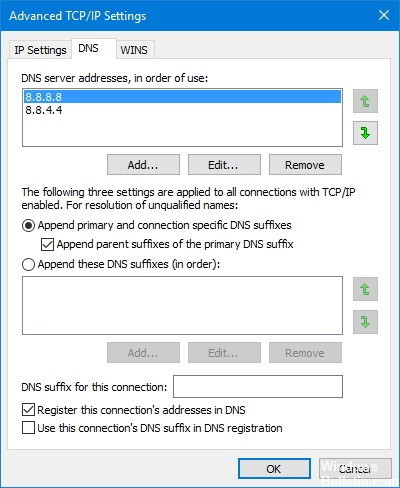
- If you want to assign a DNS server address manually, click on “Use the following DNS server addresses” and enter the addresses of all other servers. If you want to use Google’s DNS server, type 8.8.8.8 in the box next to “Preferred DNS server” and then type 8.8.8.8 next to “Alternative DNS server”. The second part of the information could be technically omitted, since this entry only comes into play if the preferred DNS server has problems. The higher settings, including the IP address, must remain unchanged, especially if a fixed IP address is entered.
- Click OK to confirm the exchange of the DNS server.
Configuration of TCP/IP settings
To do this, follow these steps:
- Select Start > Control Panel.
- Under Network and Internet, select View network status and tasks.
- Select Change adapter settings.
- Hold down the button (or right-click) and select Properties.
- Select Internet Protocol Version 6 (TCP/IPv6) > Properties.
- Select Get IPv6 address automatically > Get DNS server address automatically > OK.
- Select Internet Protocol Version 4 (TCP/IPv4) > Properties.
- Select Get IP address automatically > Get DNS server address automatically > OK.
Expert Tip: This repair tool scans the repositories and replaces corrupt or missing files if none of these methods have worked. It works well in most cases where the problem is due to system corruption. This tool will also optimize your system to maximize performance. It can be downloaded by Clicking Here

CCNA, Web Developer, PC Troubleshooter
I am a computer enthusiast and a practicing IT Professional. I have years of experience behind me in computer programming, hardware troubleshooting and repair. I specialise in Web Development and Database Design. I also have a CCNA certification for Network Design and Troubleshooting.