Updated April 2024: Stop getting error messages and slow down your system with our optimization tool. Get it now at this link
- Download and install the repair tool here.
- Let it scan your computer.
- The tool will then repair your computer.
With the default settings, Windows 10 displays a 24-hour clock on both the taskbar and the lock screen. While there is nothing wrong with the 24-hour format, many users find the 24-hour clock difficult to read and prefer the easy-to-read 12-hour clock.
If you are using Windows 10 and prefer to change the default time format from 24-hour to 12-hour or vice versa, you can change the time format in the settings and control panel.
This guide shows you how to change the time format from 24 hours to 12 hours or vice versa in Windows 10.
Please note that changing the time format from 24-hour to 12-hour time does not affect the clock on the lock screen. The clock on the lock screen will continue to display the time in 24-hour format. Unfortunately, it is now possible to change the time format of the clock on the lock screen.
April 2024 Update:
You can now prevent PC problems by using this tool, such as protecting you against file loss and malware. Additionally it is a great way to optimize your computer for maximum performance. The program fixes common errors that might occur on Windows systems with ease - no need for hours of troubleshooting when you have the perfect solution at your fingertips:
- Step 1 : Download PC Repair & Optimizer Tool (Windows 10, 8, 7, XP, Vista – Microsoft Gold Certified).
- Step 2 : Click “Start Scan” to find Windows registry issues that could be causing PC problems.
- Step 3 : Click “Repair All” to fix all issues.

To change the time in Windows 10 from 24-hour format to 12-hour format
The following steps and screenshots are from Windows 10, but Windows 8.1/8 and Windows 7 will have similar settings except for access to the control panel. The same steps therefore apply to the older version of the Windows operating system.
- Right-click on the clock in the lower right corner of your screen, then click “Set Date/Time”.
- Click on “Date, Time and Regional Formatting” on the right side of the window.
- Scroll to the end of “Data in Regional Format”.
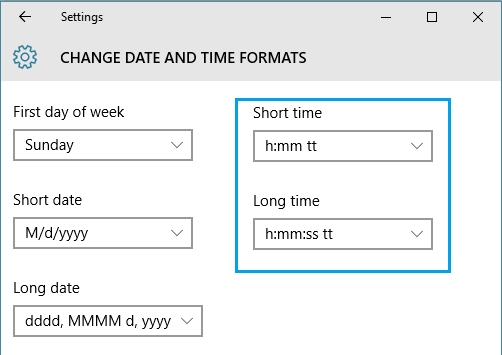
- Click “Change Data Formats”.
- Under “Short Time”, select “9:40 am”.
- Close the window
- Your time is now displayed in 12-hour format and the AM/PM value
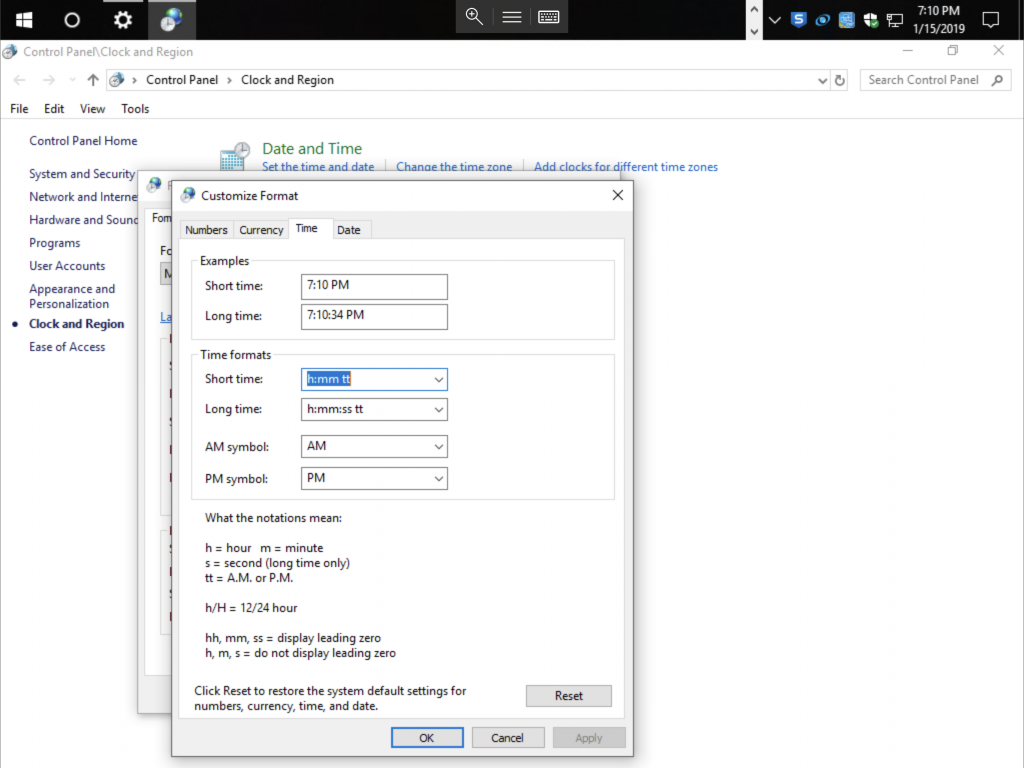
To better explain this, on a computer running Windows 10 that displays the time in 24-hour format, you can find the Long Time and Short Time settings with an uppercase “H” representing the 24-hour format. Simply click on the drop-down menu and make a selection that contains a small “h”.
- Short Time: H:mm – Change to h:mm tt
- Long Time: H:mm:ss – Change to h:mm:ss tt
The letters “tt” in the 12-hour settings above represent AM or PM. Therefore, the time on your Windows 10 computer will now display as 18:45 or 18:00.
Expert Tip: This repair tool scans the repositories and replaces corrupt or missing files if none of these methods have worked. It works well in most cases where the problem is due to system corruption. This tool will also optimize your system to maximize performance. It can be downloaded by Clicking Here

CCNA, Web Developer, PC Troubleshooter
I am a computer enthusiast and a practicing IT Professional. I have years of experience behind me in computer programming, hardware troubleshooting and repair. I specialise in Web Development and Database Design. I also have a CCNA certification for Network Design and Troubleshooting.