Updated April 2024: Stop getting error messages and slow down your system with our optimization tool. Get it now at this link
- Download and install the repair tool here.
- Let it scan your computer.
- The tool will then repair your computer.
Users can install and run multiple versions of the .NET framework on their computer. If you are developing or deploying your application, you need to know which versions of the .NET Framework are installed on the user’s computer. The registry contains a list of the versions of the .NET Framework installed on a computer.
The .NET Framework consists of two main components that are available separately:
- A set of assemblies, which are collections of types and resources that provide functionality for your applications. The .NET Framework and the assemblies have the same version number. For example, versions 4.5, 4.6.1, and 4.7.2 of the .NET Framework.
- The Common Language Runtime (CLR) that manages and executes your application code. A single version of CLR usually supports multiple versions of the .NET Framework. For example, CLR version 4.0.30319.xxxxx, where xxxxx is less than 42000, supports versions 4 to 4.5.2 of the .NET Framework. CLR version 4.0.30319.42000 or higher supports versions of the .NET Framework that begin with the .NET Framework 4.6.
Using Windows Explorer
All versions of the Microsoft .NET Framework are installed in the following directory :
%windir%\Microsoft.NET\Framework\
Where “%windir%” represents the “Windows” directory that exists on the system drive where Windows is installed in your system, e.g. C:\Windows.
So just enter the above path in the RUN dialog box or in the address bar of Windows Explorer and press Enter. This opens the directory as shown in the following screenshot:

In this directory you can find the installed versions.
Use the Registry Editor
Use the following registry information to determine which version(s) and service pack level(s) of the Microsoft .NET Framework are installed.
To do this, follow these steps:
April 2024 Update:
You can now prevent PC problems by using this tool, such as protecting you against file loss and malware. Additionally it is a great way to optimize your computer for maximum performance. The program fixes common errors that might occur on Windows systems with ease - no need for hours of troubleshooting when you have the perfect solution at your fingertips:
- Step 1 : Download PC Repair & Optimizer Tool (Windows 10, 8, 7, XP, Vista – Microsoft Gold Certified).
- Step 2 : Click “Start Scan” to find Windows registry issues that could be causing PC problems.
- Step 3 : Click “Repair All” to fix all issues.

- Click Start, type regedit in the Search for Programs and Files box (in Windows XP, click Run, then type regedit in the Run dialog box), and then press Enter.
- In the Registry Editor, open the following subkey
- HKEY_LOCAL_MACHINE\SOFTWARE\Microsoft\NET Framework Setup\NDP\v4\Full
- Note: If the complete subkey is not present, you have not installed the .NET Framework 4.5 or later.
- Look for a DWORD value called Release. The presence of the Release DWORD value indicates that .NET Framework 4.5 or later is installed on this computer.
- The Release DWORD value indicates which version of the .NET Framework is installed.

Using PowerShell to Detect .NET Versions
While it is possible to use Command Prompt or PowerShell to retrieve the versions of .NET on your computer, many methods found online produce incomplete results. As with our own tool, the best way to determine which versions of .NET are installed is to query the registry, and PowerShell can do this fairly easily.
gci ‘HKLM:\SOFTWARE\Microsoft\NET Framework Setup\NDP’ -recurse | gp -name Version -EA 0 | where { $_.PSChildName -match ‘^(?!S)\p{L}’} | select PSChildName, Version
The list of names is a bit unfriendly and you won’t get better information such as service pack numbers or minor revisions. Also, .NET 1 or 1.1 are not recognized because they are located in a different place in the registry than all other versions.
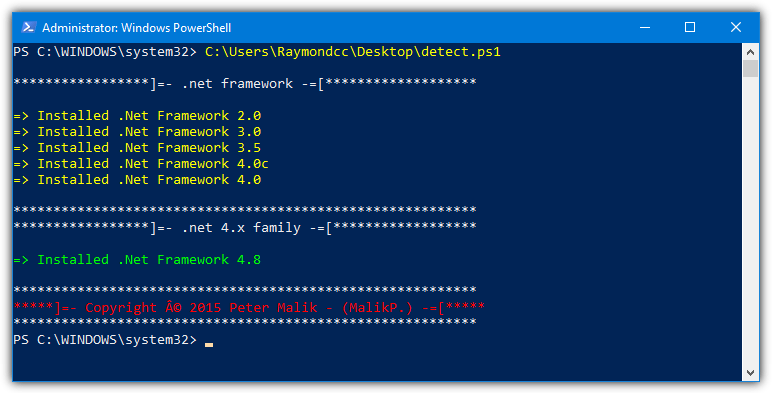
Another option is to download a ready-to-use PowerShell script that detects .NET versions and displays the information in a much more user-friendly way.
The Getter script for installed versions of the .NET Framework is hosted on Github and makes the information easier to read for most users. It currently supports and detects files from version 1.0 to the latest version of the .NET Framework 4.8.
Expert Tip: This repair tool scans the repositories and replaces corrupt or missing files if none of these methods have worked. It works well in most cases where the problem is due to system corruption. This tool will also optimize your system to maximize performance. It can be downloaded by Clicking Here

CCNA, Web Developer, PC Troubleshooter
I am a computer enthusiast and a practicing IT Professional. I have years of experience behind me in computer programming, hardware troubleshooting and repair. I specialise in Web Development and Database Design. I also have a CCNA certification for Network Design and Troubleshooting.