Updated April 2024: Stop getting error messages and slow down your system with our optimization tool. Get it now at this link
- Download and install the repair tool here.
- Let it scan your computer.
- The tool will then repair your computer.
When you type in the Windows File Explorer search box, a list of suggestions appears below the box. These suggestions come from the history of previous searches you’ve made.
This can be useful for making searches faster and easier, but you may want to delete this history. Other family members may be using the same computer and you don’t want them to see what you’re looking for. We’ll show you how to remove certain terms from the Explorer search history and how to remove the full history in Windows 7, 8 and 10.
In this article, we will call the program “File Explorer”, although it has been called “Windows Explorer” in Windows 7. The following procedure will work for both.
Clear File Explorer History with Folder Options
You can manually delete your file explorer history by going to the folder options. This will delete all previous history.
- Open Windows File Explorer, go to the Tools tab at the top of the window and select Folder Options from the list.
- This will open a new Folder Options dialog box. At the bottom of the window you will see an option called Clear File Explorer History, click the Clear button and press Ok to accept the changes.
All your previous history that has been saved will disappear, and the next time you tap the search box it will be saved again as file explorer history. Be doubly sure before deleting the history, as it will not ask you for confirmation.
Use the Shift + Delete Method
Like the Shift+Delete key combination in browsers, the same key combination can delete individual entries in the file explorer history.
April 2024 Update:
You can now prevent PC problems by using this tool, such as protecting you against file loss and malware. Additionally it is a great way to optimize your computer for maximum performance. The program fixes common errors that might occur on Windows systems with ease - no need for hours of troubleshooting when you have the perfect solution at your fingertips:
- Step 1 : Download PC Repair & Optimizer Tool (Windows 10, 8, 7, XP, Vista – Microsoft Gold Certified).
- Step 2 : Click “Start Scan” to find Windows registry issues that could be causing PC problems.
- Step 3 : Click “Repair All” to fix all issues.

- Open the file explorer. It does not matter in which folder you open it, because the history is not folder-specific.
- Click in the search bar and wait for the list of entries in your search history to appear.
- Use the arrow keys or the mouse to highlight an entry.
- Once an item is highlighted, press Shift+Delete to delete it.
Delete File Explorer History Using Windows Registry

You can make a small change in the registry and reset the file explorer search history.
- Press the key combination Gain + R to open the “Run” field.
Type “regedit” in the “run” field and press the “Enter” key.
Go to this place in the opening register editor:
Computer\HKEY_CURRENT_USER\Software\Microsoft\Windows\CurrentVersion\Explorer\WordWheelQuery - Delete everything under the “WorldWheelQuery” button.
Right-click on the taskbar and select Task Manager from the context menu. - On the Process tab, locate Windows Explorer.
- Select it and click on the “Restart” button in the bottom right corner.
- The search history in the file explorer should be deleted.
Disable File Explorer Search History
If you don’t want to permanently delete your history, you can disable it completely so that it no longer keeps track of your searches. In Windows 10 Pro, you can disable Group Policy Search History, but for Windows 10 Home, you’ll need to make some registry adjustments.
- Press the Windows + R key and type: regedit in the Run line and press Enter, or click OK.
- Then go to the next location :
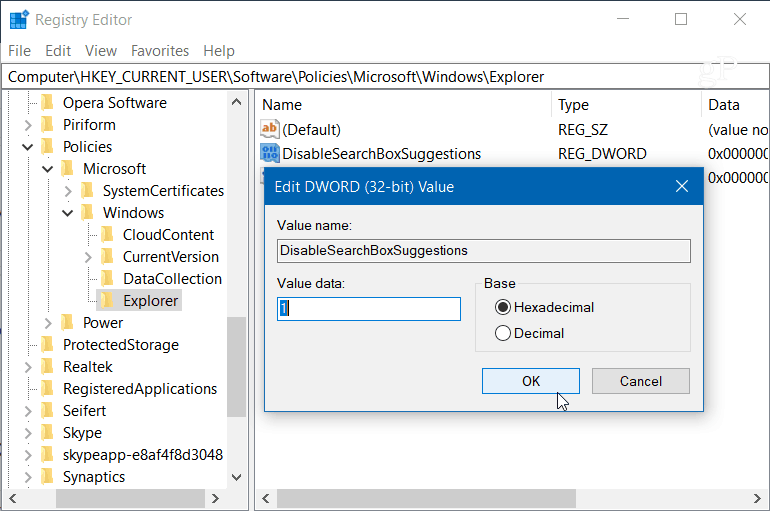
- HKEY_CURRENT_USER\Software\Policies\Microsoft\Windows\Explorer
- Right-click in the right pane and create a new DWORD (32-bit) value, name it DisableSearchBoxSuggestions and set it to 1.
When you’re done, close the registry and you must log out or reboot your system before you can see the change. In File Explorer, you no longer see the history of past searches. If you want to activate them later, just go back and change the value of DisableSearchBoxSuggestions to 0.
https://www.groovypost.com/howto/clear-disable-windows-10-file-explorer-search-history/
Expert Tip: This repair tool scans the repositories and replaces corrupt or missing files if none of these methods have worked. It works well in most cases where the problem is due to system corruption. This tool will also optimize your system to maximize performance. It can be downloaded by Clicking Here

CCNA, Web Developer, PC Troubleshooter
I am a computer enthusiast and a practicing IT Professional. I have years of experience behind me in computer programming, hardware troubleshooting and repair. I specialise in Web Development and Database Design. I also have a CCNA certification for Network Design and Troubleshooting.