Updated April 2024: Stop getting error messages and slow down your system with our optimization tool. Get it now at this link
Many Windows Live Mail users have already switched to more professional email clients, such as MS Outlook. However, some users still use this application in their company. They use it to share email information and attachments, including data from OneDrive. Like most email clients, Windows Live Mail occasionally encounters bugs.
This blog is dedicated to fixing the most annoying error, namely 0x8007007a.
What causes error 0x8007007a in Windows 10?
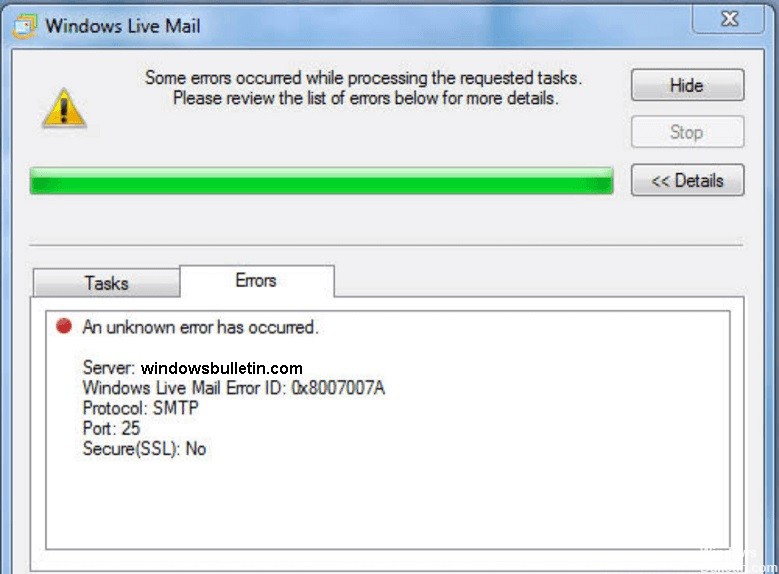
Windows Live Mail error 0x8007007a is an error that usually occurs when a user tries to send messages with a photo album. This can happen because the feature is no longer available due to changes in OneDrive, where the album was saved. Because the message can’t be sent, it can get stuck in the Outbox and prevent subsequent messages from being sent.
How do I fix error 0x8007007a in Windows 10?
You can now prevent PC problems by using this tool, such as protecting you against file loss and malware. Additionally it is a great way to optimize your computer for maximum performance.
The program fixes common errors that might occur on Windows systems with ease - no need for hours of troubleshooting when you have the perfect solution at your fingertips:
April 2024 Update:

Repairing the Windows Live Mail app
- Close Windows Live Mail if it is open on your computer.
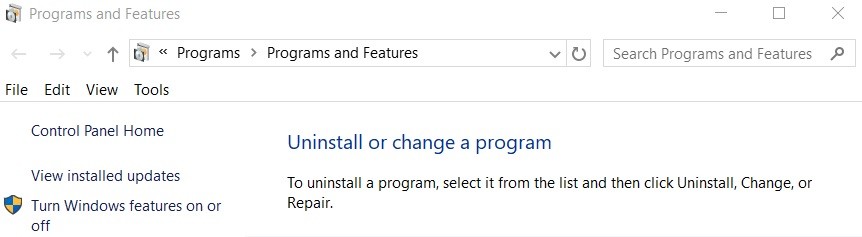
- Open the control panel on your computer.
- Then select Programs and Features.
- Then navigate to Windows Essentials under Uninstall or Change Program.
- Click on the Uninstall/Change option.
- Now confirm by clicking Yes.
- Click on the option Choose to restore all Windows Live programs.
- Wait for the repair process to complete.
- Once the repair is complete, restart your computer.
- Finally, open the Windows Live Mail application and try sending an email.
Delete a sent email
- Open Windows Live Mail or the Windows 10 Mail app.
- Click the Outbox folder in the Accounts folder in the left navigation bar.
- Select an unsent message and delete it. If you have multiple messages, delete them all.
- Then close the app and restart it.
- You can send a sample message to your own account to see if the problem is resolved and see if you can do it.
Sending image attachments without an album
- Open Windows Live Mail and start writing the email.
- Then click on the “Attach File” icon.
- Then, with the browser window open, select the image and click Open.
Deleting and reconfiguring your Windows Live Mail account
- Open the Windows Live Mail account.
- Click Tools in the menu and select the account name on the left.
- Then right-click on it and select Delete Account.
- Wait until the account is deleted.
- Reconfigure the account by selecting Accounts from the menu bar.
- Add an email account, enter the details, select Set this account as the default email account and click Next.
- Finally, click Finish to complete the process.
Expert Tip: This repair tool scans the repositories and replaces corrupt or missing files if none of these methods have worked. It works well in most cases where the problem is due to system corruption. This tool will also optimize your system to maximize performance. It can be downloaded by Clicking Here
