Updated April 2024: Stop getting error messages and slow down your system with our optimization tool. Get it now at this link
- Download and install the repair tool here.
- Let it scan your computer.
- The tool will then repair your computer.
The boot log lists the files that have been successfully and unsuccessfully processed at startup. With the boot record, you record the Windows functions that are processed when the computer starts in safe mode and also in normal mode. By comparing the differences between the two protocols, you can determine which characteristics are not necessary for start-up.
Two event log files useful for troubleshooting your PC are startup log files. These files are created when you specify the boot logging option as the boot logging option. The files are called ntbtlog.txt or bootlog.txt, depending on the age of your PC. These files, located in the Windows folder, list the success or failure of different parts of Windows when loaded with the PC’s mass storage system in memory.
Activation with the MSCONFIG utility
- Press Win+R to display the Run dialog box.
- Type msconfig and press Enter.
- On Windows Vista, enter the administrator password or click the Continue button.
- Click on the Boot tab.
- Check the Boot Log box.
- Click on OK.
- Click the Restart button to restart now. Otherwise, click Finish without restarting.
- Logging only takes effect when Windows restarts, and you have no reason to do it immediately, unless you really want to see the boot log.
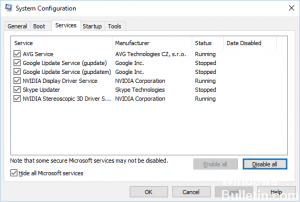
Disabling the startup connection in the system configuration

- Open Run by pressing Win + R. To open the system configuration, type msconfig and click Ok.
- In the System Configuration window, disable the Boot Log option under Boot Options to disable the Boot Log function.
- Click OK to save the changes.
April 2024 Update:
You can now prevent PC problems by using this tool, such as protecting you against file loss and malware. Additionally it is a great way to optimize your computer for maximum performance. The program fixes common errors that might occur on Windows systems with ease - no need for hours of troubleshooting when you have the perfect solution at your fingertips:
- Step 1 : Download PC Repair & Optimizer Tool (Windows 10, 8, 7, XP, Vista – Microsoft Gold Certified).
- Step 2 : Click “Start Scan” to find Windows registry issues that could be causing PC problems.
- Step 3 : Click “Repair All” to fix all issues.

Enable Boot log from the command prompt

You can also activate the startup log with the BCDEdit command line tool.
1 Look for “Command prompt” in the Start menu, right-click and select “Run as administrator”.
2. Before you can activate the boot log, you must first know the ID of the current operating system you are using. To find out, type bcdedit and press Enter. In the “Windows Boot Loader” section, you will find the identifier of your operating system next to “Identify”. Make a note of it. In my case, it’s “{current}”. In general, your username is the same as mine.
3. Once you have the ID, execute the following command to activate the boot log. If your username is different, replace “{current}” with your current operating system username in the following command.
bcdedit /set {current} bootlog yes
After restarting the system, you will find the boot log under “C:\Windows\ntbtlog.txt”.
Expert Tip: This repair tool scans the repositories and replaces corrupt or missing files if none of these methods have worked. It works well in most cases where the problem is due to system corruption. This tool will also optimize your system to maximize performance. It can be downloaded by Clicking Here

CCNA, Web Developer, PC Troubleshooter
I am a computer enthusiast and a practicing IT Professional. I have years of experience behind me in computer programming, hardware troubleshooting and repair. I specialise in Web Development and Database Design. I also have a CCNA certification for Network Design and Troubleshooting.