Updated April 2024: Stop getting error messages and slow down your system with our optimization tool. Get it now at this link
- Download and install the repair tool here.
- Let it scan your computer.
- The tool will then repair your computer.
Modern processors contain hardware virtualization features that can be used to accelerate virtual machines created in VirtualBox, VMware, Hyper-V and other applications. However, these features are not always enabled by default.
Virtual machines are wonderful things. With virtualization applications, you can run an entire virtual machine in one window of your current system. On this virtual machine, you can run different operating systems, test applications in an isolated environment, and easily experiment with features. These virtual machine applications require the hardware acceleration capabilities built into modern processors to function. For Intel processors, this means Intel VT-x hardware acceleration. For AMD processors, that means AMD-V hardware acceleration.
The following error messages may appear in your virtual machine applications at any time:
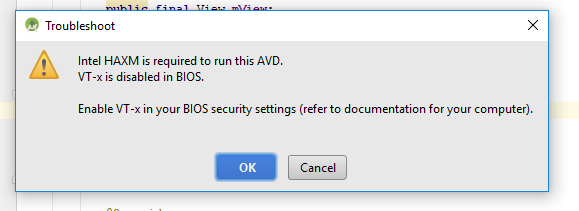
- VT-x / AMD-V hardware acceleration is not available on your system
- This host supports Intel VT-x, but Intel VT-x is disabled
- The processor on this computer is not compatible with Hyper-V
There can be several reasons for these errors. First, you can disable the hardware acceleration feature. On systems with an Intel processor, the Intel VT-x function can be disabled through BIOS or UEFI firmware settings. In fact, it is often disabled by default on new computers. This is not a problem on systems with an AMD processor. AMD-V is always enabled, so there is no need to change the BIOS or UEFI settings.
Another reason why these errors may occur is if you are trying to use a virtualization application such as VMWare or VirtualBox if you already have Microsoft Hyper-V installed. Hyper-V supports these hardware acceleration features, and other virtualization applications cannot access them.
To access the UEFI firmware settings in Windows 10
April 2024 Update:
You can now prevent PC problems by using this tool, such as protecting you against file loss and malware. Additionally it is a great way to optimize your computer for maximum performance. The program fixes common errors that might occur on Windows systems with ease - no need for hours of troubleshooting when you have the perfect solution at your fingertips:
- Step 1 : Download PC Repair & Optimizer Tool (Windows 10, 8, 7, XP, Vista – Microsoft Gold Certified).
- Step 2 : Click “Start Scan” to find Windows registry issues that could be causing PC problems.
- Step 3 : Click “Repair All” to fix all issues.

- Click Start and select Settings.
- Under “Settings”, click “Update and Security”.
- In the left pane, click Restore.
- Then click Reboot Now under Advanced Startup.
- Wait until the startup options appear. From the Select an option menu, select Troubleshooting.
- Under Advanced Options, select UEFI Firmware Settings.
- If you don’t have the “UEFI Firmware Settings” option, the option to enable Intel vt-x may be on the BIOS screen and also on my HP Envy. Depending on the brand of computer, you might try pressing F keys such as F12 (Toshiba), F10 (HP), etc. D. at startup to get there.
How to enable Intel VT-x in UEFI

Almost all modern laptops have UEFI instead of BIOS. The BIOS is not completely removed, it is now called Legacy BIOS. You do not need to run the BIOS utility to change the BIOS settings. Running the BIOS utility is confusing and often difficult. But with UEFI it’s very easy. Let’s see how it’s done in Windows 10.
- Go to Start, Windows Preferences via Start -> Preferences or type preferences in the search box on the taskbar. Then click Update and security.
- Click “Restore” in the left pane and under “Advanced Startup” click “Reboot Now”.
- Wait for the system to reboot, and then click Troubleshoot.
- In the Troubleshooting section, click Advanced Settings
- Under Advanced Options, click UEFI Firmware Settings.
- UEFI firmware settings – click “Reboot”.
- After the reboot, enter BIOS
In the BIOS, change the settings from Disabled to Enable for Intel Virtualization Technology. After changing from Disable to Enable, press F10 (or other option for your system. Look for your system’s registration and restart key on the side or below) to save and restart. You’re done with this.
How to enable VT-X in the BIOS

This document describes how to enable or disable hardware virtualization technology in your computer’s BIOS. With virtualization technology, you can create a virtual IT infrastructure.
- Turn on your computer and immediately press F10 to enter the BIOS.
- On the Security tab, use the up and down arrows to select USB Security and press Enter.
- Use the up and down arrows to select Virtualization Technology (VTx), then use the left and right arrows to select On or Off if necessary.
- When you’re done, press F10 to save your changes and exit the BIOS.
Expert Tip: This repair tool scans the repositories and replaces corrupt or missing files if none of these methods have worked. It works well in most cases where the problem is due to system corruption. This tool will also optimize your system to maximize performance. It can be downloaded by Clicking Here

CCNA, Web Developer, PC Troubleshooter
I am a computer enthusiast and a practicing IT Professional. I have years of experience behind me in computer programming, hardware troubleshooting and repair. I specialise in Web Development and Database Design. I also have a CCNA certification for Network Design and Troubleshooting.