Updated April 2024: Stop getting error messages and slow down your system with our optimization tool. Get it now at this link
- Download and install the repair tool here.
- Let it scan your computer.
- The tool will then repair your computer.
You probably can’t connect to your WiFi, so you will see the error “Can’t Connect to this network” in Windows 10. No matter how many times you try, you will always get this error until you reboot your PC, which becomes very frustrating after a few times. This problem seems to occur mainly with Windows 10 users who have an Intel wireless card, but this does not mean that it is limited to Intel.

Although there are possible explanations such as corrupted or obsolete wireless drivers, conflicting 802.11n modes, antivirus or firewall intrusion, IPv6 problems, etc. there is not a single reason why this error occurs. This depends mainly on the configuration of the user’s system, so we have listed all possible troubleshooting methods that seem to solve the problem. So, without wasting time, let’s see how to fix this bug.
Reinstalling the network adapter
An error indicating that you cannot connect to the wireless network under Windows 10 is caused by your network adapter. This is the reason why, in many cases, Windows 10 stops connecting to a network and gets the error. Well, you can easily correct your error by uninstalling and reinstalling the network adapter.
April 2024 Update:
You can now prevent PC problems by using this tool, such as protecting you against file loss and malware. Additionally it is a great way to optimize your computer for maximum performance. The program fixes common errors that might occur on Windows systems with ease - no need for hours of troubleshooting when you have the perfect solution at your fingertips:
- Step 1 : Download PC Repair & Optimizer Tool (Windows 10, 8, 7, XP, Vista – Microsoft Gold Certified).
- Step 2 : Click “Start Scan” to find Windows registry issues that could be causing PC problems.
- Step 3 : Click “Repair All” to fix all issues.

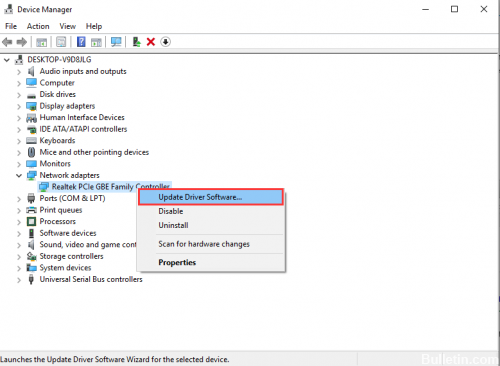
You can simply uninstall and then reinstall the Windows Wireless Network Adapter by following the steps below:
- Press the Windows + X button,
- Select Device Manager from the list.
- In the Device Manager settings, access a network card,
- Right-click on the network adapter settings.
- Click on Uninstall, then click on OK.
- If your driver is uninstalled, restart your computer and Windows 10 prompts you to automatically
- reinstall the driver. Click OK to reinstall the driver.
Update your network adapter drivers.
Sometimes problems with wireless networks are caused by obsolete drivers, and to fix the error “Windows 10 cannot connect to the network”, you must download the latest drivers for your network adapter. This requires a computer or other device with an Internet connection in good working order. All you need to do now is visit the website of the manufacturer of your network adapter and download the latest drivers for your network adapter. After installing the latest drivers, this problem should be fixed.
Resetting your router or modem
Although this is Technical Support 101, it cannot be neglected unless you have first tried it. Go to your router or modem and unplug it. Turn your thumbs or take a cup of coffee and plug it back in after a few minutes. Some routers may take five minutes to completely restart.
This can solve a common problem when Windows automatically assigns an IP address that causes a problem with APIPA (Automatic Private IP Addressing).
Resetting the network
Press the Windows + S button, type Network, then click Network Status to access the Network and Internet Status section. Scroll down, locate and click Reset Network. We saved this step last time because a reset deletes everything.
Disable IPv6
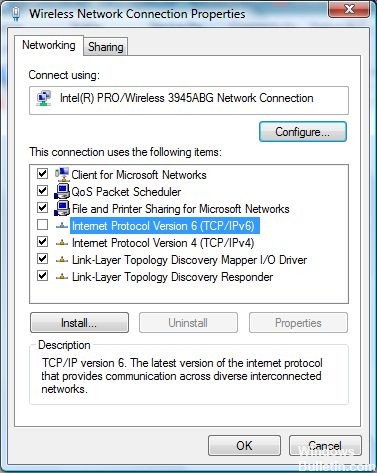
You can also try to disable IPv6 to solve the problem that Windows 10 cannot connect to this network problem. Simply follow the steps below:
Step 1. Press and hold Windows + R to open the run command.
Step 2: Type ncpa.cpl and press Enter.
Right-click on your network adapter and click Properties.
Uncheck the box for Internet Protocol version 6 (TCP/IPv6), then click OK.
https://superuser.com/questions/1003835/windows-10-wifi-issue-cant-connect-to-this-network
Expert Tip: This repair tool scans the repositories and replaces corrupt or missing files if none of these methods have worked. It works well in most cases where the problem is due to system corruption. This tool will also optimize your system to maximize performance. It can be downloaded by Clicking Here

CCNA, Web Developer, PC Troubleshooter
I am a computer enthusiast and a practicing IT Professional. I have years of experience behind me in computer programming, hardware troubleshooting and repair. I specialise in Web Development and Database Design. I also have a CCNA certification for Network Design and Troubleshooting.