Updated April 2024: Stop getting error messages and slow down your system with our optimization tool. Get it now at this link
- Download and install the repair tool here.
- Let it scan your computer.
- The tool will then repair your computer.
One of the things I’m sometimes asked about is that Hyper-V virtual machines (VMs) get stuck in a preserved state.
There are several reasons why a virtual machine can be moved to a preserved state. However, the most common reason is to back up the virtual machine. When a problem occurs (e.g. lack of system resources), the virtual machine may get stuck in a saved state forever. How to solve this problem?
Why does a Hyper-V virtual machine get stuck in a saved state?
When you shut down the virtual machine, Hyper-V backs it up. You may have shut down Hyper-V during the backup. The operating system is now in a preserved state, as the backup was incomplete due to interference. The virtual machine will literally hang if it was suspended during the backup. In addition, it can be damaged and corrupted.
Another important reason why the virtual machine gets stuck in its preserved state is the lack of disk space. The error often occurs when running the operating system on a virtual machine with little disk space.
If your physical disk was disconnected while the virtual machine was running, it will hang in the saved state. However, the drivers are also the cause of errors. If you have not installed enough drivers or are using unstable drivers. It is very likely that the virtual machine will fail and hang in the saved state.
After all, the main cause of error may be the lack of system resources. If you are using a PC with a small amount of RAM, processor and graphics processor power. Further, it is desirable not to run too many virtual machines at the same time and work under an operating system that requires low specifications. If you are using a resource-intensive operating system on your virtual machine, the virtual machine will hang and will hang in the saved state.
Delete the saved state

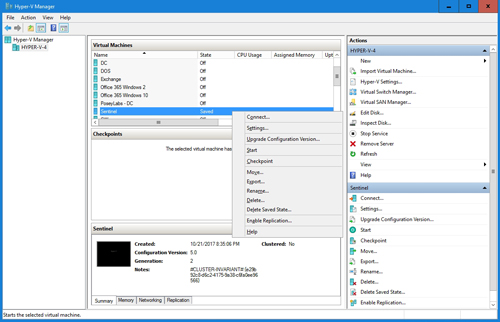
- Start the Hyper-V Manager.
- Right-click the virtual machine and select “Clear saved state”.
- Confirm your order.
- Now open the virtual machine settings and delete the missing hard drives.
- Switch on your virtual machine.
April 2024 Update:
You can now prevent PC problems by using this tool, such as protecting you against file loss and malware. Additionally it is a great way to optimize your computer for maximum performance. The program fixes common errors that might occur on Windows systems with ease - no need for hours of troubleshooting when you have the perfect solution at your fingertips:
- Step 1 : Download PC Repair & Optimizer Tool (Windows 10, 8, 7, XP, Vista – Microsoft Gold Certified).
- Step 2 : Click “Start Scan” to find Windows registry issues that could be causing PC problems.
- Step 3 : Click “Repair All” to fix all issues.

The Clear Saved State command is similar to turning off the power cord on the physical server: it literally cuts off the power to the virtual machine and, therefore, removes lockouts of the saved state on the virtual machine files that prevent you from changing the .
Check the physical drivers
Depending on the operating system used in a virtual machine, drivers and a specific hard drive are required to operate it. Therefore, if you run the operating system on an incompatible virtual machine, it is very likely that the virtual machine will get stuck in its preserved state due to a failure. An external device such as USB can also be plugged in. So make sure that you disconnect the power cord and then check the SCSI controller.
First right-click on the virtual machine where you are having problems with Hyper-V Manager. Then select the “Settings” option in the submenu. A new window will appear. Scroll down in the left pane and expand the list of SCSI controllers.
Change access rights to the folder

In fact, sometimes changing access rights to virtual machine folders can solve the problem. This was reported by a user who has already encountered the problem himself. If the methods described above do not solve the problem for you, you can go to the folder where your virtual machine is located. From there you will need to change the resolution for everyone.
To do this, follow the instructions below:
- Browse to the folder of the problem virtual machine.
- Right-click, then browse to Properties.
- In the Properties window, click on the Sharing tab.
- From there, click on the Advanced Sharing option.
- When you are in the Advanced Sharing window, check the Share this folder checkbox. Now you can click on the “Permissions” button below.
- Click on it, then check the Permissions for All box.
- Finally, click the Apply button, and then click OK. Do the same with the other windows.
- Check to see if the problem is solved.
Expert Tip: This repair tool scans the repositories and replaces corrupt or missing files if none of these methods have worked. It works well in most cases where the problem is due to system corruption. This tool will also optimize your system to maximize performance. It can be downloaded by Clicking Here

CCNA, Web Developer, PC Troubleshooter
I am a computer enthusiast and a practicing IT Professional. I have years of experience behind me in computer programming, hardware troubleshooting and repair. I specialise in Web Development and Database Design. I also have a CCNA certification for Network Design and Troubleshooting.