Updated April 2024: Stop getting error messages and slow down your system with our optimization tool. Get it now at this link
- Download and install the repair tool here.
- Let it scan your computer.
- The tool will then repair your computer.
Today, our personal computer is not only a work tool, but also our private space where we store our little secrets. Protecting our personal data from prying eyes should be one of our top priorities. People use cryptography or encryption to hide their data, but they forget that cryptography does not hide third party data, its purpose is to make your data unreadable to third parties.

This is a serious mistake that many people make when trying to hide and protect their data from prying eyes. I think it happens because they’ve never heard of steganography, the science of hiding information. In this article, I will not go into the details of what steganography is, because that is not the purpose of this article, but I will teach you how to hide your files in an image. Sounds sexy, doesn’t it? This method makes your data transfer more secure and it will be difficult for third parties to understand what you are really transferring when they sniff out your traffic. What do you need to hide your files in a picture? Ok, you need a JPG image file, your files and a terminal window.
Hide files in a picture using the terminal
To begin, press Ctrl + Alt + T to open a terminal window and create a new folder. Copy or move the image file (PNG or JPG) you want to use to this new folder.
Depending on the size of the files and the number of files you want to hide, you should use a large image so that there is enough space in the image to store the files.
Before hiding a file in a photo with cmd, you must compress it.
April 2024 Update:
You can now prevent PC problems by using this tool, such as protecting you against file loss and malware. Additionally it is a great way to optimize your computer for maximum performance. The program fixes common errors that might occur on Windows systems with ease - no need for hours of troubleshooting when you have the perfect solution at your fingertips:
- Step 1 : Download PC Repair & Optimizer Tool (Windows 10, 8, 7, XP, Vista – Microsoft Gold Certified).
- Step 2 : Click “Start Scan” to find Windows registry issues that could be causing PC problems.
- Step 3 : Click “Repair All” to fix all issues.

Compress the files you want to hide into a ZIP file.
We will create a compressed file that contains the directory we want to hide in the image. To do this, we type the following command at the command prompt and press Enter.
zip -r secret.zip secret_files/
In the above command, -r includes all subdirectories of the directory specified in the compressed file. The name of the compressed file is secret.zip and the name of the directory to be compressed is secret_files.
When you return to the command prompt, type ls and press Enter. You will see the secret.zip file (or whatever your compressed file name is).
Concatenate the ZIP and image files into a single image file
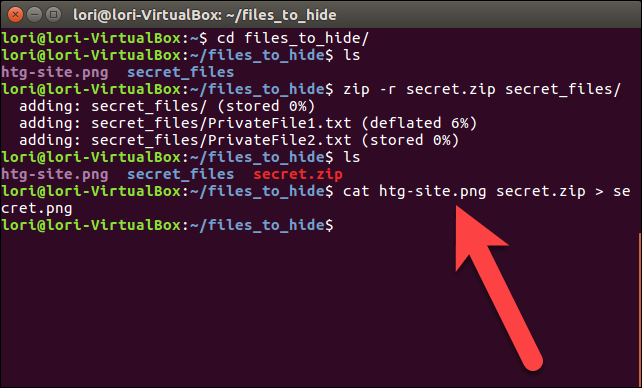
We now link the compressed file and the image file and save it as a new image file using the cat command. In our example, we type the following command at the command prompt and press Enter.
cat sample.png secret.zip > secret.png
The original image file must be mentioned first, before the name of the compressed file you want to insert in the image file. Then we redirect (>) the original image file and the compressed file to a new image named secret.png.
When you use the ls command at the command prompt, you see the new image file, secret.png , which hides the compressed file. You can view the new image with any image viewer or editor. An easy way to view the image is to double-click on it in Nautilus. It will automatically open in the default image viewer.
Securely delete your original files
Once you have hidden your files in an image file, you must securely delete the original files. This is easily done under Linux with the shred command.
Press Ctrl + Alt + T to open a terminal window if it is not already open. Use the cd command to navigate to the folder that contains the files you want to securely delete.
In our example, we will type the following command.
shred -z --remove HideThisFile.txt ThisFileIsPrivate.txt
By default, files are overwritten three times. This is usually sufficient, but you can change this by adding -iterations=N (before filenames) to the command. Replace the “N” with the number of times you want to overwrite the files.
The -z option overwrites the files one last time with zeros to hide the shredding. The -remove option deletes the file. Isn’t that what Shred does? Yes, but without the -remove option, the file still appears as if it had not been deleted.
Conclusion
All of the above tools allow you to embed confidential files into an image. What other applications do you use to embed files into images?
https://stackoverflow.com/questions/14451109/how-to-find-hidden-files-inside-image-files-jpg-gif-png
Expert Tip: This repair tool scans the repositories and replaces corrupt or missing files if none of these methods have worked. It works well in most cases where the problem is due to system corruption. This tool will also optimize your system to maximize performance. It can be downloaded by Clicking Here

CCNA, Web Developer, PC Troubleshooter
I am a computer enthusiast and a practicing IT Professional. I have years of experience behind me in computer programming, hardware troubleshooting and repair. I specialise in Web Development and Database Design. I also have a CCNA certification for Network Design and Troubleshooting.