Updated April 2024: Stop getting error messages and slow down your system with our optimization tool. Get it now at this link
- Download and install the repair tool here.
- Let it scan your computer.
- The tool will then repair your computer.
Thanks to the bookmarks visible on your browser screen, you can navigate quickly and easily between your favourite sites. But some people might find the bookmarks toolbar annoying. You may also prefer to hide your bookmarks from other people using your device.

Normally, hiding the bookmarks toolbar only takes a few clicks. But these steps vary from browser to browser. Some, like Edge and Microsoft Explorer, don’t even use the term “bookmarks”.
If you want to remove the bookmarks bar from your browser window, read this article It explains how to remove your bookmarks from the view depending on the browser you are using.
To Enable or Disable the Google Chrome Bookmarks Toolbar
- Open the Google Chrome browser.
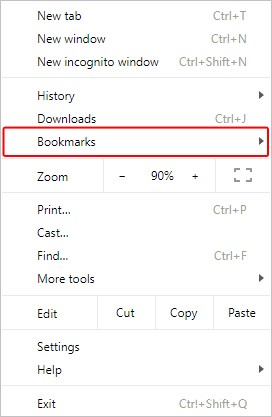
- Click the Menu icon in Google Chrome in the upper right corner of the window.
- In the drop-down menu that appears, move your mouse over the bookmarks.
- A new menu will appear. Click Show Bookmarks Bar to turn the bookmarks bar on and off.
April 2024 Update:
You can now prevent PC problems by using this tool, such as protecting you against file loss and malware. Additionally it is a great way to optimize your computer for maximum performance. The program fixes common errors that might occur on Windows systems with ease - no need for hours of troubleshooting when you have the perfect solution at your fingertips:
- Step 1 : Download PC Repair & Optimizer Tool (Windows 10, 8, 7, XP, Vista – Microsoft Gold Certified).
- Step 2 : Click “Start Scan” to find Windows registry issues that could be causing PC problems.
- Step 3 : Click “Repair All” to fix all issues.

You can also toggle the bookmarks bar by pressing Ctrl+Shift+B.
To Enable or Disable the Bookmarks Toolbar in Firefox
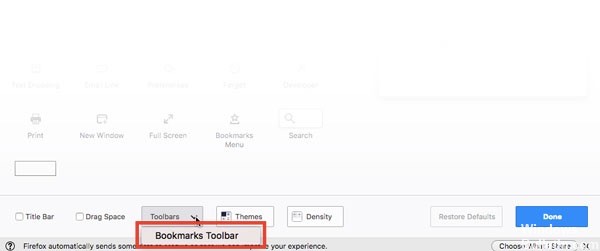
- If you are new to Firefox, the first thing to do is to enable this feature. To do so, click on the three even lines and select the Customize option.
- At the bottom of the screen, you will see the Toolbars drop-down menu. Click on it and select the Bookmarks Toolbar option. Click on the Done option to complete the process.
- To remove the Bookmarks Toolbar, follow the same steps, but make sure that the Bookmarks Toolbar option is not checked to its left.
- Since you don’t have any folders yet, you will only see one option, which is Start. Right-click on the empty area on the right and select the option to create a new folder.
- Once you have created your folder, it is time to add content. When you visit a website that you want to save, click on the star icon on the right side of the toolbar. It will turn blue and you will be prompted to select an area to save.
- If you have already created the folder, click the Folder drop-down menu on the right and select the folder. It is also possible to create a folder from here.
- Click on the folder drop-down menu, but the second one on the right, and select the option to create a new folder. Once you have created the new folder, press Enter to save it.
https://support.mozilla.org/en-US/kb/bookmarks-toolbar-display-favorite-websites
Expert Tip: This repair tool scans the repositories and replaces corrupt or missing files if none of these methods have worked. It works well in most cases where the problem is due to system corruption. This tool will also optimize your system to maximize performance. It can be downloaded by Clicking Here

CCNA, Web Developer, PC Troubleshooter
I am a computer enthusiast and a practicing IT Professional. I have years of experience behind me in computer programming, hardware troubleshooting and repair. I specialise in Web Development and Database Design. I also have a CCNA certification for Network Design and Troubleshooting.