Updated April 2024: Stop getting error messages and slow down your system with our optimization tool. Get it now at this link
- Download and install the repair tool here.
- Let it scan your computer.
- The tool will then repair your computer.
There are many reasons why your computer might stop working properly. Some common causes include malware infections, hardware problems, power surges, overheating, and even software issues. If you’re having trouble getting your computer to start up, it’s probably because of one of these problems. However, fixing the Windows boot error 0xC000000F is usually pretty simple. Here’s what you’ll need to do:
Step 1 – Restart Your Computer
When you restart your computer, hold down the shift key while it boots up. Doing this will let you choose whether you want to use Safe Mode or Normal mode. You’ll know that you’ve successfully booted into safe mode if you see a black screen with a white Microsoft logo in the middle.
Step 2 – Check For Hardware Problems
If you think that your computer might have a hardware issue, check out our guide on How To Fix A Hard Drive Crash And Keep All Of Your Data. Also, make sure that your hard disk is clean. You can do this by opening Disk Cleanup and selecting “Clean Up System Files.”
Step 3 – Update Drivers
You can update drivers manually, but sometimes updating them automatically can help resolve some issues. To do this, open Device Manager and look for any devices that aren’t listed. Right-click on each device and select Properties. Then, go to Driver tab and find the driver version number. Click on the Download button next to the driver version number and follow the instructions.
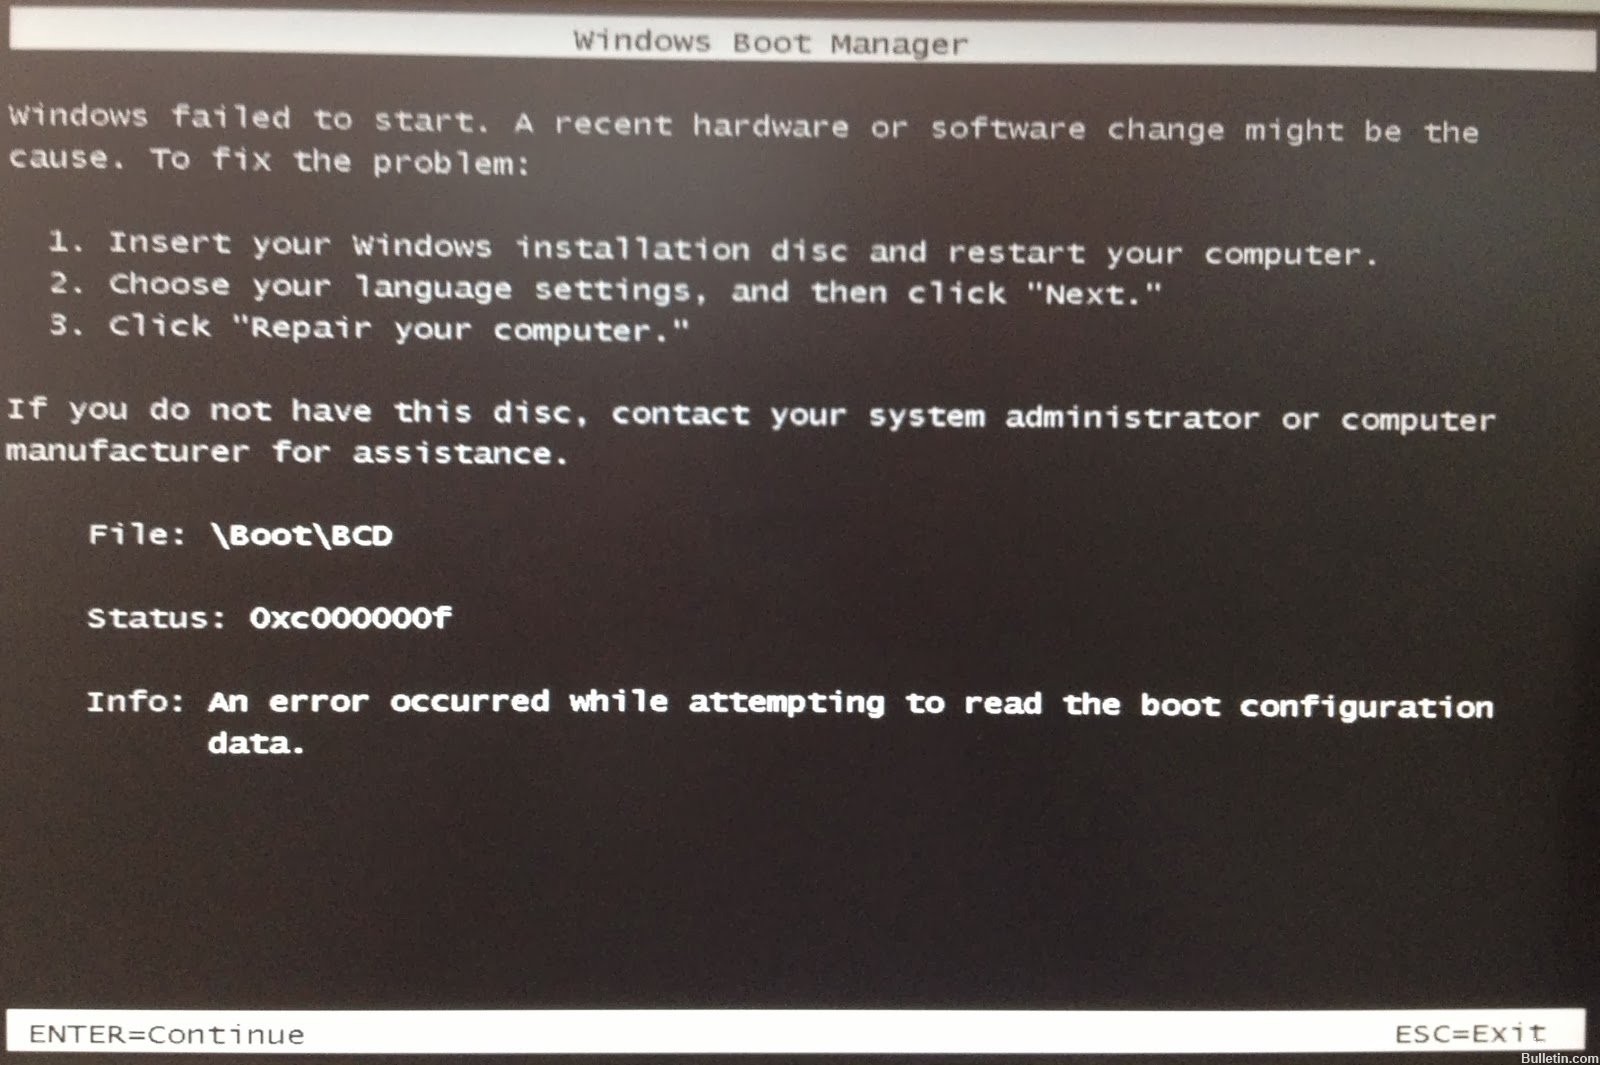
How do I fix the Windows boot error 0xc000000f?
Windows 10 is still one of the most popular operating systems out there, but it does come with some problems. One of those issues is the dreaded “0xC000000F” error code. This error usually occurs because of hardware failure, such as a faulty hard disk or RAM module. Luckily, you don’t need to pay hundreds of dollars to replace your motherboard just to solve this issue. You can easily repair it yourself, without even having to buy a replacement part. Here are the steps involved in repairing this problem.
1. Make sure that you’ve backed up everything important on your PC. If anything goes wrong during the process, you’ll lose data.
2. Shut down your system completely. Then unplug all peripherals, including monitors, keyboards, mice, printers, etc.
3. Disconnect the power cord from your device.
4. Take off the case of your PC, and disconnect the battery.
5. Turn your PC upside down, and gently shake it. This helps to dislodge dust particles stuck inside the fan vents.
6. Now take out the screws holding the motherboard onto the chassis. Be careful not to damage the board itself.
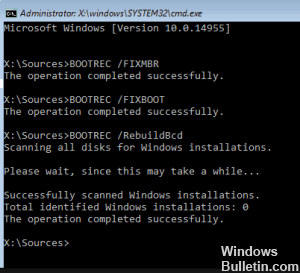
2. Repair BOOTMGR using a bootable USB drive
Bootmgr is a file located in the Windows directory that contains information about the operating system and drivers needed to start up the computer. If you are unable to access your desktop, it could be because Bootmgr is missing. To fix this problem, follow these steps:
1. Insert a bootable USB flash drive into your computer.
2. Open Disk Management. You can do this by pressing Win+R keys together and typing diskmgmt.msc.
3. Locate the partition where Windows is installed. Right-click on the partition and select “Repair”. This will open the System Configuration Utility. Click on “Startup Repair”, and then press Next.
4. Follow the instructions on screen to continue repairing the startup files. Once completed, restart your computer.
5. After rebooting, logon to your account.
3. Check your data cables
Unplug all HDD data cables (if there are any) before connecting them again. Write down all current BIOS Settings. To check the boot order press the F2 key while your PC boots up. Your computer might be having trouble because of an issue with its hardware; try to change some settings in order to fix it. This will help you to resolve the problem faster.
4. Revert to previous BIOS settings
If you are having problems getting into Windows 10, there are several things you can do to fix it. One of those things is reverting back to your original BIOS settings. This article explains how to do that.
In addition to using the “Startup Repair” function on the installation disc to correct the error, you can also manually recreate the BCD data file.
April 2024 Update:
You can now prevent PC problems by using this tool, such as protecting you against file loss and malware. Additionally it is a great way to optimize your computer for maximum performance. The program fixes common errors that might occur on Windows systems with ease - no need for hours of troubleshooting when you have the perfect solution at your fingertips:
- Step 1 : Download PC Repair & Optimizer Tool (Windows 10, 8, 7, XP, Vista – Microsoft Gold Certified).
- Step 2 : Click “Start Scan” to find Windows registry issues that could be causing PC problems.
- Step 3 : Click “Repair All” to fix all issues.

Remove Peripheral Hardware Device
Damaged peripheral hardware can lead to error 0xc000000f under Windows 10. You can delete the device to correct the error. Take these steps:
Step 1 Remove all devices connected to your computer (except the keyboard and mouse).
Step 2 Remove all CDs, USB and DVDs from their respective ports.
Step 3 Restart your computer to see if it starts normally.
Use Startup Repair to repair BOOTMGR.

5. Try a manual rebuild of the BCD data file
If you’re having trouble booting into Windows 10 again, try rebuilding the Boot Configuration Data (a.k.a. BCD) file manually. You’ll find instructions on how to do this here.
The following video explains what you need to know about repairing the BCD file manually.
Frequently Asked Questions
A BCD file is a crucial part of a Windows computer. This article explains how to recover a damaged one.
Old Data Cables Can Lead To Boot Problems
If you use an older version of Windows, there might be old data cables inside your machine. These cables connect USB devices such as keyboards, mice, printers, and external hard drives to the motherboard. If these cables aren’t properly disconnected, they could cause a problem during startup. For example, if you plug in a mouse while Windows is loading, it won’t work because the OS needs to read information about the device.
There Are Two Ways To Fix A Corrupted BCD File
The easiest way to repair a corrupt BCD file is to restore it from backup. You’ll find instructions for doing so here. However, if you don’t have a recent backup, you can try replacing the file. Here’s how to do that:
1. Turn off your computer.
2. Remove the power cord from the back of the case.
Expert Tip: This repair tool scans the repositories and replaces corrupt or missing files if none of these methods have worked. It works well in most cases where the problem is due to system corruption. This tool will also optimize your system to maximize performance. It can be downloaded by Clicking Here

CCNA, Web Developer, PC Troubleshooter
I am a computer enthusiast and a practicing IT Professional. I have years of experience behind me in computer programming, hardware troubleshooting and repair. I specialise in Web Development and Database Design. I also have a CCNA certification for Network Design and Troubleshooting.