Updated April 2024: Stop getting error messages and slow down your system with our optimization tool. Get it now at this link
- Download and install the repair tool here.
- Let it scan your computer.
- The tool will then repair your computer.
If you are still working with graphics-intensive applications such as gaming or video rendering software, you should control the use of your graphics card. For example, change the graphics quality settings to increase the number of frames per second (FPS), and adjust the orientation and zoom or screen size for better performance or better PC use.

Then the NVIDIA Control Panel is just what you need. However, sometimes it won’t open on your computer. So, what you should do, here are some effective solutions to help you solve this problem.
Check your antivirus program

According to users, a common application problem may be your antivirus. Sometimes you can’t open the Nvidia control panel because your antivirus prevents it. To solve this problem, you need to check your antivirus settings and make sure that your antivirus does not block the Nvidia Control Panel.
If not, turn off some anti-virus features and see if it helps. You can also try to completely disable the antivirus and see if it will help. In the worst case, you can even try to remove the antivirus.
Several users reported that the reason for this problem was AVG antivirus, but after removing it, the problem was solved. Even if you don’t use AVG, you can even try to remove the antivirus and see if it will solve the problem.
If removing the antivirus solves the problem, think about switching to another antivirus solution. There are many great antivirus tools available, but if you need maximum protection, it will not affect your system.
Reinstall the graphical driver
The first thing to do is to reinstall the graphics driver as the problem is usually caused by corrupted files.
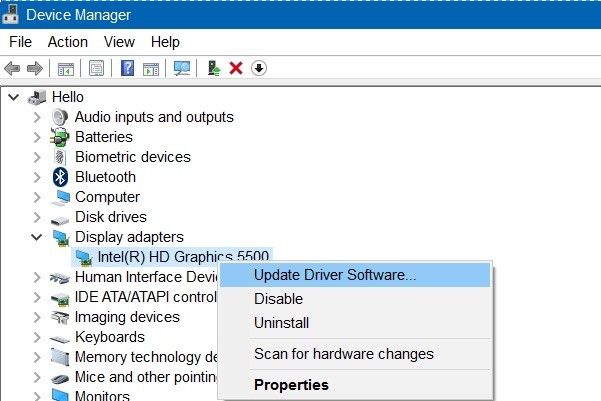
- Press the Windows + R keys and type devmgmt.msc. This will open the device management console.
- In Device Manager, expand “Graphic Maps”, right-click the NVIDIA card in this category, click “Uninstall” and check the “Uninstall driver software for this device” box. Then click OK to uninstall the drivers.
- Visit the NVIDIA Drivers page and find drivers for your graphics card in “Option 1: Scanning drivers manually”. You will need to specify your graphics card type, operating system, and other important information, and then click “Search. After you receive the latest driver version for your card, download it.
- Go to the driver download location and run the installer. During the installation, select User settings and reinstall. This will uninstall previous installations and install the latest working version.
- Reboot the computer.
Make sure that the Nvidia Control Panel is now working.
April 2024 Update:
You can now prevent PC problems by using this tool, such as protecting you against file loss and malware. Additionally it is a great way to optimize your computer for maximum performance. The program fixes common errors that might occur on Windows systems with ease - no need for hours of troubleshooting when you have the perfect solution at your fingertips:
- Step 1 : Download PC Repair & Optimizer Tool (Windows 10, 8, 7, XP, Vista – Microsoft Gold Certified).
- Step 2 : Click “Start Scan” to find Windows registry issues that could be causing PC problems.
- Step 3 : Click “Repair All” to fix all issues.

Restart the NVIDIA Control Panel process.

As with the method described above, the Control Panel may open but will not start until the process is stopped and started again. Let’s try to do the following steps.
- Press Ctrl + Shift + Esc on your keyboard to start the task manager.
- Click on Details and select the processes. On this tab, find the NVIDIA Control Panel process named nviplui.exe. Right-click it and select “Complete the task”.
- Try this for other processes, such as the NVIDIA User Experience driver component (nvxdsync.exe), which you can see in Task Manager.
- Go to your desktop or to the Start menu and restart the control panel. This time it should work.
Activate the NVIDIA Display Driver Service

- Press the Windows + R keys on your keyboard to open the launch window.
- Type services.msc and press Enter to open the Services Console.
- In the Services window, find and double-click NVIDIA Display Driver Service. Set “Startup Type” to “Automatic” and start the service after it stops.
- Repeat this process for other NVIDIA-related services.
Make sure that the Nvidia Control Panel does not open.
Set the maximum resolution
The user has solved this problem by changing the resolution to the maximum. It is very likely that NCP will not start at a lower resolution. Here is how to configure the screen resolution.
- Right click on the desktop and select “Display Options”.
- Change the resolution of your PC in the display settings and set it to a higher value. The recommended value for selection is usually displayed.
Try restarting the control panel to see if it works now.
Expert Tip: This repair tool scans the repositories and replaces corrupt or missing files if none of these methods have worked. It works well in most cases where the problem is due to system corruption. This tool will also optimize your system to maximize performance. It can be downloaded by Clicking Here

CCNA, Web Developer, PC Troubleshooter
I am a computer enthusiast and a practicing IT Professional. I have years of experience behind me in computer programming, hardware troubleshooting and repair. I specialise in Web Development and Database Design. I also have a CCNA certification for Network Design and Troubleshooting.