Updated April 2024: Stop getting error messages and slow down your system with our optimization tool. Get it now at this link
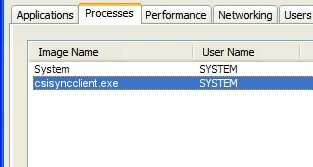
Imagine a situation in which your system slows down day after day until it reaches a stage where it occasionally almost freezes. As with most times when your system slows down, check the Task Manager. This indicates that some processes are overloading the system so that hard disk usage reaches 100%.
If the situation occurs gradually, rather than suddenly, there is a good chance that the process CSISYNCCLIENT.EXE is using a lot of system memory. This, of course, can be checked.
What causes CSISYNCCLIENT.EXE to have a high CPU usage?
- Virus
- Malware
- Software incompatibility
- Registry entries corruption
How to eliminate CSISYNCCLIENT.EXE high CPU load?
You can now prevent PC problems by using this tool, such as protecting you against file loss and malware. Additionally it is a great way to optimize your computer for maximum performance.
The program fixes common errors that might occur on Windows systems with ease - no need for hours of troubleshooting when you have the perfect solution at your fingertips:
April 2024 Update:

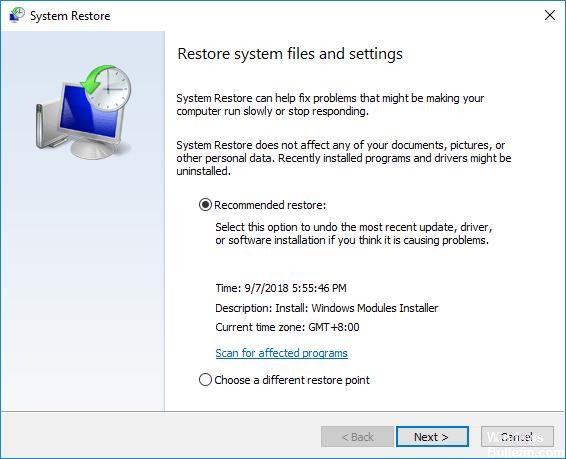
Perform a system restore
- Press the Windows logo key + R to open the launch window.
- Type rstrui.exe in the Run dialog box and press Enter to launch the system restore utility.
- Click Next. If System Restore recommends that you restore your computer to the restore point selected automatically in this screen, select the Select another restore point option and click Next.
- Click the desired restore point in the list to select it, then click Next.
- Be sure to select a recovery point that was created long before the strange circle appeared on your desktop.
- In the Confirm recovery point screen, click Done.
- In the dialog box that appears, click Yes to begin restoring your system.
Install any available Windows updates for your computer
- Open the Start menu, click Settings, click Update and security, click Windows Update in the left pane, and then click Check for updates in the right pane.
- Wait for Windows Update to search for available updates for your computer.
- Download and install all available Windows updates for your computer.
- Reboot your computer and see if the problem persists when your computer starts up.
Expert Tip: This repair tool scans the repositories and replaces corrupt or missing files if none of these methods have worked. It works well in most cases where the problem is due to system corruption. This tool will also optimize your system to maximize performance. It can be downloaded by Clicking Here
Frequently Asked Questions
How do I solve the high CPU and RAM load problem?
- Reboot your system.
- Stop or restart processes.
- Update the drivers.
- Check for malware.
- Power options.
- Find specific instructions online.
- Reinstall Windows.
Why is my CPU getting so hot?
When computers overheat, it is usually due to an overheated central processing unit (CPU). This can be caused by a number of reasons, such as lack of ventilation, dust, or faulty parts. If you notice that your computer is getting hotter than usual, you should know how to check your CPU temperature.
How to reduce CPU usage?
- Turn off unnecessary processes.
- Defragment of the hard drives of affected computers regularly.
- Don't run too many programs at the same time.
- Remove all unnecessary programs from your computer.
