Updated April 2024: Stop getting error messages and slow down your system with our optimization tool. Get it now at this link
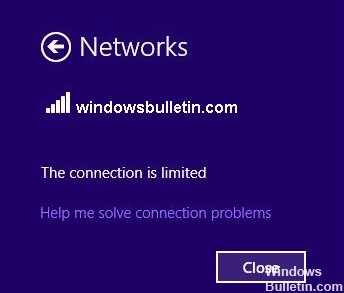
This error is a common sign of problems with your Wi-Fi adapter or router. It does not mean that your wireless adapter is disabled, but that the device cannot communicate with the router as it should. If other wireless devices are already connected to the Wi-Fi router, the problem is the computer getting this error.
However, before you try any of the following methods, try rebooting the router. Wait 5-6 minutes for the router to initialize and then try connecting again. If the “Connection Restricted” error still occurs, follow these steps.
What causes limited connectivity in Windows?

This error can be caused by various technical or configuration problems on the computer or in the path between the computer and the rest of the network. Try the following steps to resolve the problem.
How to resolve the limited connection problem in Windows?
You can now prevent PC problems by using this tool, such as protecting you against file loss and malware. Additionally it is a great way to optimize your computer for maximum performance.
The program fixes common errors that might occur on Windows systems with ease - no need for hours of troubleshooting when you have the perfect solution at your fingertips:
April 2024 Update:

Restart the modem or WiFi adapter
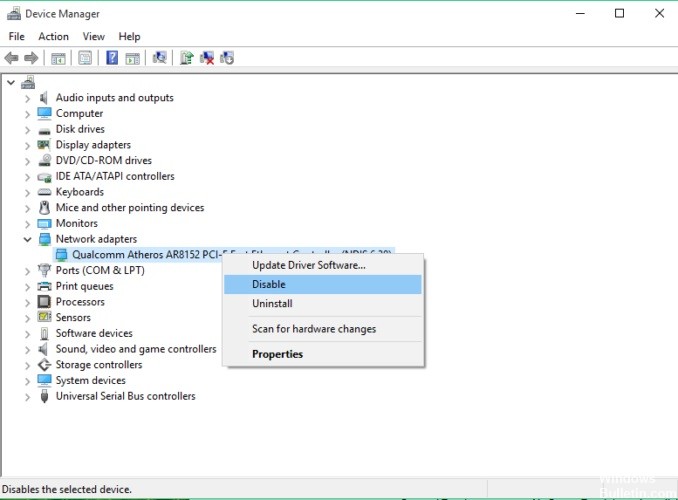
- Press the Windows + X key and select Device Manager from the list.
- Find your network device, right-click it and click Disconnect.
- Restart your computer.
- Go back to Device Manager and turn on your network device the same way you turned it off.
Launch the Windows Networking Troubleshooter
- Go to the Search section and type Troubleshooter.
- Select Troubleshooter from the menu.
- Select Network Adapter and click Run Troubleshooter.
- Follow the instructions on the screen.
Manually assign an IP address
- Click on the network icon in the taskbar and select your network from the menu.
- Now click on Change Adapter Settings.
- Find your network connection, right-click it, and select Properties from the menu.
- Select Internet Protocol version 4 (TCP/IPv4) and click Properties.
- Select Use the following IP address and enter the following information:
IP address: 192.168.1.25
Subnet mask: 255.255.255.0
Default gateway: 192.168.1.1 - Click OK to save your changes.
Change your DNS
- Follow steps 1 through 4 of the previous solution.
- Select Use the following DNS server addresses and set these values:
Preferred DNS server: 8.8.8.8.8.
Alternate DNS server: 8.8.4.4 - Click OK to save your changes.
Expert Tip: This repair tool scans the repositories and replaces corrupt or missing files if none of these methods have worked. It works well in most cases where the problem is due to system corruption. This tool will also optimize your system to maximize performance. It can be downloaded by Clicking Here
Frequently Asked Questions
How do I fix limited connectivity?
- Restart your computer.
- Restart the router or modem.
- Check the Ethernet cable if you are using it to connect to the network.
What does a limited connection mean and how can I fix it?
- Reboot the equipment.
- Check the date and time on your phone.
- Forget the Wi-Fi SSID associated with your phone.
- Switch between IP settings.
- Use the correct IP settings.
- Change Wi-Fi privacy (Android 10 or later)
- Change the network load.
How do I fix a limited connection on my desktop?
- Update your drivers.
- Restart the modem or Wi-Fi adapter.
- Check your antivirus settings.
- Reset the TCP connection.
- Run the Windows network troubleshooter.
- Manually assign an IP address.
- Change your DNS.
- Reset your router settings.
