Updated April 2024: Stop getting error messages and slow down your system with our optimization tool. Get it now at this link
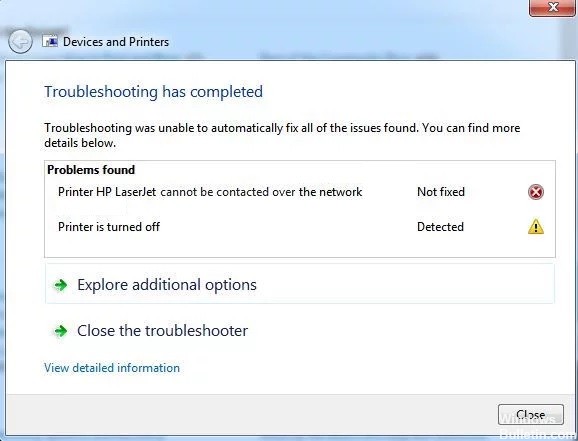
Sometimes you cannot print from a device that you have added as a network printer. After running the Windows printer troubleshooter for your printer, the troubleshooter cannot solve the problem and displays an error message: The printer cannot be connected to the network.
What causes “Cannot communicate with the printer over the network”?
The printer’s IP address is dynamic: This is not always a problem, but some printers behave badly if their IP address is not static, so make sure you change it.
Key services are disabled: The functioning of the printer depends on several services, especially if it is a network printer. Make sure that all required services are enabled.
How to eliminate the “Cannot communicate with the printer over the network” error message?
You can now prevent PC problems by using this tool, such as protecting you against file loss and malware. Additionally it is a great way to optimize your computer for maximum performance.
The program fixes common errors that might occur on Windows systems with ease - no need for hours of troubleshooting when you have the perfect solution at your fingertips:
April 2024 Update:


Enable certain services
- Press Windows + R to open the Run dialog box.
- Type services.MSC and click OK to open the Services tool directly.
- Find ‘Remote Access Autoconnect Manager, Routing and Remote Access, Secure Socket Tunneling Protocol Service, Remote Access Connection Manager’ in the list.
- Right-click on each of these services and select Properties.
- In the service status message, check to see if the service is running.
- Click the Suspend button to temporarily stop it. Skip this step if the service is already stopped.
- Then set the Startup Type to Automatic, click the Start button to restart the service, and click OK to save your changes.
- Repeat this procedure for all the above services.
Remove the printer and add it again
- Go to the Start menu, find the Control Panel, and open it.
- With Control Panel open, select View by Category and go to Hardware and Sound.
- Click View Devices and Printers to open it.
- Right-click the printer you want to remove from the Printers section.
- Select Remove Device from the list and click Yes in the Remove Device dialog box.
- Scroll up and click the Add Printer option above the Devices section.
- Click the printer you want to add, and then click Next.
- Follow the instructions on the screen to complete the installation process.
Expert Tip: This repair tool scans the repositories and replaces corrupt or missing files if none of these methods have worked. It works well in most cases where the problem is due to system corruption. This tool will also optimize your system to maximize performance. It can be downloaded by Clicking Here
Frequently Asked Questions
How do I eliminate the “Cannot communicate with the printer over the network” message?
- Make sure that some services are enabled.
- Remove the printer and add it again.
- Set a static IP address for the printer.
Why won’t my network printer connect to my computer?
Many problems connecting to your computer are caused by something as simple as a loose cable. Make sure that all cables connecting the computer to the printer are present and properly connected at both ends. If the printer won't turn on, the problem could also be the power cable.
How do I get the computer to recognize the printer?
- Connect the printer to your computer with the USB cable and turn it on.
- Open the Settings application on the Start menu.
- Click on Devices.
- Click Add printer or scanner.
- If Windows recognizes your printer, click on the printer name.
- Follow the on-screen instructions to complete the installation.
