Updated April 2024: Stop getting error messages and slow down your system with our optimization tool. Get it now at this link
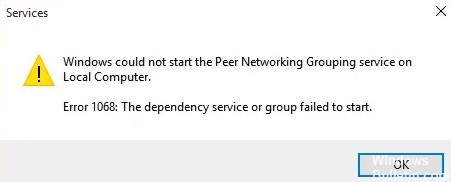
A service or dependency group that failed to start is a very common error that Windows users have encountered since Windows 7. It continues to appear in Windows 10 as well. What is the error ‘Service or dependency group could not be started’ in Windows 10? When a user cannot connect to the Internet, this error appears in the Network and Sharing Center. It affects all types of connections, whether wireless or Ethernet.
What causes the “Failed to start service or dependency group” message?
The Windows file seems to be mistaken for a virus that corrupts it and brings it into conflict with the Windows Network Location Awareness service. The main function of this service is to collect and store network configuration information and notify the window when this information changes.
Therefore, if this service is corrupted, any programs or services that depend on it will also fail. The Network List service cannot be started because it clearly depends on the Network Location Awareness service, which is already disabled due to a corrupted configuration.
How to eliminate the “Failed to start dependent service or group” error message?
You can now prevent PC problems by using this tool, such as protecting you against file loss and malware. Additionally it is a great way to optimize your computer for maximum performance.
The program fixes common errors that might occur on Windows systems with ease - no need for hours of troubleshooting when you have the perfect solution at your fingertips:
April 2024 Update:

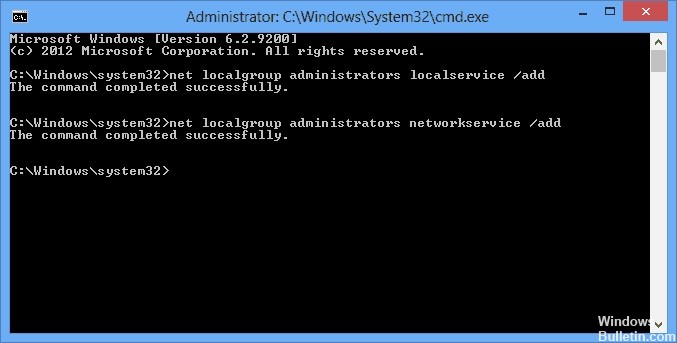
Add localservice and networkservice to the Administrators group
- Open a command prompt by clicking on the Windows Start icon and typing cmd in the search bar.
- In the drop-down list that appears, right-click cmd.exe, and then select Run as administrator.
- A command prompt will appear. Type net localgroup administrators localservice /add and press Enter.
- Type net localgroup administrators networkservice /add and press Enter again. You should take this.
- Type exit to close the prompt.
- Restart your PC and try to connect to the Internet again. You should now be ready to start.
Use the normal boot process to load all services and drivers
- Click on the Windows Start icon, type MSConfig and press Enter to bring up the System Configuration folder.
- In the window that appears, select Normal boot and click OK.
- After restarting your computer, check to see if the error is still occurring.
Enable all network-related services to start automatically.
- Click the Windows Start icon, type services.MSC, and press Enter.
- Locate each of the above services, right-click on them, and select Properties.
- In the properties folder, find the startup type and change it to Automatic. Normally, this option is set to Manual.
- Click OK and move on to the next service.
It is important that the Startup Type is set to Automatic, not Manual. In the latter case, the services will be executed when the PC starts up. With the first option, you will have to activate them every time you have connection problems, which is very tedious.
Expert Tip: This repair tool scans the repositories and replaces corrupt or missing files if none of these methods have worked. It works well in most cases where the problem is due to system corruption. This tool will also optimize your system to maximize performance. It can be downloaded by Clicking Here
Frequently Asked Questions
How to fix the “Service or dependency group failed to start” message?
- Activate the Windows firewall through Run.
- Temporarily disable your antivirus program.
- Run a malware scan.
- Visit the Windows Update Center.
- Expand your Administrators group.
- Reset your network adapter settings.
How do I activate the dependency service?
- Click the Windows Start icon, type services.MSC and press Enter.
- Locate each of the above services, right-click it, and select Properties.
- Click OK and move on to the next service.
How do I restore Windows network diagnostics?
- Right-click on Connectivity.
- Click the Windows key.
- Right-click the Connectivity icon in the desktop taskbar.
- Select Troubleshooting.
- Right-click the Windows wireless icon in your computer's taskbar.
- Select Repair.
