Updated April 2024: Stop getting error messages and slow down your system with our optimization tool. Get it now at this link
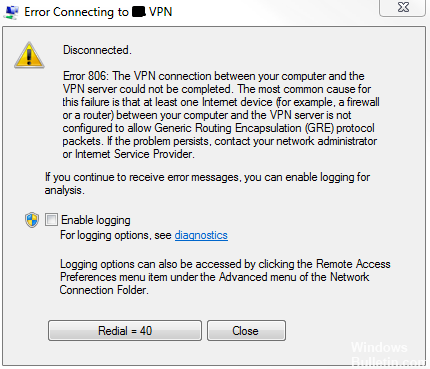
When working with a VPN in certain circumstances, errors sometimes occur, especially on Windows 10, one of which is called “806 (VPN GRE error blocked)”. If you see the pop-up, the VPN is not working. The full context of the message reads as follows:
“A connection has been established between your computer and the VPN server, but the VPN connection cannot be completed. Error code 806 – The most common reason for this error is that at least one Internet device (such as a firewall or router) between your computer and the VPN server is not configured to allow Generic Routing Encapsulation (GRE) packets. If the problem persists, contact your network administrator or ISP.”
What causes VPN error 806 (GRE Blocked) in Windows?

It turns out that several different reasons can cause this behavior. Below is a list of possible reasons that can cause VPN 806 (GRE Blocked) error:
Outdated router firmware: One of the most common causes that cause this problem is an outdated firmware version that makes the router unable to handle the GRE protocol. To avoid this, simply update your router firmware to the latest version through official channels.
TCP port 1723 is closed: This TCP port is used by most VPN clients to bypass firewall connections. If the reason for the error message is that this port is closed, you can solve the problem by whitelisting it in the firewall settings.
Various firewall issues: If this problem only occurs when the firewall is active, you may want to temporarily disable the third-party package while the VPN is running.
Now that you know all the potential culprits, here’s a short list of methods that other concerned users have successfully used to fix the VPN error.
How to solve VPN error 806 (GRE blocked) in Windows
You can now prevent PC problems by using this tool, such as protecting you against file loss and malware. Additionally it is a great way to optimize your computer for maximum performance.
The program fixes common errors that might occur on Windows systems with ease - no need for hours of troubleshooting when you have the perfect solution at your fingertips:
April 2024 Update:

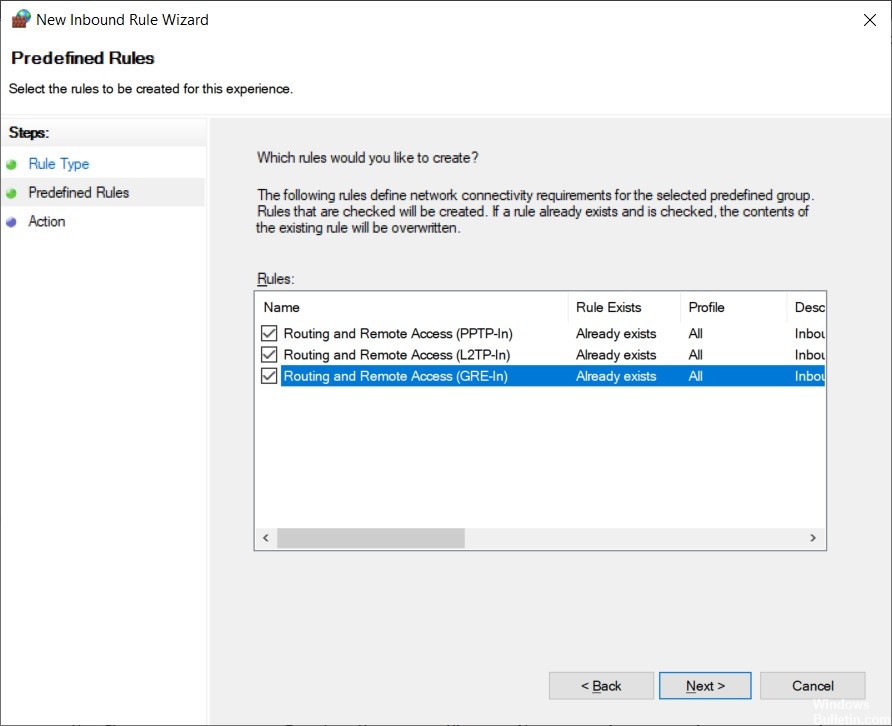
Open the GRE port for protocol 47
- Following the steps in the previous solution, create a new inbound rule in the advanced firewall settings.
- Set the rule type as predefined
- Set predefined settings for routing and remote access
- In the Predefined Rules section, select all entries for Routing and Remote Access.
- In the Action section, select Allow connection and click Finish.
- Create a new exit rule by following the same steps
Use a reliable VPN service
If you manually set up a VPN connection in Windows 10, you sometimes encounter errors like 806.
To avoid this problem in the long run, we recommend that you choose a commercial and reliable VPN service. This will automatically create a secure tunnel as soon as you connect to the VPN server.
You can even configure your computer to accept incoming VPN connections by requesting port forwarding without having to change your router settings.
Add a firewall exception
- Go to Firewall and Network Protection
- Click on Allow application through the firewall
- Click on Edit Settings (you must have administrator rights)
- Find your VPN app in this list and check the appropriate boxes for Private and Public.
- If you can’t find your VPN app here, click Allow another app to find it and add it.
If your firewall didn’t whitelist the VPN when you created the secure tunnel, that might explain why you keep seeing a VPN 806 error on Windows 10.
Open port 1723 via TCP
- Click the Start button, type Firewall, and select Firewall and Network Protection.
- Click on Advanced Settings
- Click Yes when prompted by User Account Control (UAC).
- Select Inbound Rules.
- Open the Action menu and select New Rule.
- Set the rule type Port
- Under Protocol and Ports, select TCP and set Specific Local Ports to 1723.
- Set the action to allow the connection
- Under Profile, select Domain, Private, and Public.
- Specify a name and click Done.
- Go to the Outbound Rules section and repeat the following steps
Whitelist the VPN application with your antivirus program
If you don’t have a third-party antivirus program, that means Windows Defender is responsible for your firewall settings.
If you’ve already added an exception for your VPN application through the Windows firewall, you don’t need to perform this step.
Otherwise, run your anti-malware solution and make sure you add your VPN app to the whitelist section. This will prevent your antivirus from blocking the VPN.
Expert Tip: This repair tool scans the repositories and replaces corrupt or missing files if none of these methods have worked. It works well in most cases where the problem is due to system corruption. This tool will also optimize your system to maximize performance. It can be downloaded by Clicking Here
Frequently Asked Questions
What failed, the error code returned on failure is 806?
This error indicates that the router's firewall is preventing certain VPN protocol traffic between the client and the server. In most cases, these are TCP ports 1723 and 47 (GRE), which must be opened by the responsible network administrator.
How to allow GRE through the firewall?
Log in to the firewall and click on Firewall -> Service. Click the ADD button at the bottom of the page. Select GRE (47) from the protocol drop-down list and click OK. (Port 1723 is already configured as PPTP on SonicWall).
How can I fix my GRE?
- Go to TCP port 1723 and open it.
- Another way to solve the GRE VPN blocking problem is to disable the anti-virus software and Windows firewall on your computer.
- Open Protocol 47 (GRE).
- Check if the PPTP setting on your router is enabled.
How do I know if my GRE protocol is open?
You use the pptpsrv.exe and pptpclnt.exe files from the Microsoft Windows Support Tools package. To use these command lines, run the command line, type pptpsrv on the VPN server, and pptpclnt server name or IP on the VPN client.


