Cool Circle Light Effect in Gimp

In this tutorial I will show you how to create a nice circle light effect using some circles,layer mode and blend tool. I was inspired by James White photoshop tutorial called ‘The O series’and I will use some of his technique for this tutorial.I hope you like this one and let me know guys what do you think.

Before we get started, let’s take a look at the image we’ll be creating.

Create a new document in Gimp, I used 800×600 pixels. Then fill the background layer with black.Create a new layer and named it as circle 1. After that select the layer and using the Ellipse Select tool, create a circle in the middle of the canvas. read more

Brains Icon

BRAAAIIINNNSSS!! . This may not be a scary brain, but hey, it’s a brain, right? Here’s how to make it! This tutorial is based off of an Illustrator tutorial at vectortuts+ by Alexey Botkov.

This tutorial requires some basic knowledge of the Paths Tool. Take a look at this guide to the Paths Tool before continuing if you need to.

Step 1

First thing’s first, we need to draw a brain. It’s hard to draw it straight on the computer (unless you have a tablet of course), so we’ll go with the traditional method- hand draw it! If you don’t have a scanner or digital camera available, your best bet is to draw it with a tablet or mouse (mouse being the hardest option). read more

Blog Theme Design tutorial

Finally I have managed to put my self together and create another blog template tutorial! Sorry to all those who were counting on it before,i just didn’t have the time for it but anyway here it is. so enjoy!

Getting Started

Creating this template is very easy, it just needs some patience and a little effort, so what ever you do. don’t give up.Here is the outcome of this tutorial.

Hopefully a member of the forum will help out in coding this template to a working wordpress theme, so keep an eye out for it :). read more

A folded and cut papercraft or scrapbook style heading

The September 2008 issue of Wired Magazine had a nice new headline design created by Mario Hugo. The author of the Photoshop Roadmap blog decided to turn this effect into a very detailed Photoshop tutorial.

I decided to translate it into a very ordinary and lack-lustre GIMP tutorial – simply to do my bit to push the application I want to see more artists and designers using. Basic GIMP knowledge is assumed.

Here’s the finished product shown on Photoshop Roadmap blog site:

Installing the font

First things first, get the Disco Deck font from dafont. read more

Abstract Wave Effect

Okay everyone, first off, this is converted from a Paint.net tutorial for Lipstick on the Gimper forum. So, let’s get started. Here is the final result:

Step 1

Open up a square document. Mine is 640 by 640 pixels..

Step 1

Step 2

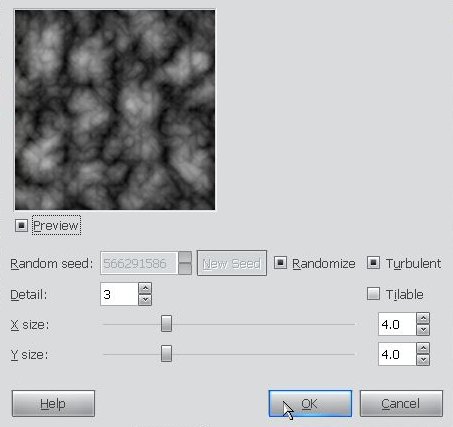
Go to Filters>Render>Clouds>Solid Noise. In here we want to check the Randomize and and Turbulent boxes. Increase the detail level to three or four. We’ll leave the size sliders alone.

Step 2

Step 3

Now we’ll go through the same menus but choose a different option called Difference Clouds. Leave the settings alone. read more

How To: Enable Registry Changes to Take Effect Immediately without a Restart

The registry editor is an integrated utility that comes with the Windows 10 operating system. It contains all hierarchical data configurations for the Windows 10 operating system, its kernel, drivers, application programs installed on it, and much more. This means that some settings that cannot be switched from the user interface can be changed using the registry editor – if the right keys are found and changed if necessary. But the main problem is that in many cases, the user has to restart his computer to find the changes in the registry. But today, we will discuss how we can disconnect from this time by running the restart process and accelerating it. read more

How To: Empty Recycle Bin Automatically

If you still forget to empty the recycle bin on Windows 10, use this guide to automatically empty the recycle bin from your computer according to a schedule.

If you click on the Delete button in a file, you are not actually deleting it from your computer. It only moves to the Trash, which continues to occupy valuable disk space.

Although you probably already know how to empty the trash, you often forget to do such a simple job. When you run out of space, follow the steps to manually empty the recycle bin and permanently delete all its contents. read more

Create a Surreal Piece of Art

This tutorial is directed towards beginners and thus will go into significant detail on how to accomplish each step. This tutorial was made specifically for Gimp 2.6.4.

In this tutorial I will show you how to create this image from scratch:

We will use several techniques including some filters and these tools:

In case at any point you have trouble finding any of the Dialogs that I refer to in the tutorial, you can find all of them by accessing this menu:

Step 1

First create a new image. I made mine 500x647px at 300ppi. Next create a new transparent layer. Use the Paths Tool and create a simple path: read more

30 Ultimate Web 2.0 Layer Styles for Gimp

Downloads Details:

After moving from Photoshop i wanted to be able to use the Ultimate Web 2.0 Layer Styles in Gimp,So i got my self to re-create 30 of them. hopefully you will enjoy as much as i did .

With these pre-made Gradients you can easily make Cool web 2.0 headers, backgrounds, button, and almost any web based designs will always need some nice gradient affect to it and instead of creating them using multiple layers all you need is to use the Gradient fill tool to apply the effects.Here are the names of the 30 Styles. read more

2.0ish Buttons Using Pre-made Gradients

Preview:

Wondering how you make those web 2.0ish button you see every where? well here is how you do it in gimp.

First download the 30 “Ultimate Web 2.0 Layer Styles for Gimp” we will use the pre-made gradients from that to get the effect.

Here are some examples of what you can make with the
With pre-made Gradients pack.

Step:

Step 1

create a new image and a new Layer and name it button, select the “rectangle selection tool” and create a button size rectangle.

Step 2

Now if you installed the “30 Ultimate Web 2.0 Layer Styles for Gimp” select the “Web 2.0 Brown Gloss” Gradient, Grab the Fill tool and place it bellow the rectangle and drag from bottom to top. read more