Updated April 2024: Stop getting error messages and slow down your system with our optimization tool. Get it now at this link
SysMenu.dll is part of an advertising program that displays pop-up ads and advertisements on sites you visit. These ads are displayed as blocks with various available coupons, underlined keywords, pop-up ads, or banners.
The adware that runs the SysMenu.dll process appears as a program that displays coupons for the sites you visit and low prices when you visit product pages on sites such as Amazon. Although seemingly a useful service, the SysMenu.dll program can be intrusive and show ads whether you like it or not.
These ads are designed to encourage the installation of additional questionable content such as web browser toolbars, optimizers, and other products so that the publisher of SysMenu.dll can earn revenue per click. The following symptoms often occur when SysMenu.dll is infected:
- Banner ads are displayed on web pages you visit.
- Text on an arbitrary web page is converted into hyperlinks.
- Pop-ups appear in your browser recommending fake updates or other software.
- Other unwanted adware may be installed without the user’s knowledge.
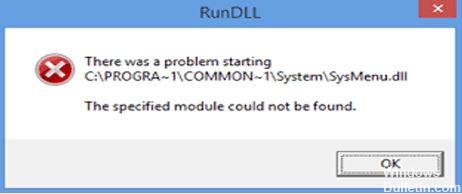
What causes problems with SysMenu.dll on startup?
- Scheduled tasks can cause SysMenu.dll errors.
- In some cases, SysMenu.dll error may be caused by third-party applications running at startup.
- One reason for the SysMenu.dll error is that the file is in the wrong location.
- Another reason for this error could be malware.
- Third-party applications installed on your computer can also cause SysMenu.dll errors. Usually, the culprit is the last application you installed on your computer.
- SysMenu.dll error may be caused by your system registry.
How to solve problems with SysMenu.dll startup?
You can now prevent PC problems by using this tool, such as protecting you against file loss and malware. Additionally it is a great way to optimize your computer for maximum performance.
The program fixes common errors that might occur on Windows systems with ease - no need for hours of troubleshooting when you have the perfect solution at your fingertips:
April 2024 Update:

Eliminate malicious adware from the web browser
Chrome:
- First, open Chrome.
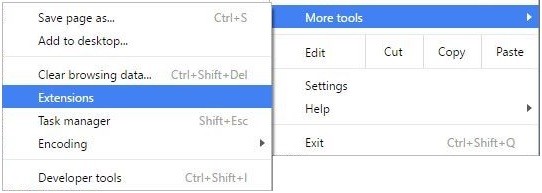
- Then click on the menu (the three horizontal dots you see in the top right corner of the browser).
- Then click on “Settings.”
- Now click on “Extensions.”
- Then look for extensions that you don’t know about.
- If something seems unfamiliar, click on the shopping cart icon.
- Then update or reload Google Chrome.
Firefox :
- Click on the Firefox button.
- Then click on the menu (the three lines you see in the top right corner of the browser).
- Now click on Extensions.
- Click on extensions.
- If you now find something you don’t know, just click on Disable
Internet Explorer:
- First, click on the Internet Explorer icon to open it.
- Now click on Extras.
- Then Manage Add-ons.
- Click on All Add-ons (All Add-ons lets you see all installed features).
- If you now find something you don’t know about. Then just click on the “Disable” button.
- When you’re done, click on the Close button.
Execute a clean boot
- Press Windows + R to open the Run dialog box.
- Type MSConfig and click OK.
- The system configuration window will appear
- Click the Services tab and check the Hide all Microsoft services checkbox.
- Click the Disable All button to disable these services.
- Click the Startup tab and open the Task Manager.
- A list of running applications will appear in front of you.
- Right-click on the first entry and select Disable.
- Repeat this step to deactivate all downloadable applications in the list.
- After disabling all applications, return to System Configuration
- Click Apply and OK to save your changes.
- Reboot the system
Get rid of problematic programs/apps
- Click the Windows Start icon, then click the Settings icon.
- On the Windows settings screen, select Apps.
- In the Apps and Features window, locate the application causing the problem, highlight it, and click Uninstall.
Expert Tip: This repair tool scans the repositories and replaces corrupt or missing files if none of these methods have worked. It works well in most cases where the problem is due to system corruption. This tool will also optimize your system to maximize performance. It can be downloaded by Clicking Here
Frequently Asked Questions
How do I get rid of the SysMenu DLL error?
- Go to your computer and find the path to the C: -> Windows -> System32 -> Tasks directory.
- In the "Tasks" directory, find the "Smupdate" file.
- When you find the Smupdate file, simply delete it.
How to fix DLL errors in Windows 10?
- Run the built-in System File Checker tool to replace missing or corrupt operating system files.
- Run the DISM tool and restore a Windows system image and repair corrupted Windows component memory.
- Repair or reinstall the software if the application is causing this error.
How do I restore the SysMenu DLL on a Windows computer?
- Remove the SysMenu menu.
- Run a third-party DLL fixer.
- Use a CCleaner.
- Remove SysMenu.
- Use autorun.
- Perform a clean boot.
- Scan your system.
How to fix the DLL error?
- Reboot your computer.
- Restore the deleted DLL file from the trash.
- Recover the deleted DLL file with a free file recovery program.
- Scan the entire system for viruses or malware.
- Use the system restore to undo recent changes to the system.
