Updated April 2024: Stop getting error messages and slow down your system with our optimization tool. Get it now at this link
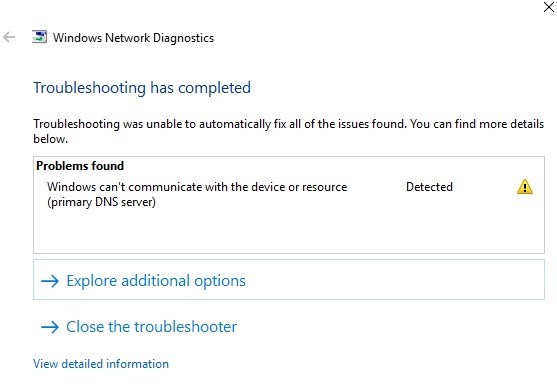
There is nothing worse than a Windows error that prevents you from accessing the Internet. The “Windows cannot communicate with a device or resource” error message is not uncommon and can quickly disrupt your plans.
If you get this message, there’s no need to panic. We’ll explain exactly what this error means and how you can fix it.
What causes Windows to fail to connect to a device or resource (the primary DNS server)?

The main causes of this network error are problems with DNS, corrupt, outdated, or incompatible network adapter drivers, corrupt DNS cache, improperly configured Hosts file, etc.
Anyway, without wasting any time, let’s see how to fix Windows that can’t connect to a device or resource using the guide below.
How to fix Windows can’t connect to a device or resource (primary DNS server)?
You can now prevent PC problems by using this tool, such as protecting you against file loss and malware. Additionally it is a great way to optimize your computer for maximum performance.
The program fixes common errors that might occur on Windows systems with ease - no need for hours of troubleshooting when you have the perfect solution at your fingertips:
April 2024 Update:

![]()
Clear DNS cache
- Type Command Prompt in the search bar on the taskbar.
- In the results, right-click and select Run as administrator.
- Type ipconfig /flushdns and press Enter on your keyboard.
- When you see the message “Successfully flushed the DNS Resolver Cache”, you can close the prompt.
- Check if you can now connect to the Internet.
Changing the IPV4 and IPV6 settings
- While holding down the Windows key on your keyboard, press R. The Run utility will appear.
- Type ncpa.CPL and click OK. The Network Connections window opens.
- Right-click on the network you are using and select Properties.
- Double-click Internet Protocol version 4 (TCP/IPv4).
- On the General tab, select Obtain an IP address automatically and Obtain DNS server address automatically.
- When finished, click OK.
- Double-click Internet Protocol version 6 (TCP/IPv6).
- On the General tab, select Obtain an IP address automatically and Obtain DNS server address automatically.
- Click OK when you are finished.
- Click OK on both windows and restart the computer.
- After your computer restarts, try connecting to the Internet.
Updating the driver directly from Windows
- While holding down the Windows key, press R. This will launch the Run application.
- Type devmgmt.MSC and click OK to open the Device Manager.
- Expand the Network Adapters section by clicking on the arrow icon.
- Right-click on the audio driver and select Update Driver.
- Click Automatically check for driver software updates.
- If Windows finds an updated driver, it will automatically download and install the update on your computer.
- Restart your computer and see if you can connect to the Internet.
Resetting your connection settings
- Type Command Prompt in the search bar on the taskbar.
- In the results, right-click and select Run as administrator.
- Enter the following four commands. Press the Enter key after each command to execute the command:
ipconfig /flushdns
ipconfig /registerdns
ipconfig /release
ipconfig /renew - Close the command prompt and reboot the computer.
- Then try connecting to the Internet to test the connection.
Expert Tip: This repair tool scans the repositories and replaces corrupt or missing files if none of these methods have worked. It works well in most cases where the problem is due to system corruption. This tool will also optimize your system to maximize performance. It can be downloaded by Clicking Here
Frequently Asked Questions
What does it mean if Windows cannot connect to the primary DNS server for a device or resource?
The error message "Windows cannot connect to the machine or resource (primary DNS server)" occurs when your computer cannot connect to the primary DNS server set by your Internet Service Provider. This error message appears in the network diagnostics that are run when you cannot connect to the Internet.
How do I fix my Windows DNS problem?
- Use the command line.
- Disable peer-to-peer downloading of Windows updates.
- Reinstall the network card drivers.
- Change the power settings.
- Make sure that the Microsoft LLDP driver is enabled.
- Perform a reboot to fix Windows 10 DNS issues.
How do I fix my primary DNS server in Windows 10?
- Manually configure the DNS server (recommended).
- Uninstall/reinstall your network drivers.
- Manually set your MAC address.
- Clear your DNS cache.
- Update the network drivers.
- Update the latest version of the router firmware.
How do I fix the “Windows can’t connect to the primary DNS server of the device or resource” problem?
- Update the drivers.
- Update the drivers using Windows itself.
- Update drivers using a third-party application.
- Clear the DNS cache.
- Reset your connection settings.
