Updated April 2024: Stop getting error messages and slow down your system with our optimization tool. Get it now at this link
- Download and install the repair tool here.
- Let it scan your computer.
- The tool will then repair your computer.
Press the Windows key + R.
Select the partition marked as system spare.
Select “Change Drive Letter and Paths”.
Select Add.
Enter Y as the drive letter.
Touch or click OK.
Find cmd in the start menu.
At the command prompt, type Y: and press Enter to switch to this drive.
According to users, issues with the “Could not create new partition” error message can be caused by the Media Creation Tool. Users reported that using a third party tool like Rufus instead of the Creation Media Tool to create a bootable USB fixed the issue.
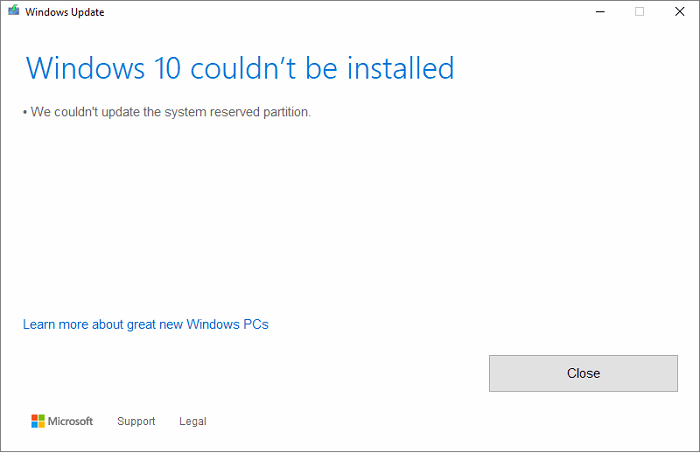
Upgrades or updates to Windows 10 may not install as well as expected. You probably encountered an error saying that Windows 10 could not be installed, we could not update the partition reserved by the system with the error code 0xc1900104 or error code 0x800f0922.
We were unable to update the reserved system partition
April 2024 Update:
You can now prevent PC problems by using this tool, such as protecting you against file loss and malware. Additionally it is a great way to optimize your computer for maximum performance. The program fixes common errors that might occur on Windows systems with ease - no need for hours of troubleshooting when you have the perfect solution at your fingertips:
- Step 1 : Download PC Repair & Optimizer Tool (Windows 10, 8, 7, XP, Vista – Microsoft Gold Certified).
- Step 2 : Click “Start Scan” to find Windows registry issues that could be causing PC problems.
- Step 3 : Click “Repair All” to fix all issues.

You may be wondering what is causing this problem and if there is a way to resolve it. We are here to say yes, there is a way and it is very easy to reach. Just put a few minutes of your time aside and you’ll solve the problem in no time.
What is the cause
You see, the reserved system partition (SRP) may be too full. Note that the system reserved partition (SRP) is only a small space on your hard disk and is used to store boot information for Windows 10.
Not only that, but also antivirus and other security applications normally write to the SRP, which can quickly cause storage space to reach its limits. There’s nothing we can do right now. It all depends on whether Microsoft can find a better solution that can free up SRP space or not.
Resolving the error
These steps are not complicated, but there is the possibility of risk because you are playing with the boot partition space reserved for the system.
To upgrade to Windows 10 now, you must first free 15 MB of disk space on the SRP, then follow the upgrade steps. However, if you upgrade to Windows 10, simply free up 13 MB of disk space and try again.
Press the Win+R button. When the Run window appears, type diskmt.msc.msc and press Enter.
The next step is to right-click on the drive (e.g. drive 0) containing the SRP and select Properties. Then select the Volumes tab, then the Partition Style tab. Either GUID Partition Table (GPT) or Master Boot Record is displayed. You must select the one you are using. It’s either GPT or MBR.
The solution for Windows 10 with GPT partition
First, the user must launch the command prompt. Click the Search or Cortana button, type the word Command prompt, hold down the button or right-click Command prompt in the results and select Run as administrator.
At the command prompt, type the following, then press Enter.
0x800f0922mount : /s
This operation adds the letter Y : to access the system partition.
Switch to reader Y by entering
0x800f0922Y:
and pressing Enter.
Then navigate to the Fonts folder by entering
. 0x800f0922cd EFIMicrosoftBootFonts
If you are there, type
0x800f0922del *
to delete font files.
The system may ask you if you are sure to continue, press Y and then press Enter to continue.
That should help!
The solution for Windows 10 with MBR partition
Press Windows + R. In the Run window that opens, type diskmgmt.msc and press Enter. Then select the partition marked as the system reserve. Right-click and select Edit player letters and paths. Select Add, then type Y for the drive letter, then click OK.
In the Start menu, search for cmd. In the search results, right-click Command Prompt and select Run as Administrator. At the command prompt, type Y : and press Enter to switch to this player. Then navigate to the Fonts folder by typing cd BootFonts.
Enter the following and press Enter:
0x800f0922takeown /d y /r /f
You must specify the space and time after f, otherwise the command will not function properly. Save the privilege set to the drive by typing the following and pressing Enter :
0x800f0922icacls Y:* /save %systemdrive%NTFSp.txt /c /t
Note: Make sure all files are displayed successfully and none failed.
Type whoami and press Enter. Enter the following command and press Enter:
0x800f0922icacles . :F /t
Do not space between usernames and :F, otherwise the command will not work.
Make sure you are still in the font (Y:BootFonts) as described above. Then enter del *.*.* to delete the font files. The system may ask you if you are sure to continue, press Y and then press Enter to continue.
As a precaution, an error can becomene costly.
Expert Tip: This repair tool scans the repositories and replaces corrupt or missing files if none of these methods have worked. It works well in most cases where the problem is due to system corruption. This tool will also optimize your system to maximize performance. It can be downloaded by Clicking Here