Updated April 2024: Stop getting error messages and slow down your system with our optimization tool. Get it now at this link
- Download and install the repair tool here.
- Let it scan your computer.
- The tool will then repair your computer.
If you have been having problems with your computer, there is a good chance that you have run into the 0x80190001 error. This error can cause all sorts of problems on your computer, and it can be very difficult to fix. In this article, we will explain what the 0x80190001 error is and how to fix it.
What does the 0x80190001 error mean?
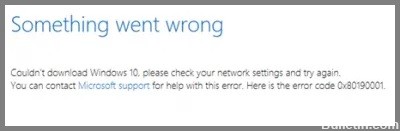
Installing a new Windows 10 update or configuration has many benefits, but it can also cause problems if error 0x80190001 occurs and prevents the user from downloading files. This is a common problem that users face due to incompatibility and security issues with drivers. This error code can result in the following error message:
Something went wrong or an unexpected error occurred while trying to download the files needed for the update.
What causes error code 0x80190001?
Before fixing error 0x80190001, it is important to determine the cause of the problem. There are several reasons why this error may occur on your Windows computer. The reasons for this problem are listed below:
- Antivirus interface.
- Damaged system files.
- Incorrect date and time.
- Damaged Windows profiles.
- Not enough free space on the reserved system partition.
Now that we know all the possible causes of error 0x8019001, please try the following solutions below.
How to resolve error message 0x80190001
Run the update troubleshooter
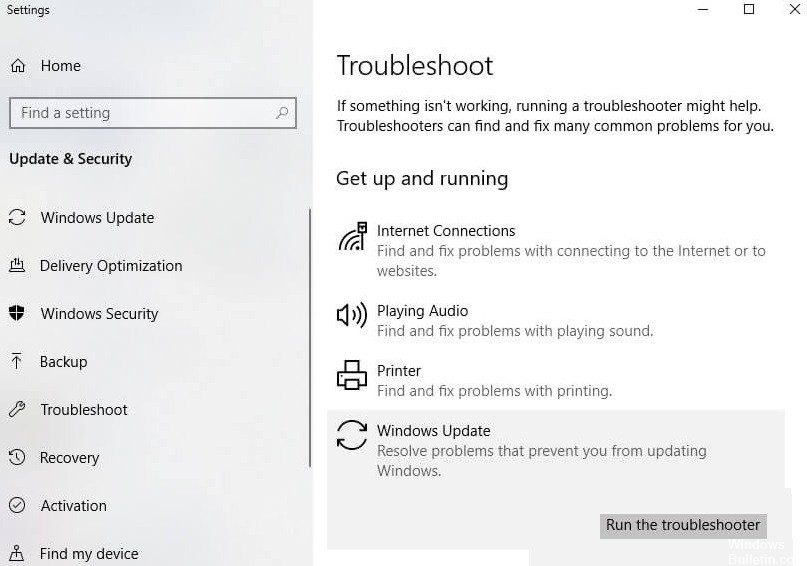
1. Open the Start menu and type “troubleshoot” into the search bar. Click on the Troubleshoot setting when it appears in the search results.
2. On the Troubleshooting page, scroll down to the bottom and click on the Windows Update option.
3. On the next page, click on the Run troubleshooter button.
4. The Windows Update troubleshooter will now run and attempt to identify any problems that may be preventing your computer from updating correctly.
5. Once the troubleshooter has finished, it will provide you with a list of potential issues that it found as well as any steps that it took to fix them. You can now close the troubleshooter and check to see if your updates are working properly. If not, you can repeat these steps or try another method to fix the problem.
Run SFC

Microsoft’s System File Checker is a handy utility that can scan your Windows installation for corrupt or missing system files and restore them if necessary. This can be a useful tool for troubleshooting various problems with your PC. Here’s how to use it:
1. First, open the Command Prompt. You can do this by searching for “cmd” in the Start menu.
2. Now, type in the following command and press Enter: sfc /scannow
3. The scan will now begin. Depending on the size of your hard drive and the number of files on it, this process can take a while. Once it’s finished, you should see a message indicating that either no corrupt files were found or that some files were successfully repaired.
If you’re still having problems with your PC after running the SFC scan, you may need to perform a more thorough scan using the DISM tool.
April 2024 Update:
You can now prevent PC problems by using this tool, such as protecting you against file loss and malware. Additionally it is a great way to optimize your computer for maximum performance. The program fixes common errors that might occur on Windows systems with ease - no need for hours of troubleshooting when you have the perfect solution at your fingertips:
- Step 1 : Download PC Repair & Optimizer Tool (Windows 10, 8, 7, XP, Vista – Microsoft Gold Certified).
- Step 2 : Click “Start Scan” to find Windows registry issues that could be causing PC problems.
- Step 3 : Click “Repair All” to fix all issues.

Temporarily disable the antivirus program
Disabling your antivirus program is not something you should do lightly. But there may be times when you need to temporarily disable protection. Whatever the reason, here’s how to disable your antivirus program in Windows 10.
To disable Windows Defender Antivirus:
1.In the search box on the taskbar, type Windows Security and then select it from the results. Or, press the Windows key + I on your keyboard to open Windows Security settings.
2. Select Virus & threat protection > Manage settings (or Virus & threat protection settings in previous versions of Windows 10).
3. Turn off Real-time protection or any other options you want to change. Note that some virus & threat protection features can’t be turned off.
4. Restart your device for the changes to take effect.
Make sure that the date and time are correct
It’s important to make sure that your computer’s clock is accurate. It’s easy to check and adjust the date and time on Windows 10. Here’s what you need to do:
1. Open the Start Menu and search for “Date and Time.”
2. Click on the “Date and Time” settings.
3. Make sure that the “Set time automatically” and “Set time zone automatically” options are turned on.
4. If the time is incorrect, you can click on the “Change date and time” button to manually adjust it.
5. You can also click on the “Change time zone” button to ensure that your computer is using the correct time zone.
By following these steps, you can be confident that your computer’s clock is accurate and up-to-date.
Perform a clean boot
A clean boot is a diagnostic startup option for Microsoft Windows operating systems that starts the computer with a minimal set of drivers and start-up programs, so that you can determine which process or driver is causing the problem.
1. Type ‘msconfig’ in the search box and press Enter to open System Configuration.
2. On the Services tab, check the box next to Hide all Microsoft services, and then click Disable all. This will prevent non-essential services from starting up when Windows boots up.
3. On the Startup tab, click Open Task Manager.
4. In Task Manager, under Startup tab, right-click each enabled startup item and select Disable. This will prevent any programs from automatically starting up when Windows boots up.
5. Close Task Manager and click OK in System Configuration window to apply changes and restart your computer. After your computer restarts, check if the issue persists.
Expert Tip: This repair tool scans the repositories and replaces corrupt or missing files if none of these methods have worked. It works well in most cases where the problem is due to system corruption. This tool will also optimize your system to maximize performance. It can be downloaded by Clicking Here
Frequently Asked Questions
What is error 0x80190001?
0x80190001 is an error code that indicates a problem with your computer's date and time settings, damaged system files and damaged Windows profiles among other things.
How do I fix error 0x80190001?
There are a few things you can try to fix error 0x80190001. You can run the SFC scan, disable your antivirus program, make sure that the date and time are correct, or perform a clean boot.
What are the symptoms of 0x80190001 error?
The symptoms of 0x80190001 error can include your computer's clock being inaccurate, problems with starting up or shutting down your computer, and issues with installing or updating programs.
