Exploring AriOS Linux: The Remix of Ubuntu for Enhanced Productivity

AriOS Linux, with its rich cultural resonance stemming from ancient Persia, offers an alternative operating system experience that is both distinctive and user-friendly. Stemming from its predecessor, mFatOS, AriOS Linux is a thoughtfully curated remix that builds upon the robust foundations of Ubuntu, aiming to enhance the user’s productivity through an efficient and aesthetically pleasing desktop environment.

Design Philosophy and User Interface

The design philosophy of AriOS is centered around the efficient use of screen space, creating an environment free from clutter and unnecessary distractions. The desktop interface reflects a blend of elegance and functionality, carefully forgoing additional panels to present a clean and simplified user experience. This approach to design is not only about aesthetic appeal but also about optimizing user workflow and accessibility. read more

How to Repair Error 495 in Google Play

A 495 error code occurs when you try to download or update apps or games from the Google Play Store over WiFi. You may get the message “The app could not be downloaded due to an error (495)”. When I download the same apps using mobile data, everything works fine in my case. Don’t worry, the solution to the 495 error is quite simple, and many users have successfully applied the solutions mentioned in this post.

The 495 error code is a numerical error indicator that usually occurs on Android smart devices when you try to download/update and install a mobile app from Google Play Store. read more

Fix: Io.Netty.Channel.ConnectTimeoutException Error in Minecraft Realms

Of the 90 million players, 20% cannot connect to the Minecraft server. Reports indicate that they are unable to connect to the server due to a timeout error.

I went through it too, man! After 9 hours of continuous research, I found the seven easiest steps to fix the Minecraft io.netty bug report.

What does io.netty.channel.abstractchannel$annotatedconnectexception mean?

Minecraft’s io.netty.channel is a connection timeout error that prevents you from connecting to the game server. The main reason for Minecraft’s connection failure is a common IP connection problem. read more

Repair Error Code 1606: Could Not Access Network Location

When trying to install or uninstall the software, the following error message appears: Error 1606: Could Not Access Network Location.

This problem may occur if an incorrect parameter is specified in one of the following registry subsections:

  • HKEY_CURRENT_USER \ Software \ Microsoft \ Windows \ CurrentVersion \ Explorer \ User shell folder
  • HKEY_LOCAL_MACHINE \ Software \ Microsoft \ Windows \ CurrentVersion \ Explorer \ User shell folder

Automatically fix this problem

To solve this problem automatically, click the Remove this problem link. In the “File Upload” dialog box click “Run” and follow the instructions of the Recovery Wizard.

Run the program compatibility fix

If you are looking for a simple solution, you can fix the 1606 error code (Unable to access the network location) by running the Compatibility Troubleshooter and following the recommended solution. read more

How to Enable and Access USB Devices in VirtualBox VM

Have you tried to connect a USB device to a VirtualBox (VM) virtual machine, but it is not detected? It’s actually a very common problem that affected me when I started using VirtualBox. The main problem is that VirtualBox Plug’n’Play does not work correctly and Windows can’t find the right driver for the USB device. The solution is to configure the correct filter in VirtualBox settings.

It is important to understand how to work with virtual hard drives and external memory inside a virtual machine. We have already explained how to create primary and secondary virtual hard drives and assign them to the virtual machine. If you missed these articles, we strongly recommend you to read them on our website. read more

Fix Sending Messages to this Channel has Temporarily been Disabled Discord Error

The message “Sending Messages to this Channel has Quickly been Disabled” appears if you cannot send messages via the Discordance channel. The problem usually occurs when discord servers have connection points.

What is the cause of the “Sending Messages to this Channel has Quickly been Disabled” error?

The Error is Caused by the Following Issues.

  • Faulty Discord Servers: In some cases, the primary servers that Discord uses to power its service may be down or fail quickly, so this error is detected in the messaging. Servers are sometimes placed under maintenance to improve security options and protect against threats. This also prevents you from connecting to a server and not even being able to log in to your account.
  • Web connection: In addition, the web connection you use to connect to servers may be unstable or the connection may not be established properly, which can cause this error. The connection may encounter issues if the PC is not configured to use the correct DNS servers and we want to change the DNS settings.
  • read more

    Fix This Computer does not Meet the Minimum Requirements Error

    When you try to install drivers for the built-in graphics card, Intel HD Graphics, Windows 10 displays an error message that says, “This computer does not meet the minimum requirements for installing the software” when you run setup.exe. This guide shows you how to work around the error while installing the Intel HD Graphics driver in Windows 10.

    The error message is probably due to the fact that the driver is too old and only supports up to Windows Vista or 7, so Windows 10 has trouble detecting and running the installation program. Some hardware that we have been using for a very long time may be obsolete and no longer supported by the manufacturer when new technologies are introduced (which is common on Asus, Dell, Lenovo laptops, etc.). The error is particularly common with driver installers downloaded from the manufacturer’s website or from a driver CD.

    What’s the Cause of this Error

    The error message appears for several reasons:

  • You have an external graphics card in your system; some motherboards disable the processor’s built-in graphics chipset when an external graphics card is connected; make sure the IntelĀ® graphics chipset is visible in the Device Manager.
  • You have the wrong driver.
  • The driver and operating system version do not match. Example: You cannot install a 64-bit driver on a 32-bit operating system.
  • You do not have an Intel graphics card.
  • The Intel Driver and Support Wizard cannot update the driver. Installing a generic Intel graphics driver instead of the computer manufacturer’s custom driver can cause technical problems.
  • read more

    How To: Stop Spammers from Invading your Google Calendar

    Spammers have found a way to add unwanted phishing and scam events to users’ Google calendars without their consent. This will prevent spammers from adding things to your agenda without your permission.

    At this point, you are probably looking for possible phishing messages in your email. You know the procedure: If you have any doubts, do not click on the links or download the attachments. This is already difficult enough to follow in practice. Thanks to the Kaspersky threat research company’s new findings, as well as phishing texts, phishing tweets and phishing pop-ups, you now have another thing to worry about: Phishing in your calendar.

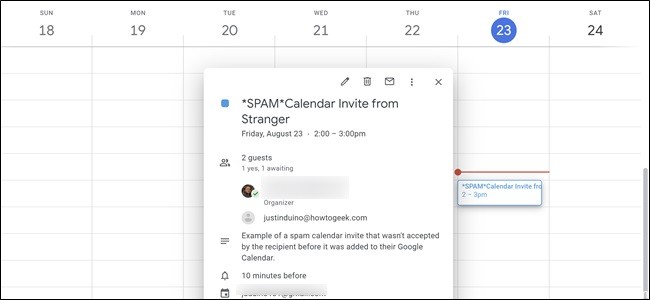
    Phishers have realized that they can use the seemingly harmless settings of the calendar to place their own events with phishing links on the victims’ agenda. In many cases, it also automatically triggers notifications, which further legitimizes malicious events. Scams are particularly effective because calendar entries and notifications come from trusted applications such as Google Calendar.

    The attack simply comes from crooks who send a wave of calendar events to Google Calendar users. The goal is to use the default setting that target calendars automatically add each event and send a notification about it. Scammers therefore preload the text from the event entry with a phishing link and a short line to make the targets click.

    To prevent the Calendar from automatically adding invitations

    This prevents your calendar from automatically adding calendar invites:

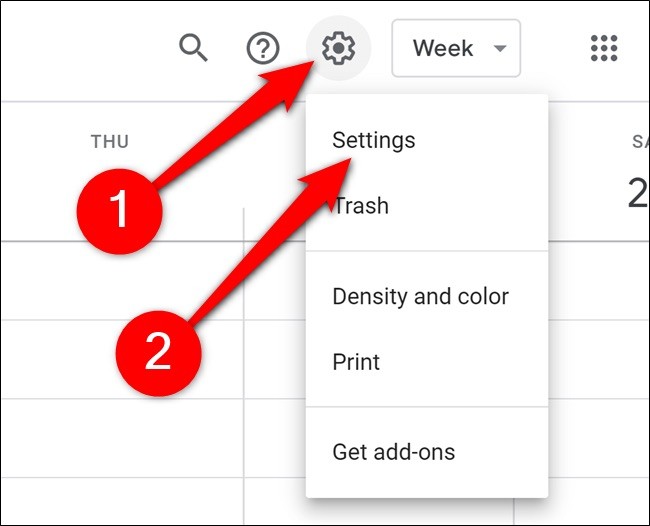
    1. Go to the Settings menu by clicking on the icon at the top right of the calendar page, then selecting “Settings” from the drop-down menu.
    2. Select Event Settings from the left sidebar.
    3. Click on the “Automatically add invitations” page.
    4. From the drop-down menu, select “No, only display invitations to which I have replied”.

    You can also prevent it from adding events from Gmail by going to the Preferences menu and clicking Go:

    • Select “Gmail Events” from the left sidebar.
    • Uncheck the box “Automatically add Gmail events to my calendar”.

    Again, it’s a kind of all or nothing, so if you like this feature, you might not want to change your settings before calendar spam becomes a problem.

    However, if calendar spam already gives you a headache, this can be a quick and easy way to solve it.

    Stop Calendar From Adding Events From Gmail

    Google Calendar also pulls events directly from Gmail. When someone sends you an invitation – sometimes even when it goes into the spam folder – it arrives in your calendar. To disable this function, return to the Settings menu by clicking on the report icon and selecting Settings.

    1. Then select “Gmail Events” from the left sidebar.
    2. Uncheck the box “Automatically add Gmail events to my calendar”.
    3. Google Calendar will ask you to confirm this action. Click OK to confirm the change.

    Hide Declined Events

    If you have had spam invitations in the past, but are tired of seeing the crossed-out entries, you can get rid of them by using the following method:

    • Go to “View Options” in the left menu.
    • Make sure that the “Show rejected events” option is not checked.

    Unfortunately, this does not affect the way you view rejected events on your phone. To ensure that rejected events do not appear on your phone:

  • Select the three parallel lines at the top left of the calendar to display the side menu.
  • Scroll down and select “Settings”.
  • Select “General”.
  • Look for “Show declined events” and make sure it is disabled.
  • read more

    What Is ETD Control Center

    ETDCtrl.exe or ETD control station file is a general software component of ELAN Microelectronics’ ELAN Smart-Pad. ELAN Smart-Pad is a type of touchpad that is normally found in laptops. The control center is managed by ETDCtrl.exe, a configuration screen that provides different types of options to change the settings of the ELAN intelligent touchpad. This is not an official Windows process and can also be easily disabled if there are problems.

    What is the ETD Control Center?

    As already mentioned, the ETD Control Center (ETDCtrl stands for Elan Trackpad Device Control Center) is a software developed by ELAN Microelectronics. Although it is not really known to cause problems, it can carry a camouflaged ETD control center virus. In addition, problems can occur even if the file is corrupted. That’s why many people choose to take it off.

    The file itself is called ETDCtrl.exe and is located in a subfolder of the Windows directory. More precisely, it can be found in C:\Program files. However, it is quite easy to delete this file if you think it poses a threat to your computer or can cause problems.

    Should you uninstall the ETD control center?

    After so much effort, if you still have problems with ETDCtrl.exe, you can remove it by uninstalling ETDWare PS/2-x86 7.0.3.8 WHQL or ETDWare PS/2-x86 7.0.3.7 WHQL using Uninstall a program from the Windows control panel.

    How can I solve ETD Control Center problems in Windows 10?

    Due to this service error in the ELAN task manager, you can choose to uninstall the ETD control center or update the Smart Pad driver for Windows 10.

    Disabling the ETD control center in the task manager

    Mainly, because the Windows etdctrl.exe process is down, you may have to disable the ETD console at startup. This way, this touchpad service will not consume a lot of CPU and will not respond to Windows 10.

  • Right-click on Start, then select Task Manager from the list.
  • In the Task Manager, locate and right-click the ETD control center in the Start tab to disable it.
  • Restart your PC to take effect.
  • read more

    What Is ASP.NET Machine Account?

    Are you one of our users who receives a prompt under Windows 10 or Windows 8.1, 8 every time you try to delete or modify a specific folder or file? All you have to do is follow the steps below, and you can solve your problem with ASP.NET MACHINE ACCOUNT on Windows 10 or Windows 8.1 to resume your daily activities in no time.

    Why does my computer have an ASP.NET account?

    If you have installed updates or new software on your computer, you have installed Microsoft.NET Framework 1.1, which includes a common runtime application that the applications you run may need. During this installation, an account called ASP.NET is created. If your computer has already displayed your desktop immediately after starting it, you can see a welcome screen when you start your computer with your existing user account and ASP.NET account. That’s because there are now two accounts on your computer.

    The account does not allow remote or interactive connection and only has Guest level privileges. Therefore, it cannot be used by anyone else or by Microsoft to connect to your computer. If you use your computer for personal use only (i.e., if you are not a software developer who must develop and test software using Internet Information Services (IIS)), you can delete this account in one of the following ways:

    1) Delete the account and leave the .NET Framework installed:
    – Start the computer management tool in your Administrative Tools folder (under Control Panel).
    – Select the Local Users and Groups node.
    – Click on the Users sub-node and select the ASPNET account.
    – Right-click on the selected account and select Delete.

    2) Uninstall the.NET Framework (Note: This will prevent applications that use the.NET Framework from working):
    – Open the Control Panel
    – Open Add/Remove Programs.
    – Select Microsoft.NET Framework 1.1.
    – Click on Modify/Remove. One of these approaches completely removes the account from your system.

    To delete this ASP.NET machine account

    registry editor - Another installation is in progress in Windows 10

    To hide this account without affecting the features it provides:

  • Press Windows+R to open the Run window, type regedit and press Enter.
  • In the Editor tab window, navigate to the next registry key: HKEY_LOCAL_MACHINE\Software\Microsoft\Windows NT\CurrentVersion\Winlogon\SpecialAccounts\Userlist. If the Special
  • Accounts key and the User List key do not exist, create them.
  • In the right part of the user list, right-click on any space and point to New -> DWORD (32-bit) value.
  • Name the new DWORD registry value name exactly like the user name used on the login screen. (In this case, ASP.NET machine account)
  • Double-click on the DWORD record value and set the value to 0 to hide the account in front of the welcome screen. To restore the user account to the home screen, delete the registration entry or set the data value to 1.
  • Exit the registry editor. Log out or restart the computer for the change to take effect.
  • read more