Updated April 2024: Stop getting error messages and slow down your system with our optimization tool. Get it now at this link
- Download and install the repair tool here.
- Let it scan your computer.
- The tool will then repair your computer.
When connecting your printer to the network, a printer error 384 may occur. The complete error is displayed: We can’t install this printer right now. Try again later or contact your network administrator for help.
Several users have reported similar problems on the Microsoft Community Forum.
This error may occur if you have multiple printers that use the same print port in Windows. In this article, we discuss how to fix printer error 384 in Windows 10.
Restart your computer, printer, and router.
Restart your computer, printer, and router to resolve any connection error conditions.
NOTE: The following steps temporarily disconnect the network and Internet connections and require you to restart the computer. Perform any ongoing tasks or downloads before continuing.
- Turn off the router by pressing the power button or unplugging the power cord.
- Turn off the printer, then disconnect all USB or Ethernet cables.
- NOTE: If a USB or Ethernet cable is connected to the printer, the printer cannot establish a wireless connection.
- Close all programs running on your computer, then turn off the computer.
- Reconnect the power cord to the router, then wait for the Internet activity indicator to show a normal connection status.
- Turn on the printer.
- Turn on your computer, then go to the next step.
Uninstalling and reinstalling the printer

A. Uninstalling the Printer
- Click the Windows+X key > Applications and Features > Scroll down and click Programs and Features > Select your printer > Select Uninstall
- Enter the printers in the Windows search box > Printers and Scanners > Select your printer > Delete device
- Enter the printers in the Windows search box > Click Printers and Scanners > Scroll down and click Print Server Properties under Related Settings > Locate your printer on the Drivers tab > Select your printer and click the Delete button at the bottom
April 2024 Update:
You can now prevent PC problems by using this tool, such as protecting you against file loss and malware. Additionally it is a great way to optimize your computer for maximum performance. The program fixes common errors that might occur on Windows systems with ease - no need for hours of troubleshooting when you have the perfect solution at your fingertips:
- Step 1 : Download PC Repair & Optimizer Tool (Windows 10, 8, 7, XP, Vista – Microsoft Gold Certified).
- Step 2 : Click “Start Scan” to find Windows registry issues that could be causing PC problems.
- Step 3 : Click “Repair All” to fix all issues.

B. Printer Installation
- Go to the printer manufacturer’s website and check the latest Windows 10 drivers > Reinstall the printer driver > Restart the computer
- Type “Printers” in the Windows “Start” search box > Click on Printers and Scanners > Click on Add Printer or Scanner on the right side > If Windows detects your printer, it will be listed > Select the printer and follow the instructions on the screen to configure it (In the case of a Wifi printer, your computer must also be connected to the Wifi network)
- If Windows does not recognize your printer, you will receive a blue message – Click on The printer you want to use is not listed
- If you are using a Bluetooth / Wirelss printer > Select a Bluetooth, wireless or network printer > Select the printer > Select your printer and follow the instructions on the screen
- If you are using a wired printer > Select Add a local printer or a network printer with manual settings > Select Use an existing port > Select your printer and follow the instructions on the screen.
Removing the printer driver
The problem may be caused by the printer drivers. You can try to remove and reinstall the drivers.
Follow the steps below:
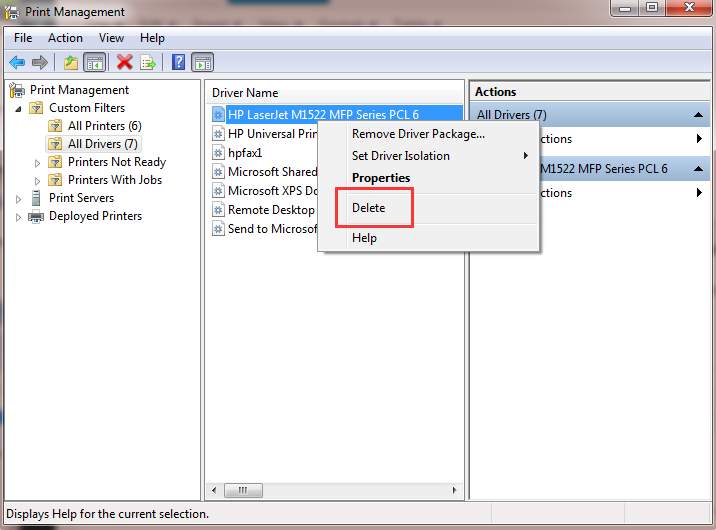
- Press Win+R (Windows logo key and R key) at the same time. A Run dialog box opens.
- Type printmanagement.msc in the Run box and click the OK button.
- Click All Drivers in the left pane.
- In the right pane, right-click the printer driver and click Delete on the context menu.
- Add the printer again.
Changing the printer port

- Press the Windows + R key to open Run.
- Enter the control panel and click OK to open the control panel.
- Click Hardware and Sound.
- Select the devices and printers.
- Right-click the printer you are having trouble with and select Print Properties.
- In the Properties window, open the Ports tab.
- Here you must assign the correct port to the printer.
- Repeat the steps for the other printers on your network. Open and assign a different port.
- Save the changes and close the control panel.
This error may occur if you have several printers connected to the same network and both have the same assigned port. Follow the steps above for assigning different ports to see if this fixes the error.
https://support.hp.com/ph-en/document/c05032099
Expert Tip: This repair tool scans the repositories and replaces corrupt or missing files if none of these methods have worked. It works well in most cases where the problem is due to system corruption. This tool will also optimize your system to maximize performance. It can be downloaded by Clicking Here

CCNA, Web Developer, PC Troubleshooter
I am a computer enthusiast and a practicing IT Professional. I have years of experience behind me in computer programming, hardware troubleshooting and repair. I specialise in Web Development and Database Design. I also have a CCNA certification for Network Design and Troubleshooting.