Updated April 2024: Stop getting error messages and slow down your system with our optimization tool. Get it now at this link
- Download and install the repair tool here.
- Let it scan your computer.
- The tool will then repair your computer.
When you try to create a Recovery CD using a USB memory stick on a Windows 10 computer, but get an error message “We can’t create a Recovery CD”. There was a problem when you created the Recovery CD. This article should help you. When you encounter this problem you will get the following complete error message.

We can’t create a recovery disk
A problem arose when creating the recovery disk.
The problem may be caused by one or more of the following known causes.
- The option “Back up system files to recovery disk” requires a USB stick of at least 16 GB.
- USB drives face damage problems, because of which Windows can not format everything on the drive to create a recovery disk.
- Windows file system is corrupted.
- Some Microsoft Office services interfere with the recovery process
- Disk Recovery Wizard failed
Fully format your USB drive

The problem with the inability to create a recovery disk in Windows 10 may be related to disk corruption. In this case you can perform full formatting of the disk (not fast formatting). Follow the instructions below:
- Plug in the USB drive and open the explorer. Right-click on the USB drive and select “Format…”.
- Save the same file system and unit size, but uncheck the box before formatting quickly. Confirm settings and click Start.
- You will receive a warning about data loss. Click OK to start the disk formatting process.
- After formatting is complete, restore the recovery disk to see if you can create it.
Disconnect the antivirus program
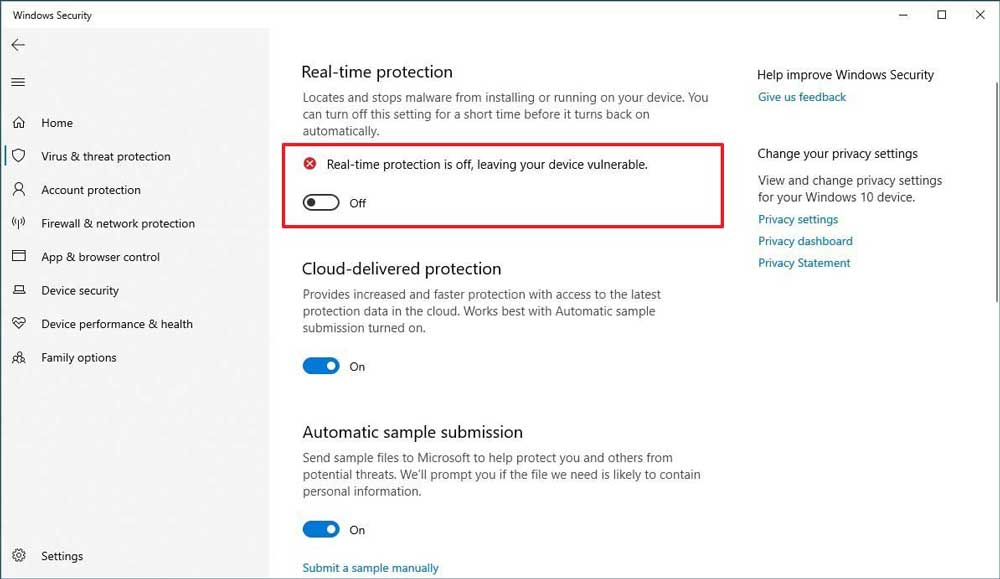
Your antivirus is important for your security, but sometimes antivirus tools can interfere with Windows and cause various problems. If you can not create a recovery disk in Windows 10, the problem may be in the antivirus software.
If you have this problem on your computer, you can try to disable some antivirus features such as real-time protection, etc. Y. If this does not work, you may have to completely disable the antivirus. As a last resort, you may need to completely remove the antivirus.
April 2024 Update:
You can now prevent PC problems by using this tool, such as protecting you against file loss and malware. Additionally it is a great way to optimize your computer for maximum performance. The program fixes common errors that might occur on Windows systems with ease - no need for hours of troubleshooting when you have the perfect solution at your fingertips:
- Step 1 : Download PC Repair & Optimizer Tool (Windows 10, 8, 7, XP, Vista – Microsoft Gold Certified).
- Step 2 : Click “Start Scan” to find Windows registry issues that could be causing PC problems.
- Step 3 : Click “Repair All” to fix all issues.

Disabling Secure boot

Secure Boot is a useful feature to protect your PC from intruders. However, this feature can sometimes prevent you from creating recovery disks. The only solution is to disable Safe Boot. To do this, proceed as follows:
While your computer is booting, press F2 or Delete to enter the BIOS.
After entering the BIOS, find the “Safe Boot” option and disable it.
After disabling this option, save your changes and restart the system.
Note that you can also access the BIOS as follows:
- Open the “Settings” application and go to “Update and Security”.
- Go to the “Restore” tab and click “Restart Now”.
- After restarting your computer, select Troubleshooting> Advanced Options> UEFI Firmware Options and click “Restart”.
Remove unused VSS ISPs from the registry.

If applicable, remove the third-party backup solution. Over time, invalid or outdated VSS vendors may appear in the registry that were added by a previously installed third-party image backup program. You can find the list of third-party providers by running the vssadmin list provider command.
You can remove all vendors except Microsoft Software Shadow Copy Provider 1.0. If you find other suppliers in the list, you can delete them (after saving each entry) using the registry editor.
- Open the registry editor (regedit.exe).
- Go to the next button:
- HKEY_LOCAL_MACHINE \ SYSTEM \ CurrentControlSet \ Services \ VSS \ Providers
- Export the key to a REG file for backup.
- Remove all subsections except GUID 1.0 of Microsoft software shadow copy vendor, which usually looks like {b5946137-7b9f-4925-af80-51abd60b20d5}.
- {74600e39-7dc5-4567-a03b-f091d6c7b092} is the Hyper-V VSS vendor key that needs to be removed. Also remove all VSS vendors added by a third-party backup program (Symantec Ghost 15 System Recovery, Comodo Backup, Replibit BDR from eFolder, etc.). Д.).
- Reboot Windows.
- Now, when you run the vssadmin list provider command line from the administrator command line, you will see only the Microsoft Software Shadow Copy 1.0 provider.
- Now try to create a USB flash drive for recovery.
Expert Tip: This repair tool scans the repositories and replaces corrupt or missing files if none of these methods have worked. It works well in most cases where the problem is due to system corruption. This tool will also optimize your system to maximize performance. It can be downloaded by Clicking Here

CCNA, Web Developer, PC Troubleshooter
I am a computer enthusiast and a practicing IT Professional. I have years of experience behind me in computer programming, hardware troubleshooting and repair. I specialise in Web Development and Database Design. I also have a CCNA certification for Network Design and Troubleshooting.