Updated April 2024: Stop getting error messages and slow down your system with our optimization tool. Get it now at this link
- Download and install the repair tool here.
- Let it scan your computer.
- The tool will then repair your computer.
If you are using Windows and your USB mouse disconnects and reconnects several times, this guide is your guide.
The quality of track skates varies; some are excellent and others not. It’s not just about having a precise touchpad that can make gestures. It is also a question of equipment. Some laptops prefer the aesthetics of a trackpad and end up giving the user something that cannot be used. For example, some Lenovo notebooks come with a bright steel plate for a trackpad. Other laptops have something much better to use. However, for some users, a mouse is even better. If you connect a mouse to your laptop, a wireless USB mouse is preferable. This will work well in most cases, although it sometimes happens. If your USB mouse has been careless or no longer responds, it is because it is disconnecting the connection when it should not. This is how you correct the disconnection and delay of the wireless USB mouse in Windows 10.

If you do not use your USB mouse for a while, Windows will turn it off. To use it again, simply double-click it and Windows will activate it again. This is a simple power saving feature that can cause the wireless USB mouse to disconnect.
Checking the properties of the USB root hub
If you notice locks or mouse failures, it may be because your computer automatically turns off the USB root hub. This is a power-saving feature for laptops. To delete this function/problem, proceed as follows:
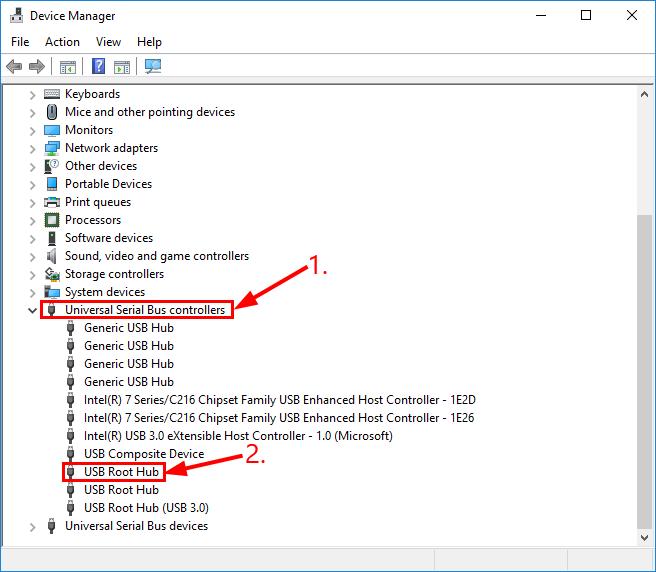
- Go to your Control Panel > System > System Tab > Hardware > and click the Device Manager button.
- In the Device Manager window, locate the element or elements named Universal Serial Bus Controller. Open it and double-click the first item named USB Root Hub.
- In the USB Root Hub Properties dialog box, click the Power Management tab.
- “Allow the computer to turn off this unit to save power” is enabled by default. Uncheck this box and click OK.
Check for hardware problems
April 2024 Update:
You can now prevent PC problems by using this tool, such as protecting you against file loss and malware. Additionally it is a great way to optimize your computer for maximum performance. The program fixes common errors that might occur on Windows systems with ease - no need for hours of troubleshooting when you have the perfect solution at your fingertips:
- Step 1 : Download PC Repair & Optimizer Tool (Windows 10, 8, 7, XP, Vista – Microsoft Gold Certified).
- Step 2 : Click “Start Scan” to find Windows registry issues that could be causing PC problems.
- Step 3 : Click “Repair All” to fix all issues.

- Change another port. Sometimes, the disconnection problem with this mouse occurs simply because you have connected your mouse to a defective USB port. You can disconnect it and plug it into another port to see if it solves the problem.
- Try a different (and functional) mouse. Check if the mouse disconnection problem is solved. If that’s the case, then it’s great! But if it continues like that, continue with correction 2, below.
Perform the hardware troubleshooting.
a) Press the “Windows + W” key on the keyboard.

b) Type the convenience store in the search box, then press Enter.
c) Click on Hardware and Sound and troubleshoot the hardware and device.
Disabling USB Selective Suspension via Power Options
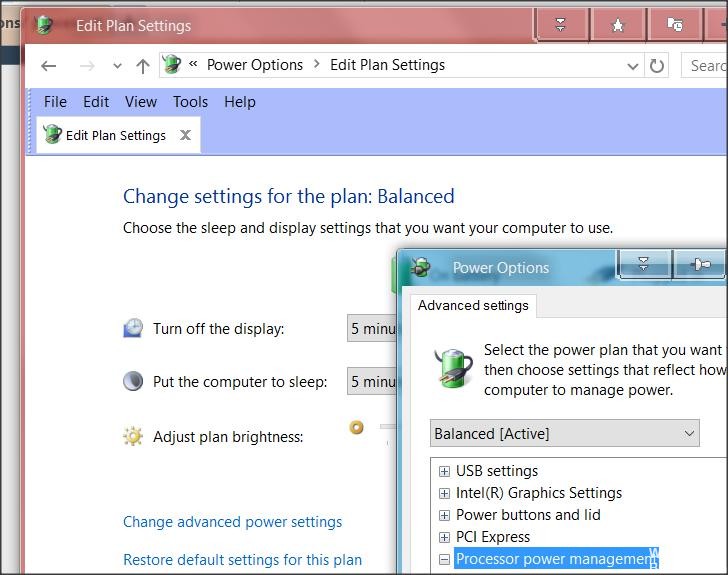
A more elegant way to disable USB suspension is to do so from the Power Options menu. Several users who also experienced accidental disconnections reported that this allowed them to solve the problem. So, if you have not been able to follow method 2, or if you are not sure to properly disable USB suspension, you can use this procedure for a more targeted approach.
Here is a quick guide to disable USB selective suspension from the Power Options menu:
- Press Windows + R to open a Run dialog box. Then type “powercfg.cpl” in the text box and press Enter to open the Power Options menu.
- If you are in the Power Options windows, click the Change Plan Settings button associated with the currently active power plan.
Note: If you are constantly changing plans, repeat the following procedure for each plan. - In the edit plan settings, click Edit Advanced Power Settings.
- Once you have reached the power options, scroll down the list of settings and expand the USB Settings menu.
- Then expand the Selective USB Suspension Settings menu and set the On Battery and Connected drop-down menus to Off.
- Click Apply to save the change and restart the computer.
- When the next boot sequence is complete, check to see if you still see random disconnections.
Expert Tip: This repair tool scans the repositories and replaces corrupt or missing files if none of these methods have worked. It works well in most cases where the problem is due to system corruption. This tool will also optimize your system to maximize performance. It can be downloaded by Clicking Here

CCNA, Web Developer, PC Troubleshooter
I am a computer enthusiast and a practicing IT Professional. I have years of experience behind me in computer programming, hardware troubleshooting and repair. I specialise in Web Development and Database Design. I also have a CCNA certification for Network Design and Troubleshooting.