Updated April 2024: Stop getting error messages and slow down your system with our optimization tool. Get it now at this link
- Download and install the repair tool here.
- Let it scan your computer.
- The tool will then repair your computer.
Whenever a Windows 10 system fails, it collects and records important information about the failure (such as when and what caused the failure) and saves it as minidump files in the minidump. By analyzing the minidump file, you can easily understand what caused the error. If your computer has recently failed and you want to know how and where to find the minidump files, follow the methods described in this article and you can easily analyze the cause of the problem.
What does the DMP file extension mean?
Windows memory dump files with the “.dmp” extension are system files stored in binary format. In case of any error or sudden failure of a third-party program or even system function, these files will be created automatically.
They record the details of the failure so that more advanced users can use .dmp files to troubleshoot problems with affected programs.
For example, if there is a BSOD (blue screen of death), details of possible causes (drivers or other software are often suspects) can be found in the automatically created .dmp file.
For obvious reasons, they are usually called “Memory.dmp” or “Crash.dmp”. They can be small individually in size.
However, as DMP files accumulate over time, they can take up a lot of disk space when they are linked together. This way, you can easily clean them with the disk cleaning utility.
Download and install the debugging tools for Windows

The tools are part of the Windows SDK for Windows. We just need the tools.
Go to the Windows Development Center to download the Windows SDK loader. It’s not a tool, it’s just a tool loader.
The installer is the loader of the entire SDK. We don’t need all the extra services, we just need the tools.
- Click “Next” in the installer until you reach the screen where the packages are loaded with the title “Select the components you want to install”.
- Clear all the checkboxes next to all packages except Debugging Tools for Windows.
- Click Install.
Wait until the installer downloads and installs the packages. When the installation is complete, click “Close”.
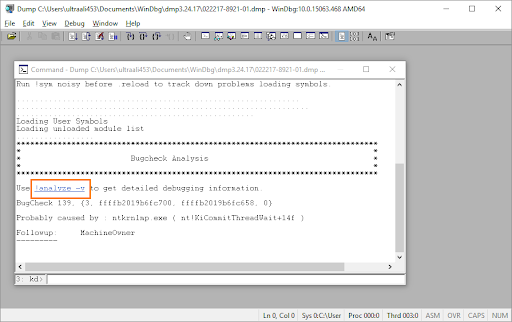
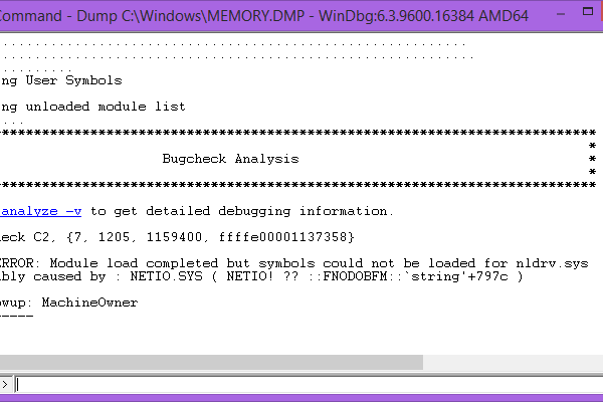
Use the Windows debugger to analyze the minidump files.
Windows Debugger is a complex minidump file analyzer on your computer.
April 2024 Update:
You can now prevent PC problems by using this tool, such as protecting you against file loss and malware. Additionally it is a great way to optimize your computer for maximum performance. The program fixes common errors that might occur on Windows systems with ease - no need for hours of troubleshooting when you have the perfect solution at your fingertips:
- Step 1 : Download PC Repair & Optimizer Tool (Windows 10, 8, 7, XP, Vista – Microsoft Gold Certified).
- Step 2 : Click “Start Scan” to find Windows registry issues that could be causing PC problems.
- Step 3 : Click “Repair All” to fix all issues.

- Download Windows 10 SDK on your computer. Click Download ISO. The latest version of Windows 10 SDK will be downloaded to your computer.
- Mount the ISO file “KSDKWIN10_MULFRE_EN-US_DV9” on your computer to view the files.
- Double-click “WinSDKSetup” to start the installation on your computer.
- In the “Specify location” window, select “Install WindowsWindows 10.0.18362.1 SDK on this computer” and click “Next”.
- You can select a separate installation directory on your computer by clicking “Browse”.
- In the “License Agreement” window, click “Accept” to accept the agreement to install the package on your computer.
- When you are prompted to select the components to install, check only the “Debug Tools for Windows” option and click “Install”.
- When the installation process is complete, simply click “Close” to close the configuration window.
- Press the Windows + R keys to open the “Run” window on your computer. Type “cmd” and press Ctrl + Shift + Enter to open the command line window with administrator rights.
- In the command line window, copy and paste these commands one by one, then press Enter after each command to run them one by one on your computer.
CD \ Program Files (x86) \ Windows Kits \ Debuggers \ x64 \
windbg.exe -IA
- Click the search box and enter “windbg”. Then right-click WinDbg (x64) * and select Run as administrator to open WinDbg on your computer. The WinDbg window will open.
- In the WinDbg window just click “File”, then “Path to icon file”.
If the file is obtained from a third-party program or driver for your hardware device, updating or disabling the screen may prevent the blue screen from appearing. If it is a Windows file, one of your hardware, such as memory, processor, or motherboard, may be faulty. First you need to run a memory test because you can do this by simply pressing the start button and typing mdsched which will run the Windows memory diagnostic program.
Expert Tip: This repair tool scans the repositories and replaces corrupt or missing files if none of these methods have worked. It works well in most cases where the problem is due to system corruption. This tool will also optimize your system to maximize performance. It can be downloaded by Clicking Here

CCNA, Web Developer, PC Troubleshooter
I am a computer enthusiast and a practicing IT Professional. I have years of experience behind me in computer programming, hardware troubleshooting and repair. I specialise in Web Development and Database Design. I also have a CCNA certification for Network Design and Troubleshooting.