Updated April 2024: Stop getting error messages and slow down your system with our optimization tool. Get it now at this link
- Download and install the repair tool here.
- Let it scan your computer.
- The tool will then repair your computer.
The new graphics feature has some caveats and limitations: It is only available on Windows 10 version 2004 or later, requires a relatively new GPU and requires drivers that support this feature. This option is only available if the system meets all requirements.
What to Expect when Upgrading to the new GPU Scheduler
The transition should be transparent and users should not notice any significant changes. While the new scheduler reduces the overhead of GPU scheduling, most applications were designed to hide scheduling costs through buffering.
The goal of the first phase of hardware-accelerated GPU scheduling is to modernize a fundamental pillar of the graphics subsystem and set the stage for the future – but that will be a story for another time.
How to Enable Hardware-Accelerated GPU Scheduling

To enable hardware-accelerated GPU programming at the hardware level with Windows 10 settings, follow these steps
- Open settings
- Select the System > Display tab.
- Locate Multiple Displays
- Click Graphics Settings.
- Select the Change Default Graphics Settings option.
- To enable the function, turn the knob next to “Hardware Accelerated GPU Scheduling ON”.
- Restart your Windows device to apply the changes.
April 2024 Update:
You can now prevent PC problems by using this tool, such as protecting you against file loss and malware. Additionally it is a great way to optimize your computer for maximum performance. The program fixes common errors that might occur on Windows systems with ease - no need for hours of troubleshooting when you have the perfect solution at your fingertips:
- Step 1 : Download PC Repair & Optimizer Tool (Windows 10, 8, 7, XP, Vista – Microsoft Gold Certified).
- Step 2 : Click “Start Scan” to find Windows registry issues that could be causing PC problems.
- Step 3 : Click “Repair All” to fix all issues.

Enabling Hardware Accelerated GPU Scheduling from the Registry

Use these steps to apply hardware-accelerated GPU programming on Windows 10:
- Open Windows search.
- Search for “Registry” and select the first option.
- In the Registry Editor, navigate to “HKEY_LOCAL_MACHINE\SYSTEM\CurrentControlSet\Control\GraphicsDrivers”.
- Locate the DWORD tile “HwSchMode”. Use the value 2 to activate it and 1 to deactivate it.
- Restart the system.
- Open Settings > Display > Graphics Settings and toggle the option.
- Reboot the system.
Conclusion
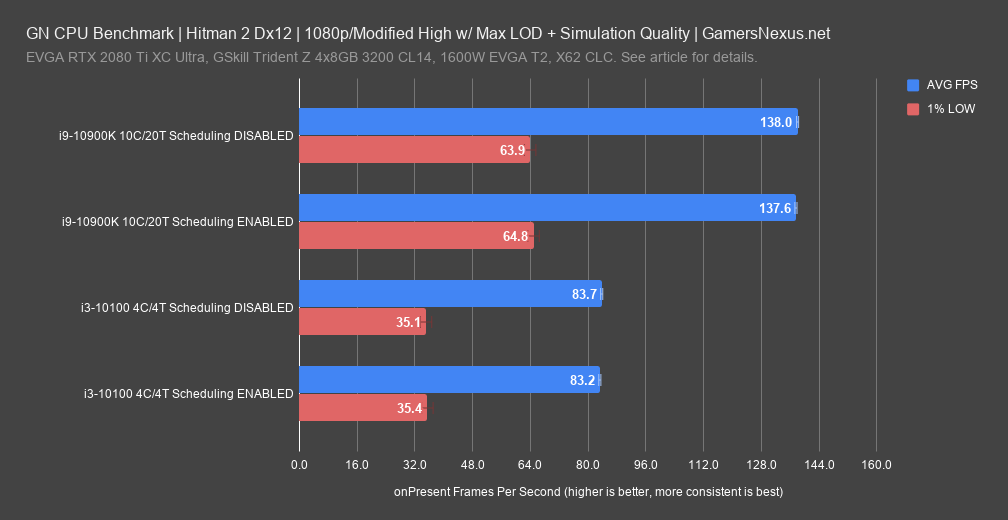
Please note that you must download and install the latest drivers for the function to appear in the Windows settings. In our tests, we have seen a performance increase of about 5% in games (Nvidia GeForce GTX 1660 Ti), but it depends on the GPU. Higher-ranked cards with more VRAM, such as the RTX 2080 and 2080 Ti, will benefit less from this feature, while lower-ranked GPUs, such as Nvidia’s 16 Series, should benefit more from hardware-accelerated GPU scheduling. AMD also added support for hardware-accelerated GPU scheduling in the latest beta update. Some AMD Navi-based GPUs currently support this feature, and you can enable it by following the steps above after downloading the latest beta drivers from the AMD website.
https://devblogs.microsoft.com/directx/hardware-accelerated-gpu-scheduling/
Expert Tip: This repair tool scans the repositories and replaces corrupt or missing files if none of these methods have worked. It works well in most cases where the problem is due to system corruption. This tool will also optimize your system to maximize performance. It can be downloaded by Clicking Here

CCNA, Web Developer, PC Troubleshooter
I am a computer enthusiast and a practicing IT Professional. I have years of experience behind me in computer programming, hardware troubleshooting and repair. I specialise in Web Development and Database Design. I also have a CCNA certification for Network Design and Troubleshooting.