Updated April 2024: Stop getting error messages and slow down your system with our optimization tool. Get it now at this link
- Download and install the repair tool here.
- Let it scan your computer.
- The tool will then repair your computer.
Error code 2203 is usually displayed when trying to install a program that requires administrator access without sufficient privileges. It is reported that this problem occurs with several programs and is confirmed in Windows 7, Windows 8.1 and Windows 10.

Running the installer with administrative access
One of the most common cases where the error code 2203 is confirmed is when the installer does not have sufficient rights to copy the program files to the installation folder or use a temporary folder during the installation phase.
If this scenario is correct, you should be able to solve the problem by making sure that you have logged on with an administrator account and made the installer open with administrator rights.
To open the installer with administrator rights, just right click and select Run as Administrator from the context menu that appears. Then, in the User Account Control (UAC) prompt, click Yes to grant administrator rights.
Then, as usual, follow the remaining instructions and see if you can complete the installation without the same error code 2203.
Temporary shutdown of the firewall and anti-virus software.
Error code 2203 when installing or upgrading Microsoft Office may occur if you have network or firewall restrictions. Network or firewall rules on your network/computer may block you from installing Office software or updating it as part of security measures. These firewall and virus protection rules are implemented on your computer by your network provider or computer user in its central system or registry.
April 2024 Update:
You can now prevent PC problems by using this tool, such as protecting you against file loss and malware. Additionally it is a great way to optimize your computer for maximum performance. The program fixes common errors that might occur on Windows systems with ease - no need for hours of troubleshooting when you have the perfect solution at your fingertips:
- Step 1 : Download PC Repair & Optimizer Tool (Windows 10, 8, 7, XP, Vista – Microsoft Gold Certified).
- Step 2 : Click “Start Scan” to find Windows registry issues that could be causing PC problems.
- Step 3 : Click “Repair All” to fix all issues.

You can resolve error code 2203 by temporarily disabling the firewall or antivirus program, or resolve error code 2203 by creating an exception rule for installing or updating Microsoft Office.
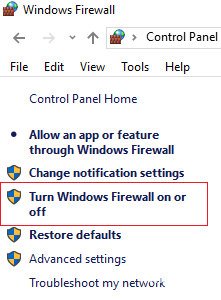
Follow the steps to disable the firewall :
Step 1 Open the “Control Panel”.
Step 2 Go to “System and Security” and then to “Windows Firewall”.
Step 3 Click the button “Enable or disable Windows Firewall”.
Step 4 Select Disable Firewall for private and public networks.
Step 5 Try to install or update Microsoft Office and see if the error code 2203 has been fixed.
Remove unnecessary files from Internet Explorer to correct error code 2203.
- Hold down the Windows key and the “R” letter simultaneously.
- In the “Run” window, type the command “inetcpl.cpl” and press the Enter key.
- Now go to the “Advanced” tab in the “Internet Options” window.
- Then press the “Reset” button.
- In the pop-up window, select the option to delete your personal settings.
- Wait until the reset is complete, then proceed to the next step.
Now you can check if the error code is corrected when installing the Windows 2203 application.
Take ownership of the temp folder
- click Start, enter %temp% in the Start search field and click Enter
In the upper part of the Explorer window, in the address bar, click on a folder to the left of Temp in the path to the folder (the default is Local Folder).
Right-click a file or folder and select “Properties” from the context menu.
Click on the Security tab.
Click “Advanced”. - Click the “Owner” tab in the “Advanced security settings for Windows users” section.
- Click the “Edit” button and select a user from the “Change Owner” list if the user or group is not in the list and then click other users or groups. Enter a user/group name and click OK.
Now select User/Group and click Apply and OK (check the “Replace owner on sub-containers and items” box if you have files and folders in the selected folder).
Click OK when you are prompted for Windows security. - The name of the owner should have changed.
11 Now click OK in the property windows to exist.
Once you have taken possession of a file or folder, the next step is to grant permissions for that file/folder or item.
Expert Tip: This repair tool scans the repositories and replaces corrupt or missing files if none of these methods have worked. It works well in most cases where the problem is due to system corruption. This tool will also optimize your system to maximize performance. It can be downloaded by Clicking Here

CCNA, Web Developer, PC Troubleshooter
I am a computer enthusiast and a practicing IT Professional. I have years of experience behind me in computer programming, hardware troubleshooting and repair. I specialise in Web Development and Database Design. I also have a CCNA certification for Network Design and Troubleshooting.