Updated April 2024: Stop getting error messages and slow down your system with our optimization tool. Get it now at this link
- Download and install the repair tool here.
- Let it scan your computer.
- The tool will then repair your computer.
Some MapleStory 2 players report that they continue to log out with error code 10053. Most affected users reported that this behavior usually occurs in a dungeon.
After examining this particular problem, it turns out that there are different scenarios that can cause this error code. This mostly happens when your public IP address changes between sessions. This can be caused by a loss of Internet access or by restarting your modem/router when you are on a game server. To solve this problem, restart the game after restarting the Internet connection so your connection would be bound to your new IP address.
Configure VPN

- Go to VPNBook and select “Free VPN” in the header menu.
- Screenshot via VPNBook
- Select the US1 OpenVPN certificate package from the OpenVPN list and download it.
- Screenshot via VPNBook
- Open the zip file (you will need the extractor if you don’t have one click on the selected word to load WinRAR). Do not extract the files yet.
- Now browse to disk C and find the OpenVPN folder.
- This computer> Local Hard Drive (C :)> Programs> OpenVPN> config
- Select four files in the zip file and drag and drop them into the configuration folder. This should work like this:
Clear DNS cache
According to many affected users, this type of MapleStory 2 error is often caused by a mismatch with the Domain Name System (DNS). If an unacceptable range is assigned to your network device, this may affect the connection between your local MapleStory 2 installation and the game server.
April 2024 Update:
You can now prevent PC problems by using this tool, such as protecting you against file loss and malware. Additionally it is a great way to optimize your computer for maximum performance. The program fixes common errors that might occur on Windows systems with ease - no need for hours of troubleshooting when you have the perfect solution at your fingertips:
- Step 1 : Download PC Repair & Optimizer Tool (Windows 10, 8, 7, XP, Vista – Microsoft Gold Certified).
- Step 2 : Click “Start Scan” to find Windows registry issues that could be causing PC problems.
- Step 3 : Click “Repair All” to fix all issues.

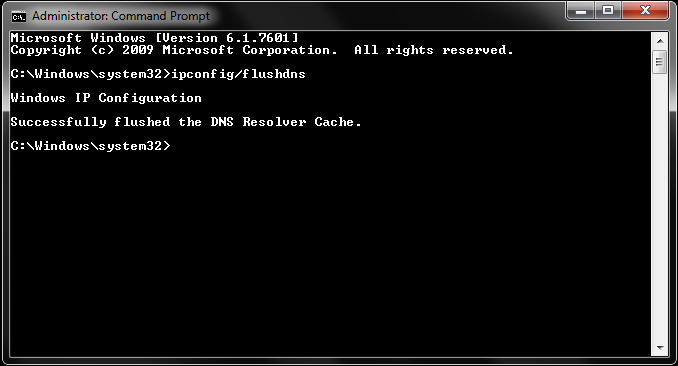
If the problem persists, you can solve it using the command line with elevated privileges to clear the current DNS cache. Several affected users, who had the same problem, confirmed that they have fixed the problem by clearing the current DNS cache.
Change DNS
If your DNS cleanup did not work in your case, it could be a bad DNS zone. In most cases this is reported when the standard DNS allocation method is used.
If this scenario is applicable and you think that you have encountered this problem due to DNS mismatch, you can solve this problem by switching to another set of domain name addresses (Google DNS or Open Level 3 beach) for public use.)
Several affected users have successfully solved this problem by changing the default DNS values in the “Network Connections” window.
How to change DNS settings on PC with Windows 10
- Access to the control panel
- Click on Network and Internet.
- Click the Network and Sharing Center.
- Go to the “Change adapter settings” section.
- Here you can see some network icons. Select the network you are currently connected to and right-click it. Select Properties.
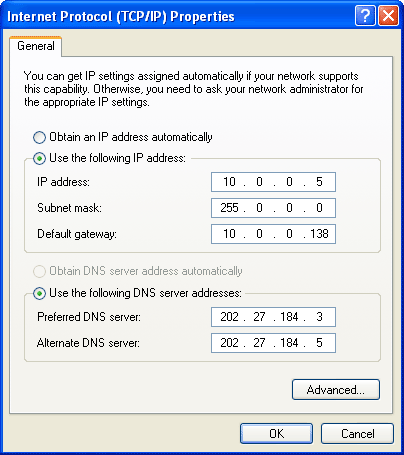
- Click on IPv4 and select Properties.
- If “Get DNS server address automatically” is selected, set the switch next to “Use the following DNS server addresses:”.
- Now enter the DNS addresses that you want to use.
- Click OK and close.
Now your DNS settings will be changed on your PC with Windows 10.
Temporary disable Windows antivirus
- Open the Windows Start menu.
- Log in to Windows security.
- Press Enter on your keyboard.
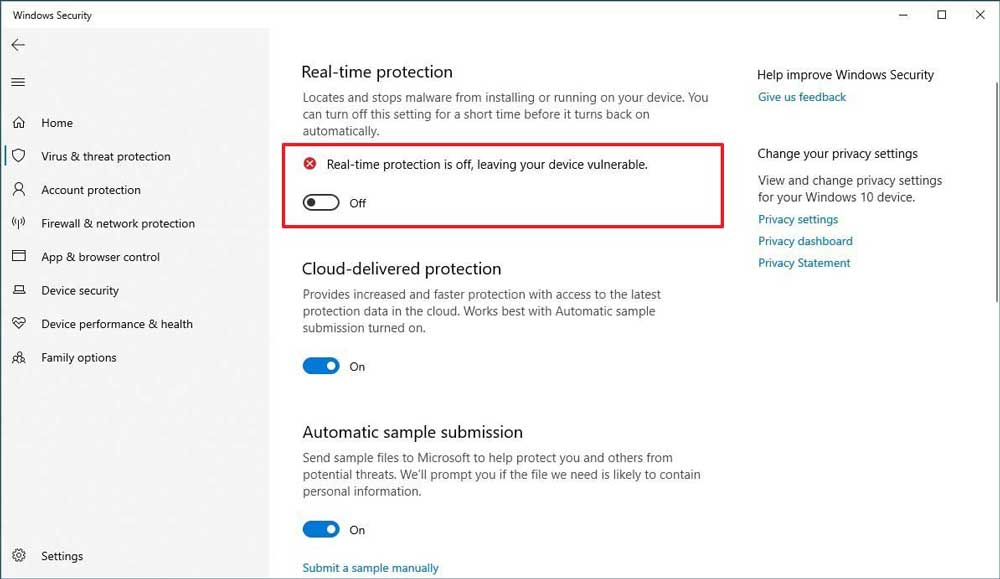
- On the left action bar click Protection against viruses and threats.
- Scroll down to Virus and Threat Protection settings and click Manage Settings.
- In the “Live protection” section, click the switch to temporarily disable Windows Protector antivirus.
- Click Yes to confirm the change when prompted.
- Check if the problem with the Acronis software has been resolved.
- Click the switch again to re-enable Windows Anti-Virus Defender.
- If you do not activate the protection in real time manually, it will automatically resume on the next computer reboot.
Expert Tip: This repair tool scans the repositories and replaces corrupt or missing files if none of these methods have worked. It works well in most cases where the problem is due to system corruption. This tool will also optimize your system to maximize performance. It can be downloaded by Clicking Here

CCNA, Web Developer, PC Troubleshooter
I am a computer enthusiast and a practicing IT Professional. I have years of experience behind me in computer programming, hardware troubleshooting and repair. I specialise in Web Development and Database Design. I also have a CCNA certification for Network Design and Troubleshooting.