Updated April 2024: Stop getting error messages and slow down your system with our optimization tool. Get it now at this link
- Download and install the repair tool here.
- Let it scan your computer.
- The tool will then repair your computer.
So, if you try to update the IP address of your computer from Windows 10 using the above commands, but you get an error message “You can’t contact your DHCP server”, you are at the right side of the site to fix this error.

This type of error indicates that the network card cannot communicate with the DHCP server, so it cannot free up new IP addresses. There could be several reasons for this. To fix this error, you can try to restore, update or reinstall the drivers for the network card. You can also run the built-in network adapter troubleshooter and start or restart the DHCP client service.
Check the network card settings
Step 1: Open the “Network Settings” or “Internet Connection” window using the following method: Open the “Run” dialog box, simultaneously pressing the key with the Windows logo + R keys, enter ncpa.cpl and press the “OK” button .
Step 2: Double-click the active network adapter, click “Properties” and find the Internet protocol version 4 (TCP / IPv4) in the list, select it and click “Properties”.
Step 3: Make sure the “Get IP address automatically” and “Get DNS server address automatically” options are selected.
Step 4: Click the “Advanced” button and make sure that DHCP is enabled.
Step 5: Repeat the steps above if you also or exclusively use IPv6.
Try to update the network drivers
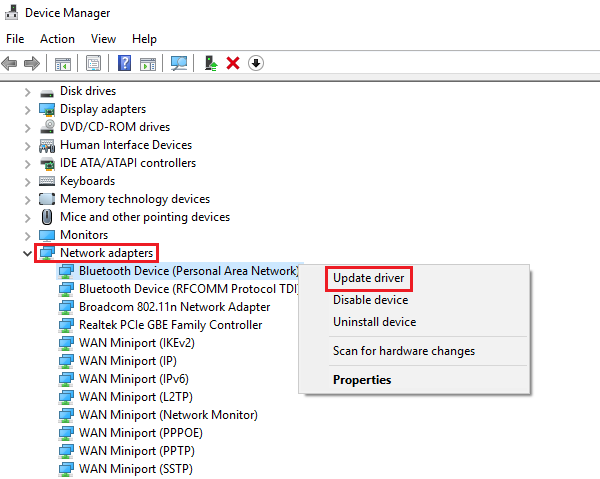
If going back to the previous version of the network card drivers did not help, you need to update them. To do this, you need to do the following:
- Press the Win + R keys to open the launch window. Then type the command “devmgmt.msc” and press Enter to open the Device Manager window.
- In the Device Manager you will see the list of drivers. From there, find and expand the Network Adapters.
- Then right-click on each of the network drivers and update them all.
- Reboot your computer and see if this helps to fix the BSOD bug.
April 2024 Update:
You can now prevent PC problems by using this tool, such as protecting you against file loss and malware. Additionally it is a great way to optimize your computer for maximum performance. The program fixes common errors that might occur on Windows systems with ease - no need for hours of troubleshooting when you have the perfect solution at your fingertips:
- Step 1 : Download PC Repair & Optimizer Tool (Windows 10, 8, 7, XP, Vista – Microsoft Gold Certified).
- Step 2 : Click “Start Scan” to find Windows registry issues that could be causing PC problems.
- Step 3 : Click “Repair All” to fix all issues.

Disable the driver associated with VirtualBox

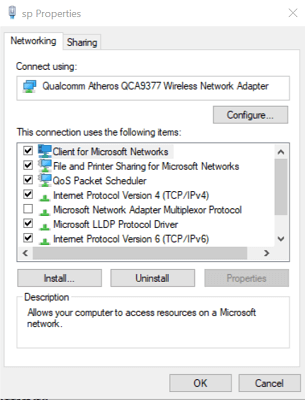
Step 1: Open the “Network Options” or “Internet Connection” window using the following method: Open the “Run” dialog box, simultaneously pressing the key with the Windows logo + R keys. Then enter ncpa.cpl and press OK.
Step 2: Double-click the active network adapter, then click “Properties” and find the VirtualBox Bridged Networking Driver entry in the list.
Step 3: Uncheck the box next to this entry and click OK.
Step 4: Reboot your computer to confirm the changes and see if the error repeats itself.
Reset the Networking Driver
There are cases when the latest version of the network driver has errors that can cause this problem. For this reason, you should reset this driver to the default driver provided by Windows.
- Right-click the network adapter you want to uninstall and select “Properties”.
- Click on the Driver tab and find the option to reset the driver.
- If this option is disabled, the device has not been updated recently because there are no backup files that remember the old driver. This also means that the last driver update is probably not the cause of your problem.
- If the click option is available, follow the on-screen instructions to continue the process.
- Reboot your computer.
Make sure that Windows 10 is still unable to contact your DHCP server.
Run the command from the command line
You can try running a simple command at the command line to solve the problem. This update will not harm your computer as it initiates a manual dynamic registration of DNS names and IP addresses configured on your computer and is actually used to fix network problems.
Step 1: Type cmd in the search box, go to the command line and select Run as administrator.
Step 2: Type this command: ipconfig / registerdns and press Enter to start it.
Step 3: Once the process is complete, close the command line and reboot the computer.
Now check if the error message “You cannot contact your DHCP server” appears.
Disable IPv6
If you have IPv6 enabled on your computer, it may cause this problem. Try turning it off to see if it causes the problem.
- Open the “Run” dialog box by simultaneously pressing the key with the Windows logo + the R key. Then type “ncpa.cpl” and press “OK”.
- When the Internet connection window opens, double-click the active network card.
- Click on Properties and find Internet Protocol version 6 in the list.
- Uncheck the box next to this entry and click OK.
- Reboot your computer.
Make sure that Windows 10 is still unable to contact your DHCP server.
Expert Tip: This repair tool scans the repositories and replaces corrupt or missing files if none of these methods have worked. It works well in most cases where the problem is due to system corruption. This tool will also optimize your system to maximize performance. It can be downloaded by Clicking Here

CCNA, Web Developer, PC Troubleshooter
I am a computer enthusiast and a practicing IT Professional. I have years of experience behind me in computer programming, hardware troubleshooting and repair. I specialise in Web Development and Database Design. I also have a CCNA certification for Network Design and Troubleshooting.