Updated April 2024: Stop getting error messages and slow down your system with our optimization tool. Get it now at this link
- Download and install the repair tool here.
- Let it scan your computer.
- The tool will then repair your computer.
Although sound problems sometimes cause sound failures, in most cases the software is to blame. For example, major updates to Windows 10 offer many new features, but they can also cause new problems. The fix may conflict with old sound drivers or with your sound card manufacturer’s software.
Reboot your PC
If sound is not output from your computer’s speakers or headphones, the problem may be caused by an application that controls the device and prevents other applications from using it. Before performing the other troubleshooting steps described in this document, reboot your computer and then check the sound to see if the problem has disappeared.
If the problem with the sound is not resolved, proceed to the next step.
Use Device Manager to fix sound problems in Windows 10
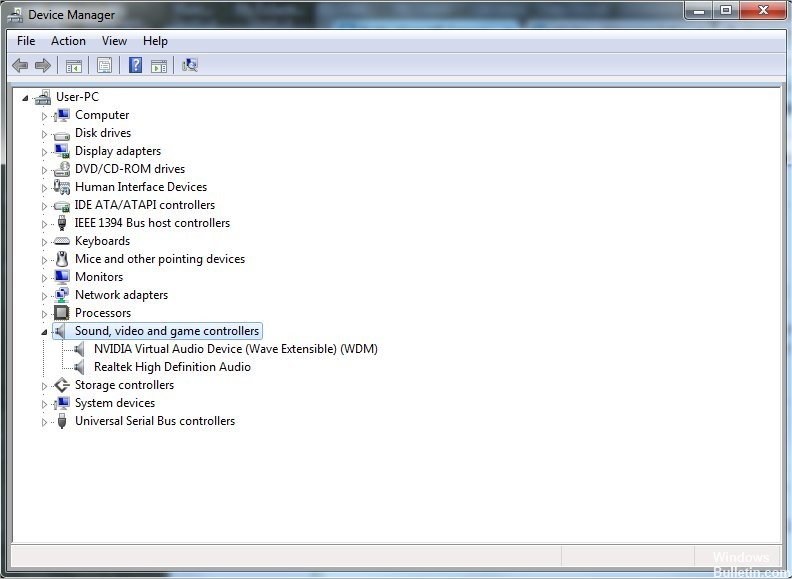
Another reason why your Windows 10 PC may be causing problems may be because of driver issues. Make sure that your sound card works correctly and works with updated drivers.
To fix your Windows 10 sound problems, just open Start and go to Device Manager. Open it and in the Device Manager list find your sound card, open it and click the Drivers tab.
Now select the Update Driver option. Windows should be able to go online and update your computer to the latest audio drivers. If not, you can find the drivers you need on your PC manufacturer’s website.
April 2024 Update:
You can now prevent PC problems by using this tool, such as protecting you against file loss and malware. Additionally it is a great way to optimize your computer for maximum performance. The program fixes common errors that might occur on Windows systems with ease - no need for hours of troubleshooting when you have the perfect solution at your fingertips:
- Step 1 : Download PC Repair & Optimizer Tool (Windows 10, 8, 7, XP, Vista – Microsoft Gold Certified).
- Step 2 : Click “Start Scan” to find Windows registry issues that could be causing PC problems.
- Step 3 : Click “Repair All” to fix all issues.

You may also want to try updating your player with the universal audio driver that comes with Windows. So –
Select “Update driver”> “Find software drivers on my computer”> “Allow selection from the list of drivers available on my computer”> “High definition audio device”> “Next”> “Install”.
Reset or reinstall the audio drivers
Drivers always had an unfortunate talent for creating problems. Windows 10 is no different. Because Windows 10 takes care of driver updates, sometimes your system has the wrong driver configuration.
In the early days of Windows 10 (especially after the Windows 7, 8, and 8.1 update cycles) driver updates frustrated many users. Since then, Microsoft has made significant improvements in the driver update process, and manufacturers are now deeply integrated into the Windows 10 ecosystem.
Thus, the new drivers are configured for Windows 10 rather than adapting an old driver for Windows 7, 8 or 8.1.
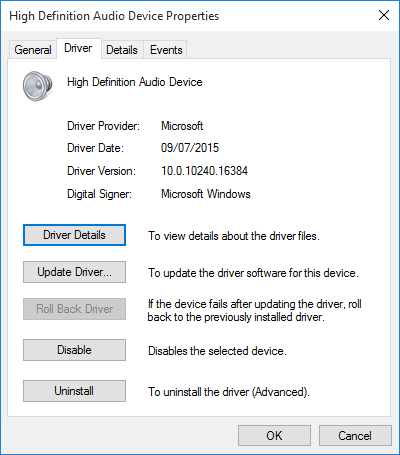
Windows 10 gives us several ways to get rid of a tedious driver. First, we can try to get it back to the last good configuration. Right-click Start, select Device Manager, right-click the audio driver, select Properties, and go to the Driver tab. Click on the “Reset Driver” option, if available, and Windows 10 will launch the process.
If you can’t reset the driver as in the image above, you will need to update or reinstall the driver. Perform a new installation if we have any problems with the audio drivers. This will remove the faulty driver during the process and instead give your system a good clean driver.
Before continuing uninstallation, make sure you have the new driver version installed from the manufacturer. You can download it directly from the hardware manufacturer’s website or, in some cases, from a third party vendor.
Use the Windows Troubleshooting Tool
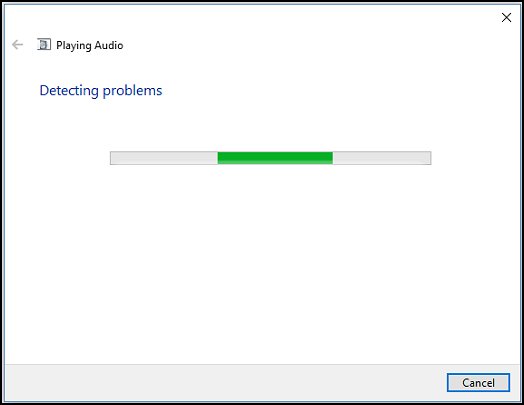
- Run the Windows Sound Troubleshooting Tool to automatically solve common problems with sound recording and playback on your computer.
- In Windows, enter the sound in the “Find and Fix” field or right-click the speaker icon in the system tray and select “Troubleshooting Sound Problems”.
- In the search results, select Find and fix sound problems or Find and fix sound recording problems.
- Click Next.
- Select the device you want to troubleshoot, and click Next.
- Wait for the Troubleshooting Tool to detect the problems and make changes (or suggest you make changes).
- When the troubleshooting is complete, the Troubleshooting page will complete and list all the problems detected and changes made to your computer.
- Click Close.
- If you see the recommended action, select “Apply this update” or “Skip this step” to check for other problems.
Check the sound. If the problem with the sound does not disappear, proceed to the next step.
Expert Tip: This repair tool scans the repositories and replaces corrupt or missing files if none of these methods have worked. It works well in most cases where the problem is due to system corruption. This tool will also optimize your system to maximize performance. It can be downloaded by Clicking Here

CCNA, Web Developer, PC Troubleshooter
I am a computer enthusiast and a practicing IT Professional. I have years of experience behind me in computer programming, hardware troubleshooting and repair. I specialise in Web Development and Database Design. I also have a CCNA certification for Network Design and Troubleshooting.