Updated April 2024: Stop getting error messages and slow down your system with our optimization tool. Get it now at this link
- Download and install the repair tool here.
- Let it scan your computer.
- The tool will then repair your computer.
Chromebooks officially do not support Windows, but that does not mean that you can’t run Windows on a Chromebook. We assure you that there are a number of alternatives for running Windows desktop programs on a Chromebook.
Google is constantly updating its Chrome OS with new features, but it has nothing to do with Windows, Mac, or even some Linux distributions. The idea of running Windows 10 on your Chromebook will therefore not give you peace of mind.
Even though Chromebooks come with a special BIOS designed for the Chrome OS, you can install Windows on many models of Chromebooks. We just hope that you are not afraid of these unofficial ways of running Windows.
However, if you don’t want to get your hands dirty, access to the Office suite may be a good alternative. We give you here the detailed steps for both options.
Will it work with your Chromebook?
You should only try to install Windows on a Chromebook if you know that your model is supported. You should also follow the instructions for your specific Chromebook model, as the steps are slightly different for different models.
If your Chromebook can be made compatible with Windows, congratulations. We recommend that you follow an installation guide such as the one on the Coolstar installation help page to ensure that you have set everything up correctly for your specific hardware model. However, the instructions on this site may be more detailed, so you will likely find information in this guide that is not available elsewhere.
We offer assistance by guiding you through the Windows installation process on an Acer C910 Chromebook codenamed YUNA. The process is similar for other Chromebook models, but some things – such as the position of the write protect screw on the motherboard – will be different.
April 2024 Update:
You can now prevent PC problems by using this tool, such as protecting you against file loss and malware. Additionally it is a great way to optimize your computer for maximum performance. The program fixes common errors that might occur on Windows systems with ease - no need for hours of troubleshooting when you have the perfect solution at your fingertips:
- Step 1 : Download PC Repair & Optimizer Tool (Windows 10, 8, 7, XP, Vista – Microsoft Gold Certified).
- Step 2 : Click “Start Scan” to find Windows registry issues that could be causing PC problems.
- Step 3 : Click “Repair All” to fix all issues.

Remove the Write-protect Screw

The Chromebook BIOS is locked by a special hardware feature that prevents you from changing it, called write protection. To disable this feature, you must open Chromebook, find the write-protect screw, and remove it. Some Chromebooks have a write protect switch instead of a write protect screw.
- Turn off the Chromebook, if it is not already turned off, do not put the Chromebook in standby mode, but turn it off completely.
- Turn the Chromebook over.
- Loosen all the bottom screws to remove the plastic plate and access the motherboard. Do not lose the screws.
- Locate the write-protection screw or write-protection switch. For more documentation on the screw of your Chromebook, please refer to the Internet with the model name and number of your
- Chromebook and the “write-protection screw”.
- The write-protection screw is visibly different from all other screws on the motherboard. The write-protection screw on our Chromebook was in dark gray, while the other screws on the motherboard were in light silver. Under the screw was light silver, while the other screws on the motherboard were bronze.
- Remove the write-protection screw and replace the bottom cover of the Chromebook. You can now write and change the BIOS of your Chromebook. Keep the write protect screw in a safe place if you want to protect your BIOS for writing later.
Enable USB Boot

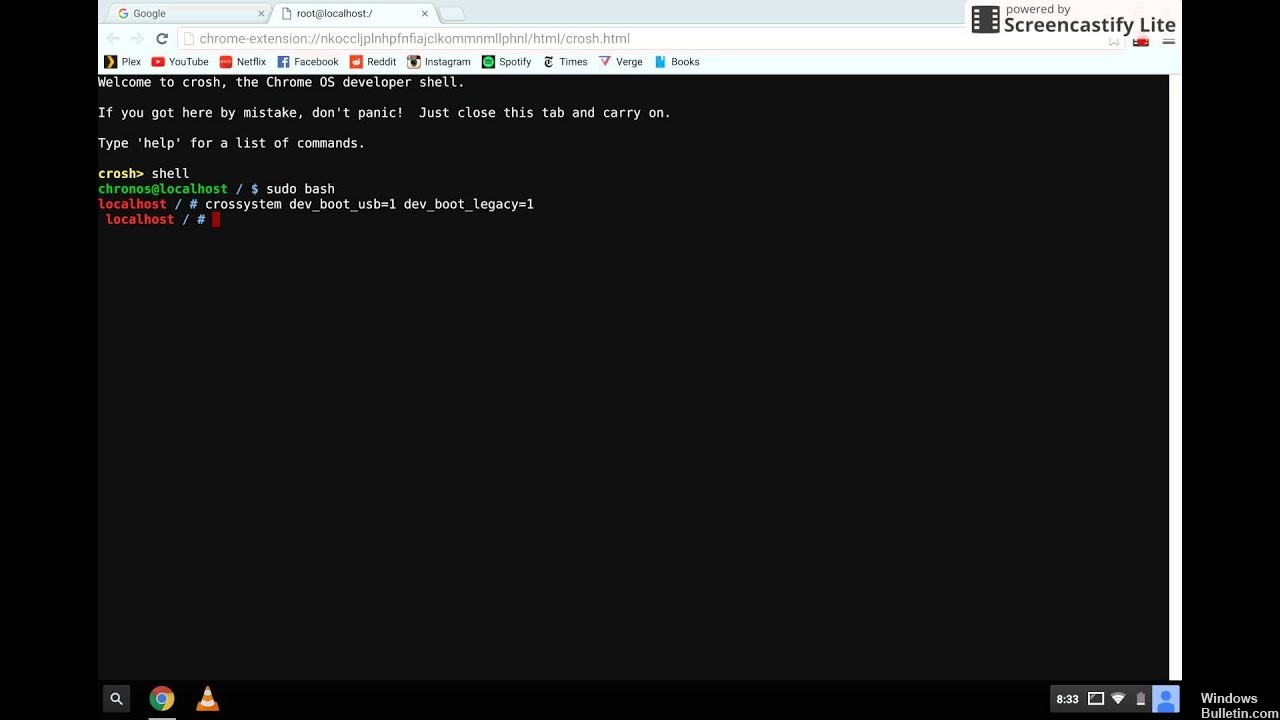
You can go to the ChromeOS installation the next time you turn on your device by pressing Ctrl + D, but we need to boot from a USB device, so we need to enable USB booting.
- Turn on your device and press Ctrl + D on the first boot screen to load ChromeOS.
- Press Ctrl + Alt + F2 on the ChromeOS login screen.
- Log in with the timer password.
- At the terminal prompt, type the following command and press Enter
- sudo crosssystemdev_boot_usb=1 dev_boot_legacy=1
- Turn off your device by entering: sudo poweroff
- Now, the BIOS screen is displayed on the ChromeOS at boot time instead.
Enable Developer Mode
Now, the “developer mode” should be activated on your Chromebook. Chromebooks are locked for security reasons and will only boot if the operating system is properly signed, after the operating system manipulation has been verified and users and applications have been prevented from modifying the Chrome operating system. In developer mode, you can disable all of these security features so that you have a laptop you can play with at your leisure.
When the developer mode is enabled, you can access a Linux terminal in Chrome OS and do whatever you want.
Using CrossOver

CrossOver from CodeWeavers is a software solution that allows you to run certain OS applications on other operating systems. Thanks to the latest update, which now includes running Windows applications on your Chromebook. Before you get angry, there are a few things you should be aware of before continuing. First of all, it is important to note that the version of Chrome OS is still in beta. You can try it, but it is not guaranteed to be error-free and easy to use for some time.
The second problem is that this download will not be available for everyone because of the requirements of the software. In particular, you can only run it on Intel-based Chromebooks and if you want to include Android devices or applications, they must be compatible with Android 5.x or higher. In addition, some features such as mouse lock (often used in FPS games) will not work.
The good news is that the software is currently in beta and can therefore be tried for free. Here’s what you need to do:
Step 1: Go to Google Play and choose to install CrossOver on Chrome OS Beta. This will install a new icon of two semicircles on your dashboard. When you click it, make sure it can access your media and files on your Chromebook.
Step 2: Make sure you have a copy of the application installation file in your download folder, even if it’s not currently running.
Step 3: When CrossOver starts, the easiest way to search for Windows software is to use the search bar at the top of the window and simply enter the name of the application you want to use. Both Quicken and DirectX applications work, so search for what you want.
Step 4: In many cases, you can confirm the software you want, and CrossOver will begin the installation process without any problems. In some cases, you will need to select the correct installation file from a list. So pay close attention to the file names, and be sure to select the file you want. You may also need to accept license agreements and other similar agreements at this time.
Step 5: Once the installation is complete, you should be able to start the installation directly. Note that large programs require a lot of space, which is not the case for all Chromebooks. Fortunately, there are ways to use Android applications on Chromebook and save space.
https://www.reddit.com/r/chromeos/comments/bel197/any_way_to_run_windows_10_minecraft_on_my/
Expert Tip: This repair tool scans the repositories and replaces corrupt or missing files if none of these methods have worked. It works well in most cases where the problem is due to system corruption. This tool will also optimize your system to maximize performance. It can be downloaded by Clicking Here

CCNA, Web Developer, PC Troubleshooter
I am a computer enthusiast and a practicing IT Professional. I have years of experience behind me in computer programming, hardware troubleshooting and repair. I specialise in Web Development and Database Design. I also have a CCNA certification for Network Design and Troubleshooting.