Updated April 2024: Stop getting error messages and slow down your system with our optimization tool. Get it now at this link
- Download and install the repair tool here.
- Let it scan your computer.
- The tool will then repair your computer.
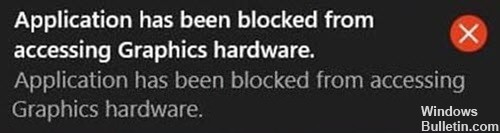
You are playing your favorite game in Windows and suddenly get an error message “Application is blocked from accessing the graphics hardware”. The same error can occur when running other software on your computer. What is the cause of this problem and how to fix it? This error usually occurs when you have incompatible display drivers installed on your device. However, there are several other reasons for this problem, which we will discuss in more detail. So, let’s start without further ado.
What causes this error?
The exact cause of the error is still unknown, but it is assumed that the problem is caused by the drivers. After a major operating system update, your graphics drivers may no longer be compatible with your version of Windows 10. This is especially true if you update your drivers manually rather than using the automatic update tool. Therefore, your graphics processing unit (GPU) gets stuck and does not respond to the graphics request sent by your system.
If your GPU does not respond within a given amount of time, Windows 10 aborts the attempt to start the application and displays the error message “The application cannot access the graphics hardware”. Another reason for this error message could be that there are too many visual effects or programs running in the background.
How to fix this error?
Update your graphics card driver
Windows 10 offers built-in tools to manage graphics card drivers, and you can use these to update your drivers with just a few clicks. Here’s how:
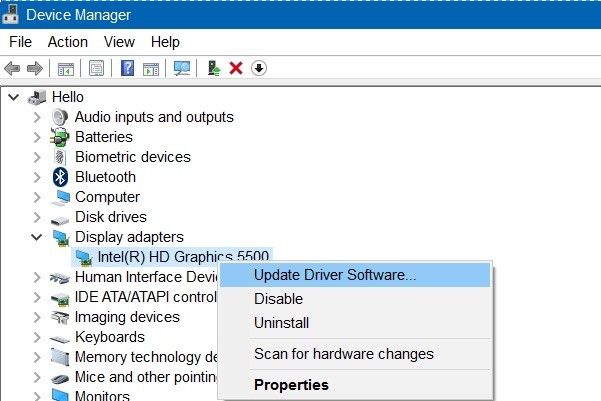
- Open the Start menu and type “device manager” into the search box.
- Select the “Device Manager” option from the results.
- Expand the “Display adapters” section.
- Right-click on your graphics card and select “Update Driver.”
- Choose the “Search automatically for updated driver software” option.
- Windows will now search for and install the latest drivers for your graphics card.
- Once the process is complete, restart your computer to ensure that the new drivers are properly installed.
Launch the application as an administrator
In order to run an application as an administrator on Windows 10, there are a few steps that must be followed.
- First, open the start menu and locate the app that you want to run as an administrator.
- Right-click on the app and select “Run as Administrator” from the drop-down menu.
- If you are prompted by User Account Control, click “Yes” to allow the app to make changes to your device.
- Once the app is open, you will be able to access all of the features and functions that are available to administrators.
- If you need to perform any tasks that require elevated privileges, you will be prompted for your password or other authentication methods.
- Once you have completed the task, you can close the app and continue using your device as normal.
These steps will ensure that you are able to take full advantage of the features and functions that are available to administrators on Windows 10.
April 2024 Update:
You can now prevent PC problems by using this tool, such as protecting you against file loss and malware. Additionally it is a great way to optimize your computer for maximum performance. The program fixes common errors that might occur on Windows systems with ease - no need for hours of troubleshooting when you have the perfect solution at your fingertips:
- Step 1 : Download PC Repair & Optimizer Tool (Windows 10, 8, 7, XP, Vista – Microsoft Gold Certified).
- Step 2 : Click “Start Scan” to find Windows registry issues that could be causing PC problems.
- Step 3 : Click “Repair All” to fix all issues.

Launch SFC scanner
- Open Command Prompt as an administrator. To do that, type cmd in the search bar, then press Ctrl + Shift + Enter.
- In the Command Prompt window, type the following command and press Enter: sfc /scannow
- This will start scanning for corrupt system files and repairing them. The scan can take some time, so please be patient.
- Once the scan is completed, restart your computer and check if the issue is resolved.
Perform DISM scan
A DISM scan is a helpful way to troubleshoot and repair Windows 10 issues. The scan can be used to fix corrupt system files, install updates, and restore damaged components. Here’s how to perform a DISM scan on Windows 10:
- Press the Windows key + S to open the search box.
- Type cmd into the search box.
- Right-click Command Prompt and select Run as administrator.
- Type dism /online /cleanup-image /restorehealth into the Command Prompt window and press Enter.
- The scan will take some time to complete, but once it’s finished, you should see a message that says “The operation completed successfully.” If you don’t, then you may need to try another option to fix your Windows 10 issues.
Reinstall videocard driver
It’s not uncommon for your graphics card driver to become outdated or corrupt. If you’re experiencing graphical glitches or your games are stuttering, you may need to reinstall your graphics card driver. Here’s how to do it on Windows 10:
- First, uninstall your current graphics card driver. You can do this from the Device Manager. Just expand the “Display adapters” section and right-click on your graphics card.
- Select “Uninstall device” and check the “Delete the driver software for this device” box. Confirm the uninstallation and restart your computer.
- Next, download the latest driver for your graphics card from the manufacturer’s website.
- Once downloaded, open the installer and follow the prompts. You may need to restart your computer again after the installation is finished.
- Now, open up your Control Panel and go to “Display.” Click on “Change display settings” and then “Advanced settings.”
- Under the “Adapter” tab, make sure that your new driver is selected. If not, click on the “Driver” button and select it from the list.
- Finally, click “Apply” and then “OK.” Your new driver should now be installed and working properly.
Run the hardware troubleshooter
If you’re having hardware issues on your Windows 10 computer, you can use the built-in Hardware and Devices troubleshooter to fix the problem. Here’s a step-by-step guide on how to run the troubleshooter:
- Go to Start > Settings > Update & Security > Troubleshoot.
- Under “Hardware and Devices,” click on the Run the troubleshooter button.
- Follow the prompts to complete the troubleshooting process.
If the Hardware and Devices troubleshooter doesn’t fix your problem, you may need to contact your computer’s manufacturer for further assistance.
Expert Tip: This repair tool scans the repositories and replaces corrupt or missing files if none of these methods have worked. It works well in most cases where the problem is due to system corruption. This tool will also optimize your system to maximize performance. It can be downloaded by Clicking Here
Frequently Asked Questions
How do I fix the application that has been blocked from accessing graphics hardware?
- Run your applications as an administrator.
- Configure the default graphics performance settings for the application.
- Adjust the application's compatibility mode settings.
- Update or reinstall the display drivers.
How do you update your Graphics driver?
- Press win+r (the "win" key is the key between the left Ctrl key and the Alt key).
- Type "devmgmt.
- Under "Display Adapters" right-click on the graphics card and select "Properties".
- Click on the "Drivers" tab.
- Click on the "Update Driver..." button.
- Click on "Automatically check for updated drivers".
How do I unblock an application in Windows 10?
- Launch Windows Defender Security Center from the Start menu, desktop, or taskbar.
- Click the Application and Browser Control button on the left side of the window.
- In the Application and File Checker section, click Disabled.
