Updated April 2024: Stop getting error messages and slow down your system with our optimization tool. Get it now at this link

High hard drive and CPU usage with Super Fetch is no stranger to Windows 10 users, and the latest update is making itself felt. Windows 10 is Microsoft’s latest operating system, and the company offers users security updates and new features.
SuperFetch is a process that has recently plagued Windows 10 users. The high CPU usage of “Service Host: Superfetch” consumes a lot of memory, and you can monitor it in Task Manager.
What causes the high HDD and CPU utilization when using Superfetch?

Superfetch can be compared to disk caching. The service helps to copy all memory of frequently used files to the system RAM. That’s why programs run much faster when using it. However, there is one serious problem with this service, which occurs if you do not have enough or the latest hardware to support caching. In this case, the Host Superfetch service causes a heavy load on your hard drive.
The Superfetch error is overlooked by many, but sometimes it can cause real alarm as the system responds to I/O service requests as best it can because of the high load on the hard disk. It then tends to empty RAM memory and starts copying new files recently accessed by the user.
Once the disk is full, the service automatically slows down, freeing up memory for other applications and reducing disk space on board.
How to solve the high hard disk/processor load problem of Super Fetch?
You can now prevent PC problems by using this tool, such as protecting you against file loss and malware. Additionally it is a great way to optimize your computer for maximum performance.
The program fixes common errors that might occur on Windows systems with ease - no need for hours of troubleshooting when you have the perfect solution at your fingertips:
April 2024 Update:

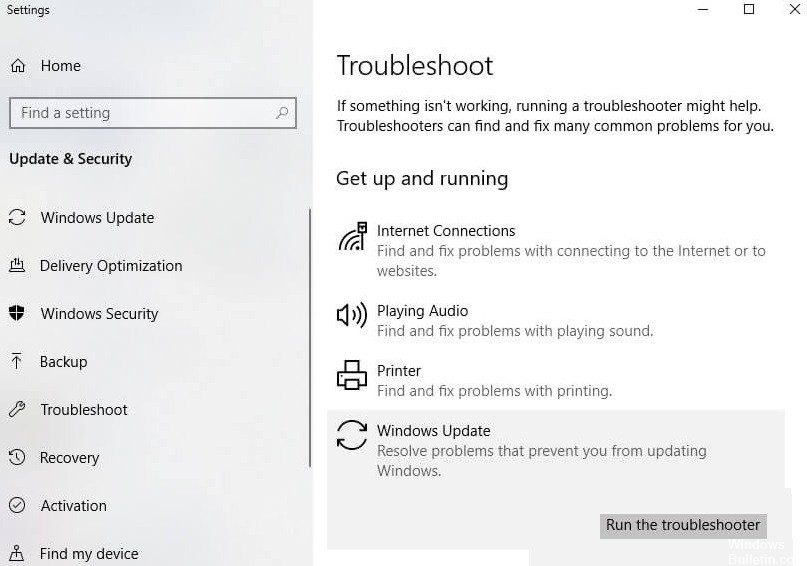
Launch the Windows Update Troubleshooting program
- Right-click on the Windows Start button and select Settings.
- Go to Update and Security
- Select Troubleshooting on the left side of the window.
- Scroll down and select Windows Update (right side).
- Click the Run Windows Update troubleshooting button.
Uninstall the latest Windows updates
- In the Windows search, type Control Panel and press Enter.
- Go to Programs -> Uninstall a program
- Click View Installed Updates on the left side of the window.
- Find the Microsoft Windows section and look for the most recently installed update.
- Right-click and select Uninstall.
- Reboot your computer.
Disable the Host SuperFetch service via Tools
- Press Win + R on your keyboard or use Windows search.
- Type services.MSC and press Enter.
- Sort by name
- Scroll down and find the SuperFetch or SysMain entry.
- Right-click and select Properties.
- Under Startup Type, select Disabled.
- Click Apply and OK.
- Restart your computer.
Expert Tip: This repair tool scans the repositories and replaces corrupt or missing files if none of these methods have worked. It works well in most cases where the problem is due to system corruption. This tool will also optimize your system to maximize performance. It can be downloaded by Clicking Here
Frequently Asked Questions
Can I disable Superfetch?
We do not recommend disabling Superfetch unless it is a fix for the potential problems mentioned above. Most users should leave Superfetch on, as it has a positive effect on overall performance. If you are unsure, try turning it off. If you don't see an improvement, turn it back on.
What can I do about very high CPU load?
- Reboot the system.
- Stop or restart the processes.
- Update the drivers.
- Check for malware.
- Power options.
- Find specific instructions online.
- Reinstall Windows.
Why is my CPU usage suddenly so high?
There are many reasons for high CPU utilization - some of them surprising. The slow processing speed may be caused by an anti-virus program you're using or a virus that that program needs to stop. Try running multiple antivirus scans or manually removing the virus.
