Updated April 2024: Stop getting error messages and slow down your system with our optimization tool. Get it now at this link
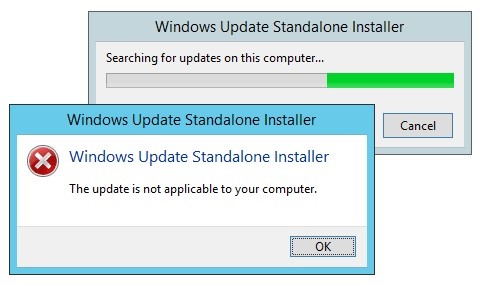
Installing Windows Update using the offline (or “offline”) installer is a very convenient process because it gives users choices, download and installation times, etc. However, when installing the latest Windows update, you may get the message “Update not applicable to your computer”. This problem causes the update process to stop on your system.
What causes the “Update not applicable to your computer” message?
In general, the error can be caused by an unsuitable update package, an already installed update, a problem with Windows Updater, an uninstalled update, corrupt system files, etc.
Are you also encountering this problem? If so, you can learn how to fix the error here.
How to fix the “This update is not suitable for your computer” error message?
You can now prevent PC problems by using this tool, such as protecting you against file loss and malware. Additionally it is a great way to optimize your computer for maximum performance.
The program fixes common errors that might occur on Windows systems with ease - no need for hours of troubleshooting when you have the perfect solution at your fingertips:
April 2024 Update:

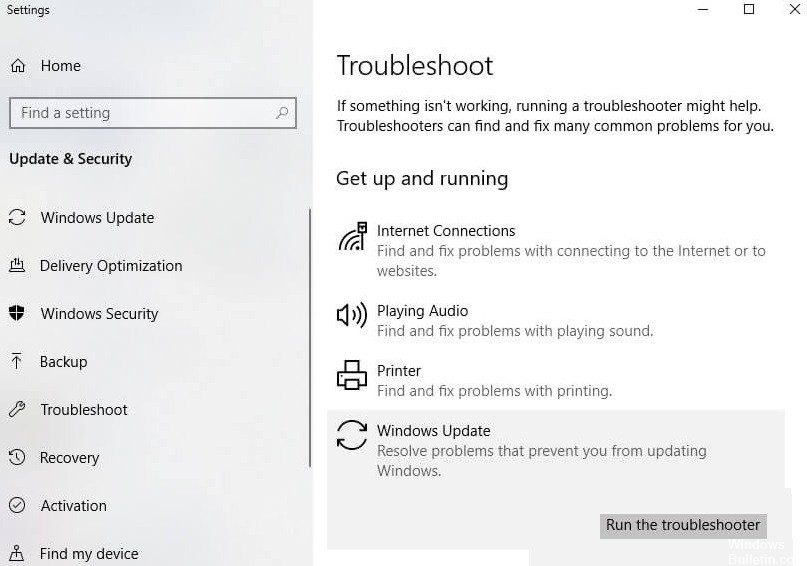
Launch the Windows Update troubleshooter
- Open Cortana and type “troubleshooter” in the search box.
- Select Troubleshooter to open the window.
- Click the Troubleshoot Windows Update option to open the window.
- Click on Advanced and select Apply repairs automatically if not.
- Select Run as administrator and click Next to start Windows Update scanning and repair.
Running the DISM and SFC tools from the command line
- Press the Windows + X key to open the Win + X menu.
- Now select Command Prompt (Admin) from the list.
- If Command Prompt is not available, you can also use PowerShell (Admin).
- Then type DISM.exe /Online /Cleanup-Image /RestoreHealth /Source:C:RepairSourceWindows /LimitAccess at the command prompt and press Return. The scan can take anywhere from five to ten minutes.
- When DISM has finished, type sfc /scannow at the command prompt and press Return.
- Close the command line and restart Windows after the SFC scan is complete.
Using System Restore
- Press the Windows + S keys and type System Restore.
- In the list of results, select Create a restore point.
- Now click System Restore.
- The system restore will now begin. Click Next to continue.
- If available, select the Show other restore points option.
- Now select the desired restore point from the list and click Next.
- Follow the instructions on the screen to complete the recovery process.
Change the locale of your system
- Press the Windows + S key and type Control Panel. Now select Control Panel from the list.
- When the Control Panel opens, go to the Region section.
- Make sure that the format is set to English (US).
- Now go to the Administration tab and click on Change System Locale.
- Set the Current System Locale to English (United States) and save the changes.
Check the update history
- Type Show Installed Updates in the Cortana search box.
- Select Show Installed Updates in the Cortana list to open the window.
- This will give you a list of Windows updates to date. From here, you can check if an update has already been added to Windows.
- You can also check the history of updates in the Settings app. Type “Update History” in the Cortana search box and select Check for Updates to open the window.
- Tap Update history to open a list of Windows updates.
Expert Tip: This repair tool scans the repositories and replaces corrupt or missing files if none of these methods have worked. It works well in most cases where the problem is due to system corruption. This tool will also optimize your system to maximize performance. It can be downloaded by Clicking Here
Frequently Asked Questions
How do I resolve 'this update is not applicable to your computer' error message?
- Check if the service pack matches your version of Windows.
- Check whether the service pack matches the Windows processor architecture.
- Check the update history.
- Run the Windows Update troubleshooter.
- Update Windows 10 with the latest KB update.
How do I fix a Windows 10 update error?
- Make sure you have enough memory on your device.
- Run Windows Update several times.
- Check for third-party drivers and download any updates.
- Disable any additional hardware.
- Check the Device Manager for errors.
- Uninstall third-party security programs.
- Fix the hard drive errors.
- Perform a clean Windows reboot.
What should I do if Windows Update keeps crashing?
- Run the Windows Update Troubleshooter.
- Restart the services related to Windows Update.
- Run the System File Checker (SFC).
- Run the DISM command.
- Temporarily disable your antivirus program.
- Restore Windows 10 from a backup.
Why did the Windows update fail?
If you don't have enough free space on your computer to perform the Windows 10 update, the update will stop and Windows will report that the update failed. If you free up some memory, this is usually not a problem.
