Updated April 2024: Stop getting error messages and slow down your system with our optimization tool. Get it now at this link

If you want to test another operating system on your current computer, virtualization is what you need. There is a lot of virtualization-based software on the market. VirtualBox by Oracle is one such virtualization software available for free.
You can install it on the host operating system, create a new virtual machine, and then install the guest operating system. However, sometimes you get an error message saying that VT-X/AMD-V hardware acceleration is not available on your system. In this article, we’ll look at how to fix this error.
What causes the message “VT-X/AMD-V hardware acceleration is not available in your system” error?

VT-x/AMD-V is disabled in the BIOS: Another reason for this error message may be that the virtualization technology used by your processor is disabled in the BIOS.
VT-x/AMD-V has been disabled by Hyper-V: Hyper-V is Microsoft’s proprietary virtualization technology. In recent versions of Windows, Hyper-V is automatically enabled and VT-x/AMD-V is disabled to avoid conflicts. However, Hyper-V does not work well with virtual machines.
Your processor does not support VT-x/AMD-V: Some older processors do not support Intel VT-x or AMD-V. If your computer does not support virtualization technology, you will not be able to bypass or fix the error message.
How to resolve the ‘VT-X/AMD-V hardware acceleration not available on your system’ error message?
You can now prevent PC problems by using this tool, such as protecting you against file loss and malware. Additionally it is a great way to optimize your computer for maximum performance.
The program fixes common errors that might occur on Windows systems with ease - no need for hours of troubleshooting when you have the perfect solution at your fingertips:
April 2024 Update:

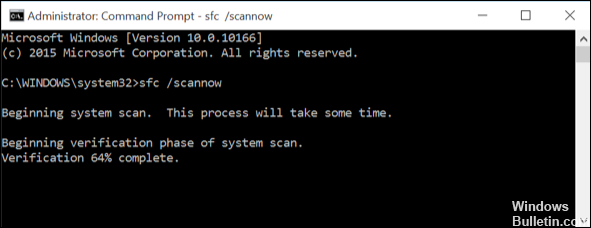
Perform an SFC scan
- Open the extended command line again, type the command sfc /scannow and press Enter.
- This tool will then scan and restore corrupted system files.
- This process may take some time; make sure it is complete.
Enable VT-x/AMD-V in the BIOS
- Restart the computer and press Delete or F2 when the home screen appears to access the BIOS.
- Go to the Advanced tab, select the Intel Virtualization Technology option and change it to Enabled using the arrow keys.
- Press F10 to save your changes and exit BIOS. Your computer will restart after that.
Disabling Hyper-V
- Press Win + R to open the Run dialog box, type OptionalFeatures.exe and press Enter.
- In the Windows Features window, scroll down to find the Hyper-V option. If enabled, uncheck the box for Hyper-V, including its suboptions.
- Click OK to save your changes.
- Type cmd in the search box, right-click Command Prompt, and select Run as administrator.
- At the extended command prompt, type the following command and press Enter.
bcdedit /set hypervisorlaunchtype off - Open the Local Group Policy Editor window by running the gpedit.MSC command, and then find the following path in the left navigation pane:
Computer Configuration -> Administrative Templates -> System -> Device Guard. - Double-click the Enable virtualization-based security option and set it to Disabled, then click OK to save your changes.
Expert Tip: This repair tool scans the repositories and replaces corrupt or missing files if none of these methods have worked. It works well in most cases where the problem is due to system corruption. This tool will also optimize your system to maximize performance. It can be downloaded by Clicking Here
Frequently Asked Questions
How can I fix the fact that AMD Vt-x hardware acceleration is not available?
- Press F2 when you start BIOS setup.
- Go to the "Advanced Mode" tab and select the "CPU Configuration" option.
- Scroll down to "Intel Virtualization Technology" and change [Disabled]->[Enabled].
How do I enable AMD VT-x hardware acceleration?
Press F2 when you start BIOS setup. Press the right arrow key to go to the Advanced tab, select Virtualization Technology, and press Enter. Select Enabled and press Enter. Press F10, select Yes and press Enter to save your changes and restart Windows.
How do I make Vt-X available?
- Disable Hyper-V virtualization.
- Enable nested virtualization in the Avast settings menu.
- Disable Windows Defender kernel isolation.
- Enable VT-X in your BIOS settings.


