Updated April 2024: Stop getting error messages and slow down your system with our optimization tool. Get it now at this link
- Download and install the repair tool here.
- Let it scan your computer.
- The tool will then repair your computer.
You may get an error code 52 in the driver manager or DXDiag telling you that Windows can’t validate the digital signatures for a particular hardware component. You won’t be able to update any of the drivers for that component. It may even cause the computer to malfunction.
Some users begin experiencing this problem when they install a specific update, and it seems to be related to a driver issue. They suggest running the troubleshooting tool or updating the drivers manually if you’re having trouble.
However, if you’ve ever experienced problems with drivers before, then you’ll know that the methods listed above rarely fix the problem, but luckily, we have a few alternatives that might just get the job done. First off, try restarting your computer and see if that helps. Next, check out the third method below, and finally, if none of those options worked, you may have to resort to the other option.
What does error code 52 mean?
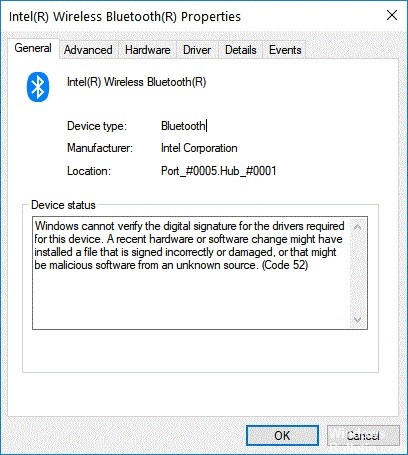
Code 52 errors are often caused by a faulty driver or hardware component. They occur when Windows cannot properly communicate with the device, causing it to malfunction. If you see this code, there is no need to panic; however, you do need to make sure that you install the proper drivers and update your system accordingly.
If you are having trouble identifying what type of driver is causing the issue, try downloading and running a third-party tool. This tool scans your PC and identifies problematic drivers automatically.
What exactly is a driver’s digital signature?
Device Drivers are software programs that allow computers to communicate with hardware components such as printers, scanners, modems, cameras, etc. They are essential for most PCs and laptops to function correctly. In fact, without device drivers, it would be impossible to use many standard computer peripherals.
To make sure that the driver you download works correctly, Microsoft requires that every driver package include a digital signature. This ensures that the files match what was uploaded to the server and that no one tampered with the file during transit.
The problem is that small businesses often don’t have the resources necessary to verify each driver. So how does Microsoft know that the driver you’re downloading isn’t malicious? Simple — they sign it themselves.
This process is called “driver signing.” If you’ve downloaded a driver package from Microsoft, you already had it digitally signed. But did you realize it? Did you even notice? Probably not.
In fact, according to a recent study conducted by the Ponemon Institute, only 32% of organizations have verified their drivers. And of those that have, only 11% check the signatures regularly.
So why aren’t we checking our drivers? It’s because there’s nothing to stop someone from taking a legitimate driver package and modifying it to contain malware. That’s where the problem lies. Because once a malicious driver is installed on a PC, it could compromise the entire system.
April 2024 Update:
You can now prevent PC problems by using this tool, such as protecting you against file loss and malware. Additionally it is a great way to optimize your computer for maximum performance. The program fixes common errors that might occur on Windows systems with ease - no need for hours of troubleshooting when you have the perfect solution at your fingertips:
- Step 1 : Download PC Repair & Optimizer Tool (Windows 10, 8, 7, XP, Vista – Microsoft Gold Certified).
- Step 2 : Click “Start Scan” to find Windows registry issues that could be causing PC problems.
- Step 3 : Click “Repair All” to fix all issues.

Why is it a bad idea to disable driver signature enforcement?
Driver signature enforcement is a security feature built into Windows 10 to make sure that all installed drivers are legitimate and safe. If you enable it, Windows will check whether the driver matches the version of the operating system and hardware components. If there is a mismatch, it will notify you. You can choose to ignore the warning or install the driver anyway.
Disabling this feature could cause severe issues with your computer. For example, it might cause your PC to malfunction. Disabling the feature prevents Windows 10 from updating the System Files. These files contain information about how the OS works. Without them being updated, some parts of the system might become incompatible with each other. This includes device drivers. Device drivers are pieces of code that control your computer peripherals like printers, scanners, etc. They are essential for your computer to function correctly.
If you decide to turn off driver signature enforcement, you’ll lose access to newer versions of the drivers. Older devices won’t work anymore either. Drivers are usually distributed in separate packages named.inf files. When you update the drivers, Windows checks whether the package is signed. Signed packages are digitally signed. By signing them, Microsoft ensures that the package hasn’t been tampered with. Unsigned packages aren’t checked for authenticity. As a result, you might end up installing malware.
You can use Group Policy Editor to disable the feature. To do this, open the program and navigate to Computer Configuration\Administrative Templates\Windows Components\Windows Update. Double-click on Driver Signing Enforcement. Change the value to Disabled. Click OK. Restart your computer.
How to resolve error code 52?
Run a system restore
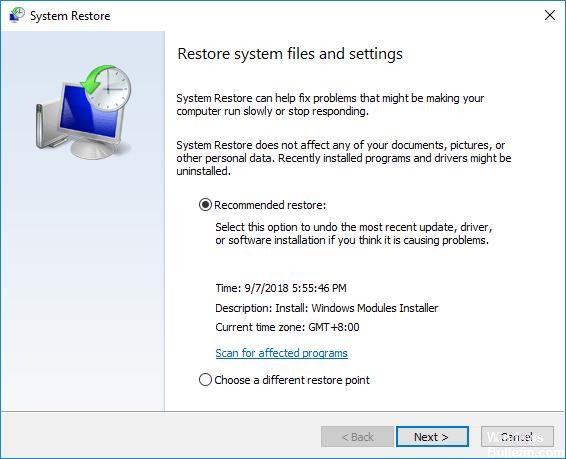
Press Windows+R keys together to open Runbox. Type “sysdm.cpl” into the box and press OK. On the System Protection tab, click Next and select a previous date/time. Then click Next again and select a different restore point. Finally, click Finish. If you are prompted about whether you want to restart the computer, click Yes. When the computer restarts, check if the problem is resolved.
If you don’t see the System Protection tab, it might mean there are no restore points installed on the PC. You’ll need to install one manually. Locate and uninstall the following programs: Microsoft Backup Client Tools and Microsoft System Image Recovery Toolkit. Reboot the computer and try opening sysdm.cpl once again.
You need to reset your BIOS
The next thing you want to do is reset your BIOS settings. This is done by selecting a specific option under UEFI Firmware Settings. If you are unsure what to choose, refer to your motherboard manual.
In most cases, the following instructions will work:
1. Select UEFI Firmware Settings from the boot menu.
2. UnderAdvancedoptions, selectResetthe system.
3. A warning message will pop asking whether you wish to perform a hard shutdown. Choose Yes and press enter.
4. When prompted, enter the administrator password.
5. You will see a brief countdown and a screen indicating that the system has been successfully reset.
Launch SFC scanner
1. In the Search box, type Command prompt and click on Run as Administrator.
2. After Command Prompt starts, enter the following: sfc /scannow
3. Press Enter button, and the System File Checker process will now start.
4. Because the repair process can take some time, wait patiently while it finishes and don’t close the Window.
5. Once the scanning gets completed, you’ll see a notification stating, “The operation completed successfully.” Restart your PC and try opening Windows again.
Make sure the driver is downloaded and installed
1. The next step is to download the driver you want to use to fix the problem on your computer.
2. Once you’ve downloaded the file, double-click it to begin installing the driver.
3. When prompted, follow the on-screen directions to finish the installation process successfully.
4. After the update is complete, restart your device.
Uninstall Problematic devices
If you’re having trouble uninstalling some software installed on your computer, try this method. This method does require a little work, but it works every single time.
1. Press the Windows key + R keys on your keyboard to open the Run box. Type “devmgmt.MSC” and press OK. If there are multiple entries under Device Manager, pick the one named Computer Management.
2. Right-click on the yellow exclamation marks next to the listed devices and choose Uninstall. You’ll see a list of applications associated with the device. Click Yes/OK to confirm.
3. Reboot your computer to ensure that everything is working correctly.
The Secure Boot feature should be disabled
If you want to turn off Windows 10’s Secure Boot feature, you’ll need administrative access. You’ve got three options here.
Use an Administrator Account
To disable Secure Boot, you’ll have to log into Windows with an admin account. This option works best if you already know how to use an admin account because it requires some additional steps. If you don’t have an admin account, you won’t be able to perform this step.
Run Setup As An Admin
You can run the setup as an admin without logging into Windows. However, you’re still required to have an admin account. You can do this by opening the Start menu and typing cmd into the Search box. Then press Enter. Type “cmd”, hit Enter again, type “run as /user:” and hit Enter once more. In the command prompt window that appears, type “setup.” Hit Enter. When prompted, enter an admin password. Once complete, restart your computer.
Create A New User And Enable Them To Log Into Windows With An Admin Account
This method is probably the easiest way to disable Secure Boot. First, create a new user account. Next, enable that user to log into Windows with admin privileges. Finally, delete the original user account.
Once you’ve done those things, reboot your computer. You’ll now be logged into Windows with an admin profile. From there, you can follow the instructions above to disable Secure Boot.
Expert Tip: This repair tool scans the repositories and replaces corrupt or missing files if none of these methods have worked. It works well in most cases where the problem is due to system corruption. This tool will also optimize your system to maximize performance. It can be downloaded by Clicking Here
Frequently Asked Questions
Is there a way to get rid of error code 52?
To fix Windows cannot verify digital signature (code 52) error in Windows 11/10, you can take the following steps: Download the driver from the manufacturer's website. Remove the Top USB filter and Bottom USB filter entries. Disable forced driver signing.
What should I do if I receive error code 52 in Windows 10?
- Go to Settings and select System.
- Then click on Troubleshooting.
- Go to Advanced Troubleshooting.
- Perform audio playback troubleshooting.
- Restart your computer and check the results.
How do I resolve Intel HD graphics error code 52?
Error code 52 is a problem with the digital signature of the Intel graphics driver and the operating system. We recommend manually installing the latest graphics driver to resolve this issue.
