Updated April 2024: Stop getting error messages and slow down your system with our optimization tool. Get it now at this link
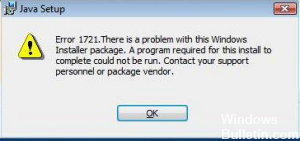
Windows Installer Error 1721 is similar to errors that occur when a user tries to install Java or other applications.
This error occurs when the Error 1721 message appears on the screen. The error means that there is a problem with the Windows Installer package, and the program required for installation cannot be deployed. To correct the error, contact the package manufacturer or support.
It is the PC’s inability to read the programs or files needed to install the program that is at fault here. As a result, the installation process slows down or does not start at all. To eliminate this error, you need to solve the problem that is causing it and preventing the installation process of various applications and programs. Problems with the operating system must also be detected and eliminated.
What is the cause of the Java error 1721?

Unfortunately, there is no fixed reason why this error occurs. Perhaps the Windows installer needs to be registered and disabled, the Windows installer contains corrupted files, a newer version of the Windows installer is required, or the registry needs to be cleaned with a registry cleaner.
To fix the error, you need to cover as many bases as possible, which you can do below:
How to repair the Java error 1721?
You can now prevent PC problems by using this tool, such as protecting you against file loss and malware. Additionally it is a great way to optimize your computer for maximum performance.
The program fixes common errors that might occur on Windows systems with ease - no need for hours of troubleshooting when you have the perfect solution at your fingertips:
April 2024 Update:

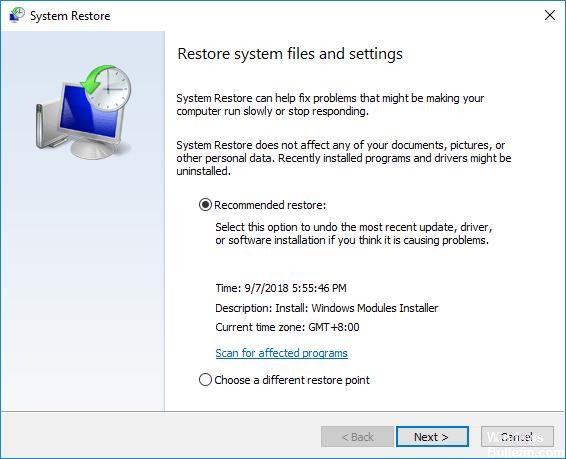
Perform a system restore
- Click the Windows icon.
- Type Create a restore point and click on it
- In the System Properties window, click System Restore.
- Select a restore point for your computer
- Click Search for affected apps to find apps you no longer need.
- Click Next
- On the System Restore window, click Next.
- Click Finish.
Start the SFC scan
- Click the Windows icon.
- Type cmd, right-click and select Run as administrator.
- In the prompt window, type sfc/scannow and press Enter.
- This scan will take some time, so please be patient.
Uninstalling programs
- Go to Settings.
- Click on Applications
- Tap on Applications and features.
- Select the apps that are no longer in use.
- Highlight those apps and tap Uninstall.
Cleaning the disk
- Click the Windows icon.
- Type Disk Cleanup and click on the search result.
- Select the drive to clean and click OK.
- Under Files to delete, click the file you want to delete and click OK.
- If you need to clear files, click Clear system files and then click OK.
Expert Tip: This repair tool scans the repositories and replaces corrupt or missing files if none of these methods have worked. It works well in most cases where the problem is due to system corruption. This tool will also optimize your system to maximize performance. It can be downloaded by Clicking Here
Frequently Asked Questions
How do I restore the Windows installation package?
- Reboot your computer.
- Update Windows.
- Update your Windows applications.
- Run the Windows troubleshooter.
- Repair your application.
- Reboot the application.
- Reinstall the application.
- Disable some applications at startup.
How to fix Java error 1721?
- Stop conflicting background processes.
- Disable the installation link using the registry editor.
- Restart the Windows installer.
- Run a system file check (SFC) and DISM scan.
- Troubleshoot the Windows Store and Windows Update application.
- Perform a manual reset of Windows Update components.
How do I fix the Java installation error?
- Once you see error 1721, close the installer.
- Find and launch the Java Control Panel.
- Disable the Enable Java content in your browser option.
- Reinstall Java and re-enable Java content in the browser.
How do I disable the Java installer?
- Open the Windows Start menu.
- In the search box, type Services.
- In the Services window that opens, scroll down and find Windows Installer.
- Select Windows Installer, right-click and select Properties.
- Click the Startup Type drop-down list and select Disabled.
- Click Apply, and then click OK.
