Updated April 2024: Stop getting error messages and slow down your system with our optimization tool. Get it now at this link
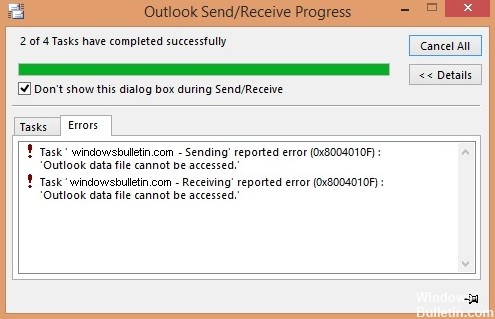
Recently, many people have reported the error “Cannot access Outlook data file” when using Outlook. This is an important issue, and we’ll look at it today.
How to fix Outlook data file error on Windows 10? You can easily fix this problem by creating a new Outlook profile. If that doesn’t solve the problem, use the Repair option or create a new pst file.
For more information, see the following instructions.
What is the cause of the “Cannot access Outlook data file” message?

- Firewall settings
- OST file is corrupt
- Damaged Outlook program files
- Insufficient read/write permissions
- No Internet or unreliable network connection
- Invalid configuration or corrupt Outlook profile
- Sending/receiving e-mail through a shared mailbox
- Changing the location of an OST file on your computer
- The primary account is not linked to the primary account’s OST file
- A copy of an old OST file used by a previous version of Outlook after an upgrade
How to solve the “Cannot access Outlook data file” problem?
You can now prevent PC problems by using this tool, such as protecting you against file loss and malware. Additionally it is a great way to optimize your computer for maximum performance.
The program fixes common errors that might occur on Windows systems with ease - no need for hours of troubleshooting when you have the perfect solution at your fingertips:
April 2024 Update:


Creating a new Outlook profile
- Open the Control Panel and click on the Mail option.
- Select the View Profiles button to view your profiles.
- On the next screen, click Add to add a new profile.
- Enter a name for the new profile in the Profile Name field and click OK to save the profile.
- The Email Setup Wizard appears. Select Manual Setup or Advanced Server Types and click Next to set up the e-mail account in Outlook.
- Select the type of email account and click Next at the bottom.
- If you have POP3 or IMAP data for your email account, select this option and then you can configure the account settings manually.
- On the next screen, enter your email account information.
- When finished, select the Existing Outlook Data File option under Deliver New Messages and click the Browse button.
- Navigate to the path to the Outlook data file you marked earlier and select that file.
- Exit the email account setup wizard.
- Go back to your mailbox, select the profile you just created under Always use this profile, and click OK. This will make your new profile the default email profile for Outlook.
Restore Outlook using the restore tool
- Open the Settings app.
- On the next screen, select Applications.
- Scroll down the list of applications until you find Microsoft 365 or Microsoft Office.
- Click the Office entry and select Edit.
- Select Yes when Windows asks you for certain permissions.
- The updater asks you how you want to restore Outlook and other Office applications. Select Quick Fix and see if that solves the problem.
- If it doesn’t, select Online Repair to fully restore the applications.
Changing your email delivery location
- Open the Start menu and launch Outlook.
- Click the File tab at the top of the screen.
- Select About from the list of options on the left sidebar.
- Then click Account Settings in the right sidebar and select Account Settings again.
- By default, you are on the Email tab. Switch to the Data Files tab and click Add to add a new data file.
- Outlook will ask you where you want to save the file. Select a location, enter a file name, and click OK to save the file.
- Outlook will always use the old data file to save messages. Change this by setting the new data file as the default data file.
- Select the file you just created from the list and click Set Default at the top.
Expert Tip: This repair tool scans the repositories and replaces corrupt or missing files if none of these methods have worked. It works well in most cases where the problem is due to system corruption. This tool will also optimize your system to maximize performance. It can be downloaded by Clicking Here
Frequently Asked Questions
What does “Cannot access Outlook data file” mean?
0x8004010F: "Cannot access Outlook data file" is an Outlook sending/receiving an error that usually occurs due to a corrupt Outlook profile or inaccessible Outlook data files (OST or PST). Error 0x8004010F appears when sending or receiving email in Microsoft Outlook or Outlook Express.
How do I recover an Outlook data file?
- Exit Outlook and navigate to one of the following file locations:
Outlook 2019: C:\Program Files (x86)\Microsoft Office\root\Office16.
Outlook 2016: C:\Program Files (x86)\Microsoft Office\root\Office16
Outlook 2013: C:\Program Files (x86)\Microsoft Office15
Outlook 2010: C:\Program Files (x86)\Microsoft Office\Office14
Outlook 2007: C:\Program Files (x86)\Microsoft OfficeOffice12 - Open SCANPST.
- Select Browse to select the Outlook data file you want to scan.
- Select Start to start scanning.
- If errors are found during scanning, select Repair to start the error correction process.
- After the repair is complete, start Outlook with the profile associated with the Outlook data file you just recovered.
How to fix error 0x8004010F?
- Locate the default Outlook data file. Select Start, then Control Panel.
- Create a new Outlook profile. Method 1 - Use automatic account set up to create an IMAP or POP3 email account.
- Set the new Outlook profile as the default profile.
