Updated April 2024: Stop getting error messages and slow down your system with our optimization tool. Get it now at this link
- Download and install the repair tool here.
- Let it scan your computer.
- The tool will then repair your computer.
Taking a screenshot is pretty common when it comes to computer tasks, but it’s still a very useful skill. Screenshots can be useful at work, be essential for record keeping, or even be requested by technical support to better illustrate an error that has occurred.
But when it comes to taking screenshots on a Windows PC, the first thing to know is that there are actually many different ways to do it. These include using the Print Screen button, sending screenshots to OneDrive, retrieving screenshots from the game bar and more. Our preferred method uses the Paint program, but you can edit the screenshots with almost any original or third-party tool.
To Make a Screenshot of the Entire Screen in Windows 10

There are two ways to take a full screenshot under Windows 10:
- Press the Windows + print screen key.
- Now go to the image library of your computer by starting the explorer (Windows key + e) and clicking on Images in the left panel.
- Open the Screenshots folder to find your screenshot stored here under the name Screenshots (NUMBER).
- Alternatively, you can simply press Print Screen and open MS Paint. Now press Ctrl + v to insert the screenshot into Paint. You can now save it anywhere.
To Take a Single Screenshot of the Current Window

If you only want to take a screenshot of an open application or window, follow these steps:
- Click on the application you want to take a screenshot of. Make sure that it is in the foreground and not behind other open applications.
- Press Alt + Print Screen.
- Open MS Paint.
- Press Ctrl + v.
- This will insert the screenshot of the open window into Paint. You can save the screenshot wherever you want.
April 2024 Update:
You can now prevent PC problems by using this tool, such as protecting you against file loss and malware. Additionally it is a great way to optimize your computer for maximum performance. The program fixes common errors that might occur on Windows systems with ease - no need for hours of troubleshooting when you have the perfect solution at your fingertips:
- Step 1 : Download PC Repair & Optimizer Tool (Windows 10, 8, 7, XP, Vista – Microsoft Gold Certified).
- Step 2 : Click “Start Scan” to find Windows registry issues that could be causing PC problems.
- Step 3 : Click “Repair All” to fix all issues.

To Take a Screenshot of a Part of the Screen in Windows 10
Here you use the Windows cutting tool. Follow these steps to make a screenshot of a part of the screen in Windows 10 :
- Select the Start button, type “Snipping Tool” in the search box on the taskbar, then select “Snipping Tool” from the list of results.
- Under “Snipping Tool”, select “Mode”. In earlier versions of Windows: Select the arrow next to the “New” button. Then, when you select the type of snip you want, you will see the entire screen turn slightly gray. Next, select the area of your screen that you want to capture from all the elements currently on the screen.
To Take a Screenshot of the Game Bar in Windows 10
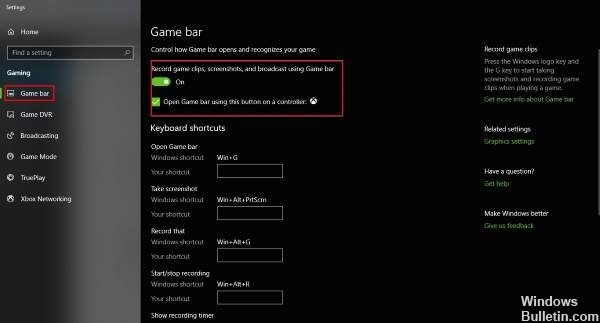
- Using the Windows Game Bar
- Windows Key-G opens the game bar, which contains a camera-like icon in its Transfer and Recording section. Tap on it and your screenshot will be saved (somewhat unexpectedly) in the Videos/Captures folder under your main user folder.
Double-click on your Surface Pen

If you are on a touch screen PC that uses digital ink, such as a Surface Pro, you can take a screenshot of your full screen by simply double-clicking the “Back” button on a Surface Pen. This opens Snip and Sketch, and the full screenshot is available for commenting, editing and sharing.
Conclusion
If you need to take a screenshot of something on your computer screen, Windows 10 offers a variety of methods to do so.
Whether you want to save the whole screen or just a portion of it, we’ve compiled the most common techniques for taking a screenshot in Windows 10.
https://support.microsoft.com/en-us/help/13776/windows-10-use-snipping-tool-to-capture-screenshots
Expert Tip: This repair tool scans the repositories and replaces corrupt or missing files if none of these methods have worked. It works well in most cases where the problem is due to system corruption. This tool will also optimize your system to maximize performance. It can be downloaded by Clicking Here

CCNA, Web Developer, PC Troubleshooter
I am a computer enthusiast and a practicing IT Professional. I have years of experience behind me in computer programming, hardware troubleshooting and repair. I specialise in Web Development and Database Design. I also have a CCNA certification for Network Design and Troubleshooting.