Updated April 2024: Stop getting error messages and slow down your system with our optimization tool. Get it now at this link
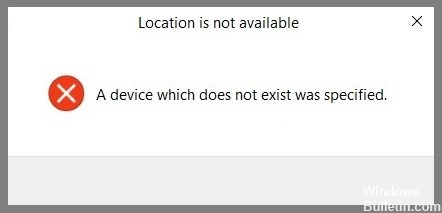
When an external device is connected to the system, you can see it in the File Explorer window. You can access the device simply by double-clicking on it. However, sometimes it turns out that the device is not available, even if it is recognized, and an error appears.
What causes the error message “A non-existent device was specified” in Windows 10?
There are several reasons for this error. Users who have encountered this problem claim that even a Windows update can cause the error. Basically, if your hard drive has been used for a very long time or it is old, then the resulting hard drive error is a common occurrence.
As the disk drive gets older, sectors get damaged and the disk deteriorates. Also, if you often format the disk while installing Windows, you may also get this error.
How to fix the “Specified non-existent device” error in Windows 10?
You can now prevent PC problems by using this tool, such as protecting you against file loss and malware. Additionally it is a great way to optimize your computer for maximum performance.
The program fixes common errors that might occur on Windows systems with ease - no need for hours of troubleshooting when you have the perfect solution at your fingertips:
April 2024 Update:


Granting full rights to your hard drive
- Type File Explorer in the search box and press Enter to open File Explorer.
- In File Explorer, find your local hard drive C or D or E or F or any other local or external hard drive to open its properties.
- In the Security section, click Edit.
- Then select the Full Controls checkbox. You will see that the Edit, Read and Run, List folder contents, and Read automatically checkboxes are checked.
- Click Apply and OK to save your changes.
Check the state of your hard drive with the CHKDSK tool
- In File Explorer, right-click on the problem disk to open its properties.
- If Windows 10 tells you that the drive is inaccessible, simply open the local drive properties.
- Click Check under Tools.
- After the tool finishes, open the drive and see if you can access that drive or a folder on it without getting an error message.
Reboot your computer
- If you find an error in File Explorer or Disk Manager, you should reboot the device without turning it off.
- For some users, a simple reboot will get rid of the warning message.
- This eliminates system conflicts with the drive.
Expert Tip: This repair tool scans the repositories and replaces corrupt or missing files if none of these methods have worked. It works well in most cases where the problem is due to system corruption. This tool will also optimize your system to maximize performance. It can be downloaded by Clicking Here
