Updated April 2024: Stop getting error messages and slow down your system with our optimization tool. Get it now at this link
- Download and install the repair tool here.
- Let it scan your computer.
- The tool will then repair your computer.
Sometimes Windows Search may not work correctly on a Windows 10 system. But most users rarely notice this because we tend to think that if Windows Search couldn’t find the item we’re looking for, we manually start digging around looking for that item. Experienced users, however, may want to fix this problem if they notice it. This article substantiates an issue that describes a similar problem.
In this case, the following message appears at the top of the search window when you perform a search through Windows Search:
Search indexing was turned off
What causes the ‘search indexing was turned off’ error

There are a couple of things that can cause the error message “search indexing was turned off.”
- One possibility is that the indexing service is not running. This can happen if the service is disabled in the services list, or if the index files are corrupt.
- Another possibility is that there is something wrong with the Windows Search service. This can be caused by a number of things, including an incorrect registry setting or a corrupted search filter.
If you’re seeing this error message, it’s important to try and troubleshoot the issue so that you can get your search indexing back up and running.
How to resolve the ‘search indexing was turned off’ issue
Run the Search and Indexing troubleshooter
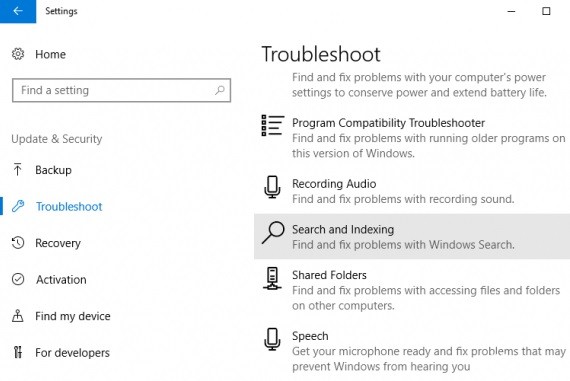
Follow these steps to run the Search and Indexing troubleshooter on Windows 10:
- Open Control Panel.
- Click Troubleshooting.
- Click View All on the left side of the window.
- Click Search and Indexing.
- Click Next on the first screen that appears.
- Wait for the troubleshooter to scan your computer for issues and then click Next.
- Make sure that Apply repairs automatically is checked and then click Next again.
- If any issues are found, follow the instructions on the screen to fix them.
- Once you’re finished, click Close on the window that appears.
Run SFC scan

A system file checker is a handy tool that can be used to scan for and repair corrupt files on your Windows 10 computer.
- To use the SFC scan, open the Command Prompt as an administrator.
- In the Command Prompt, type “sfc /scannow” and press Enter.
- The scan will take some time to complete, and you may see some on-screen activity as it progresses.
- Once the scan is finished, you’ll see a message indicating whether or not any problems were found.
- If no problems were found, then you can rest assured that your system is healthy.
- However, if problems were found, then you’ll need to take additional steps to fix them.
- For more information on how to use the SFC scan, consult the Windows help documentation.
April 2024 Update:
You can now prevent PC problems by using this tool, such as protecting you against file loss and malware. Additionally it is a great way to optimize your computer for maximum performance. The program fixes common errors that might occur on Windows systems with ease - no need for hours of troubleshooting when you have the perfect solution at your fingertips:
- Step 1 : Download PC Repair & Optimizer Tool (Windows 10, 8, 7, XP, Vista – Microsoft Gold Certified).
- Step 2 : Click “Start Scan” to find Windows registry issues that could be causing PC problems.
- Step 3 : Click “Repair All” to fix all issues.

Run DISM tool
The DISM tool is a powerful utility that can be used to repair or update Windows 10.
- Open the Command Prompt as an administrator. You can do this by searching for “Command Prompt” in the Start menu, and then right-clicking on the result and selecting “Run as administrator.”
- Type DISM.exe /Online /Cleanup-image /Restorehealth and press Enter. This will scan your system for errors and attempt to fix them.
- Wait for the process to complete. This can take anywhere from a few minutes to a couple of hours, depending on the severity of the errors.
- Once the process is finished, type Exit and press Enter to close the Command Prompt window.
- Restart your computer and check to see if the issue has been resolved. If not, you can try running the DISM tool again with the /ScanHealth switch instead of /Restorehealth. This will perform a more thorough scan of your system, but it will also take longer to complete.
Perform system restore
- Open Start and type in ‘System Restore’. Click on the first result that comes up.
- On the System Restore window that pops up, click on the ‘Create a restore point’ button on the right side.
- Give your restore point a name and click ‘Create’. Wait for the process to finish.
- Once the restore point is created, click on the ‘System Restore’ button.
- Select your restore point and click ‘Next’. Confirm your selection by clicking ‘Finish’.
- Your computer will now restart and begin the restore process. Once it’s finished, you should be able to use Windows 10 without any issues.
Run ‘Reset this PC’
Reset this PC is a Windows 10 feature that allows you to restore your computer to its default settings. If you’re having problems with your PC, running Reset this PC can help to fix them. Here’s how to do it:
- Press the Windows key + I to open the Settings app, then click on Update & Security.
- Click on Recovery in the left-hand menu, then under Reset this PC, click on Get Started.
- You’ll be given two options: keep my files or remove everything. Choose the option that you want, then follow the instructions on the screen.
- Once the ‘Reset this PC’ is finished, your computer will restart and be back to its default settings.
Expert Tip: This repair tool scans the repositories and replaces corrupt or missing files if none of these methods have worked. It works well in most cases where the problem is due to system corruption. This tool will also optimize your system to maximize performance. It can be downloaded by Clicking Here
Frequently Asked Questions
How do I fix search indexing is turned off?
- Press the Windows + R key on your keyboard.
- Type services.msc and press Enter.
- Search for the indexing service.
- Right-click on the service and select Restart.
How do I turn indexing back on?
If Windows search indexing is disabled, you can follow the steps above in reverse order to re-enable it. Open the Services console, find the Windows Search service and double-click it. In the Windows Search Properties window, select Automatic (delayed start) from the Startup Type drop-down menu and click Apply.
What does indexing search do?
Indexing is the process of examining files, emails, and other content on your computer and cataloging their information, such as the words and metadata they contain. Computer searches use a term index after indexing to find results more quickly.
How do I fix indexing?
In the Indexed Places dialog box, under Edit Selected Places, select the check box for the place you want to edit and click OK. In the Advanced Options dialog box, in the Index Settings tab under Troubleshooting, click Create New.
