Updated April 2024: Stop getting error messages and slow down your system with our optimization tool. Get it now at this link
Steam has been known to crash from time to time, either at startup every time you run it, or randomly. This is a very common problem that is also mentioned on the official Steam forums. The fixes mentioned there don’t seem to work.
What causes the Steam client to crash?

- The problem may be caused by an antivirus program on your computer.
- If the data stored in the AppCache folder is corrupted, this can cause this problem.
- Maybe a third-party application installed on your computer is causing the problem.
- There are times when Steam requires high privileges to run certain processes. If it does not have administrator access, this problem may occur.
- ClientRegistry.blob is where your registration information and installed games are stored. If the data stored there has been corrupted, it may be causing this problem.
How to restore Steam that keeps crashing?
You can now prevent PC problems by using this tool, such as protecting you against file loss and malware. Additionally it is a great way to optimize your computer for maximum performance.
The program fixes common errors that might occur on Windows systems with ease - no need for hours of troubleshooting when you have the perfect solution at your fingertips:
April 2024 Update:

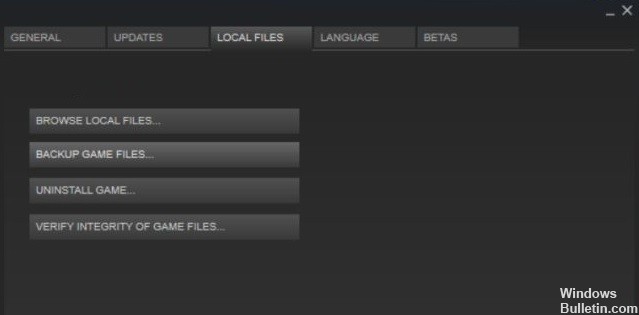
Check the integrity of your game cache
- Start the Steam client and click on LIBRARY.
- Right-click on the game that keeps crashing and select Properties.
- Click the LOCAL FILES tab, then click CHECK GAME CHECKER FOR INTEGRITY.
- Then click on the CLOSE button.
- Run the game and see if the problem is resolved.
Launch the Program Compatibility Troubleshooter
- Right-click on the Steam client shortcut on your desktop and select “Properties.
- Click the Compatibility tab, then click Run Compatibility Troubleshooter.
- Click Try Recommended Settings to test the program with the recommended compatibility settings.
- Follow the instructions on the screen to see if this troubleshooting option works or not.
Perform a reboot
- On your keyboard, press the Windows logo key and R at the same time to open the Run dialog box.
- Type MSConfig and press Enter to open the System Configuration window.
- Select the Services tab, select the Hide all Microsoft services check box, and then click Disable all.
- Select the Autorun tab, and then click Open Task Manager.
- On the Autorun tab of Task Manager, select the startup item for each startup item, and then click Disable.
- Return to the System Configuration window and click OK.
- Click Restart to restart your computer.
- Start the Steam client and see if the problem repeats when you restart your computer.
Updating your Windows system
- Press the Windows logo key on your keyboard and type Update.
- In the list of results, click Check for Updates to open the Windows Update window.
- Click Check for Updates to update your Windows system.
- Restart your computer after the Windows Update process completes.
Expert Tip: This repair tool scans the repositories and replaces corrupt or missing files if none of these methods have worked. It works well in most cases where the problem is due to system corruption. This tool will also optimize your system to maximize performance. It can be downloaded by Clicking Here
