Updated April 2024: Stop getting error messages and slow down your system with our optimization tool. Get it now at this link
- Download and install the repair tool here.
- Let it scan your computer.
- The tool will then repair your computer.
Windows 10 was launched some time ago and has brought many features that have improved the user experience on your device. It may not be perfect, but the development team is certainly committed to improving the user experience of this operating system. Whether you have a new or old Windows PC, sooner or later you will encounter some sort of error. One of the most common error messages is: “The action cannot be completed because the file is open in another program.”
This may not seem like a particularly serious error, but it can quickly become annoying because you can’t make any changes on your Windows computer. This error usually occurs when you try to rename, move, or delete a particular file in File Explorer. This error message can be very annoying because users have no information about the location or process under which the file in question may be open.
What’s the cause of this error
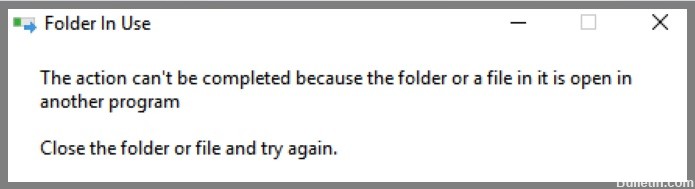
This message appears in the “File in use” window when you try to delete, rename, or move certain files and folders. The error message appears because the file or folder being manipulated is currently being used by a background application or process. In most cases, it is sufficient to find and stop the process using the file or to restart the computer. However, there are situations when none of the above measures solves the problem.
The problem may also occur again after restarting the system. Unfortunately, the message displayed does not really offer a solution on how to avoid this problem. Intuitively, users should stop the corresponding process and then try to delete or move their files. Sometimes the associated processes are not visible at all, which means that users cannot shave them off. Fortunately, there are ways to fix this problem and regain full control of the file.
How to fix the ‘The action cant be completed’ problem?
Restart file explorer
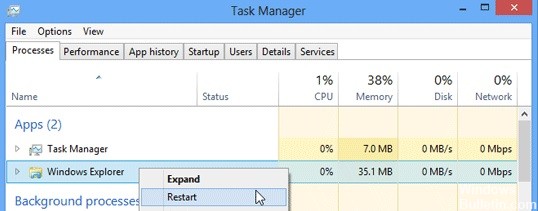
- Open the Task Manager by pressing Ctrl+Shift+Esc on your keyboard.
- Click the Processes tab.
- Find Windows Explorer in the list of processes and click on it.
- Click the Restart button at the bottom of the Task Manager window.
Alternatively, you can also restart File Explorer by opening the Start menu and typing “File Explorer” into the search bar. Right-click on the File Explorer shortcut and select “Restart.” If you’re having trouble finding File Explorer, you can also type “explorer.exe” into the search bar and press Enter to open it directly. Once you have File Explorer open, you can begin working with your files and folders again.
Restart your computer
There are a few different ways to restart your computer on Windows 10.
- One way is to click the “Start” button in the lower-left corner of your screen. Then, click the Power button and select Restart from the menu that appears.
- Another way to restart your computer is to press the Ctrl+Alt+Delete keys simultaneously. This will bring up the Task Manager, where you can click on the “Restart” button in the bottom right corner.
- Finally, you can also use the Command Prompt to restart your computer. To do this, type “shutdown -r” into the Command Prompt window and hit Enter.
These are just a few of the ways that you can restart your computer on Windows 10. Try them out and see which one works best for you!
April 2024 Update:
You can now prevent PC problems by using this tool, such as protecting you against file loss and malware. Additionally it is a great way to optimize your computer for maximum performance. The program fixes common errors that might occur on Windows systems with ease - no need for hours of troubleshooting when you have the perfect solution at your fingertips:
- Step 1 : Download PC Repair & Optimizer Tool (Windows 10, 8, 7, XP, Vista – Microsoft Gold Certified).
- Step 2 : Click “Start Scan” to find Windows registry issues that could be causing PC problems.
- Step 3 : Click “Repair All” to fix all issues.

Perform a reboot
A clean boot is a troubleshooting technique that can help you identify software conflicts when starting Windows. By starting Windows with a minimal set of drivers and startup programs, you can determine whether a background program is interfering with your ability to install or run a program. To perform a clean boot, follow these steps:
- Press the Windows key + R to open the Run dialog box.
- Type msconfig and press Enter. This will open the System Configuration Utility.
- Click on the Boot tab.
- Check the box next to Minimal under Boot options. This will enable minimal mode, which starts Windows with only essential drivers and programs.
- Click Apply and then OK to save your changes and restart your computer.
- After your computer has restarted, open the System Configuration Utility again and click on the services tab.
- Check the box next to Hide all Microsoft services, which will hide all Microsoft services from the list of available services.
- Click Disable all to disable all remaining startup services.
- Click Apply and then OK to save your changes and restart your computer once again.
- Once your computer has restarted, you can test whether the issue has been resolved.
Disable file preview in Windows explorer
Anyone who has ever tried to find a specific file in Windows Explorer knows how frustrating it can be. Fortunately, there is a way to turn off file previews, which can help to declutter the interface and make it easier to find what you’re looking for. Here’s how:
- Open Windows Explorer and click on the ‘View’ tab.
- In the ‘View’ tab, click on the ‘Options’ button.
- In the ‘Folder Options’ window, select the ‘View’ tab.
- Under the ‘Advanced settings’ section, uncheck the ‘Always show icons, never thumbnails’ options.
- Click on the ‘OK’ button to save your changes.
Now, when you open Windows Explorer, you should see fewer icons and more spacious thumbnails. This can make it much easier to locate specific files, especially if you know what they look like. So if you’re tired of hunting through messy folders, be sure to give this tip a try.
Disable thumbnails via performance settings
Windows 10 gives users a lot of options for customizing their experience, and that includes how the operating system uses memory and resources. One way to fine-tune Windows 10’s performance is to adjust the ‘Show thumbnails instead of icons’ setting in the Performance options menu. This setting controls whether or not Windows 10 renders miniature versions of photos and videos when they’re displayed in File Explorer. For users who are working with limited resources, disabling thumbnails can help make Windows 10 feel more responsive. Here’s how to do it:
- Open the Start Menu and search for ‘Performance.’
- Click on ‘Adjust visual effects,’ which will open the Performance Options window.
- Scroll down to the ‘Visual Effects’ tab and find the ‘Show thumbnails instead of icons’ option.
- Select ‘Never show thumbnails’ and click ‘Apply.’
With this change in place, Windows 10 will no longer generate thumbnail images for photos and videos stored on your hard drive. As a result, you should see a slight uptick in performance, especially when opening sizable images or video files.
Expert Tip: This repair tool scans the repositories and replaces corrupt or missing files if none of these methods have worked. It works well in most cases where the problem is due to system corruption. This tool will also optimize your system to maximize performance. It can be downloaded by Clicking Here
Frequently Asked Questions
What is the cause of the 'the action cannot be completed because the file is open' error?
There can be several causes for this error, but the most common is that a program is using the file that you're trying to delete.
How can I fix the 'the action cannot be completed because the file is open' error?
There are a few potential fixes for this error, which include disabling file preview in Windows Explorer, adjusting the performance settings, or using the Command Prompt.
How do I prevent the 'the action cannot be completed because the file is open' error from happening again?
One way to prevent this error is to close all open programs before attempting to delete a file. You can also try using the Command Prompt to delete the file instead of Windows Explorer.
