Updated April 2024: Stop getting error messages and slow down your system with our optimization tool. Get it now at this link
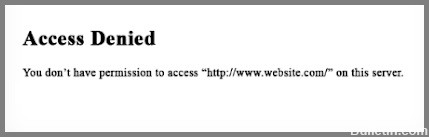
The Access Denied error message is a common error message that can appear when using alternate browsers. This error message looks something like this:
“Access Denied, you are not allowed to access (URL) on this server.
It prevents certain websites from opening in the browser. This error message can have different reasons, such as the server is no longer available, VPN access is blocked on this server, etc. We know how frustrating it can be when you can’t access certain websites and can’t understand why. Don’t worry, in this article you’ll find some tips on how to solve the “access denied” problem so you can get back to work quickly.
What causes the “Access Denied” error?
The “Access Denied” error occurs when your Firefox browser uses a different proxy or VPN setting than the one installed on your Windows 10 computer. This error is most likely caused by a network-related problem in your browser and occurs in Firefox browsers. So when the site detects that something is wrong with your browser’s or your network’s cookies, it blocks it from opening.
How do I fix the “Access Denied” site error?
There are several ways to solve this annoying error. Which solution is best for you depends primarily on what caused the error. So, what can you do to repair a website affected by the “Access Denied” error message? Let’s take a look at the options and then proceed to find the error. You can try to do this:
Disable the proxy server
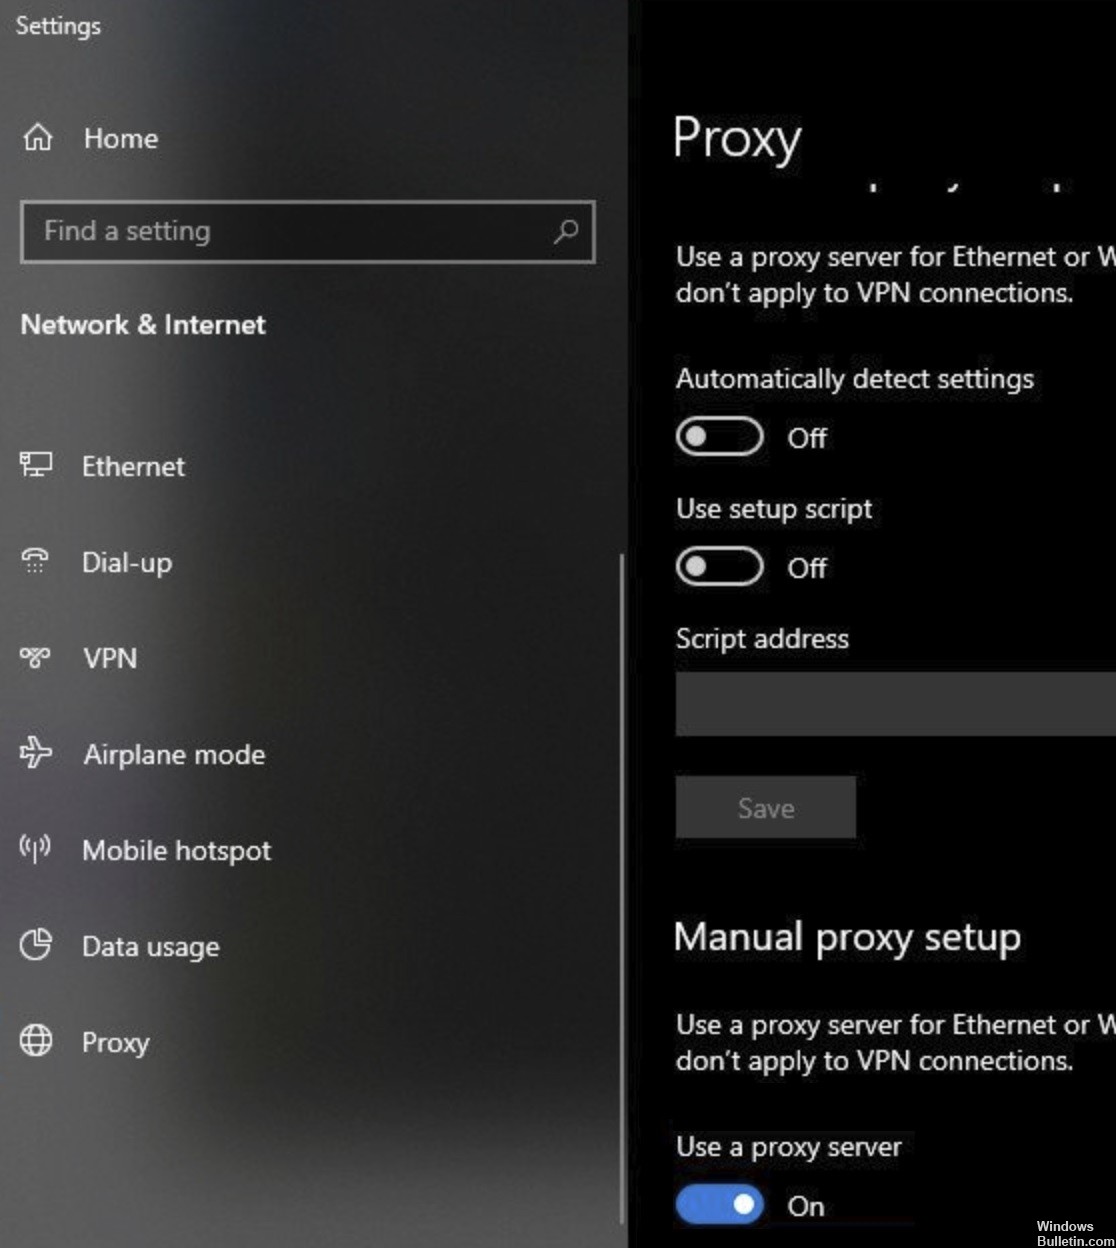
Disabling the proxy server on Windows 10 is a straightforward process. You can do it in just a few steps:
- Open the Settings app by pressing the Windows key + I on your keyboard.
- Click on Network & Internet.
- On the left-hand side, select Proxy.
- On the right-hand side, set the toggle under Use a proxy server to Off.
Once you’ve followed these steps, the proxy server will be disabled and you’ll be able to access websites without issue.
Reset browser data
If your web browser is acting up, one of the first things you should do is reset its data. This will clear out any temporary files, cookies, and other data that may be causing the problem. Here’s how to reset browser data on Windows 10:
- Open the Settings app and go to the “Privacy” section.
- Click on the “Clear browsing data” button.
- Select the type of data you want to clear (e.g., cookies, cache, history).
- Click on the “Clear” button.
- Restart your browser and try again.
You can now prevent PC problems by using this tool, such as protecting you against file loss and malware. Additionally it is a great way to optimize your computer for maximum performance.
The program fixes common errors that might occur on Windows systems with ease - no need for hours of troubleshooting when you have the perfect solution at your fingertips:
April 2024 Update:

Disable VPN and VPN extensions
- Disable VPN and VPN extensions on Windows 10 by going to the “Start” menu and selecting “Control Panel.”
- Click on “Network and Internet” and then select “VPN.”
- Select the “Disabled” radio button and then click on “OK.”
- If you have any VPN extensions installed, disable them by going to the “Start” menu and selecting “All Programs.”
- Right-click on the VPN extension and select “Uninstall.” Follow the prompts to complete the uninstallation process.
- Restart your computer for the changes to take effect. With these steps, you can be confident that your Windows 10 computer is free from any unwanted VPN or extension activity.
Delete cookies and browser history
Even if you close all your tabs and log out of your account, there are still going to be some “cookies” left behind. If you want to get rid of all the unwanted files taking up space on your computer, here’s a list of steps on how to delete cookies and browser history on Windows 10:
- Open the start menu and type “control panel” into the search bar.
- Click on the “Network and Internet” category.
- Click on the “Internet Options” tab.
- Under the “General” tab, click on the “Delete…” button.
- Select the checkboxes next to the types of data you want to delete (e.g., cookies, Temporary Internet Files, etc.) and click on the “Delete” button.
- Click on the “OK” button to save your changes.
- Close the Control Panel window.
- Restart your computer for the changes to take effect.
After following these steps, all of the unwanted cookies and browser history will be cleared from your Windows 10 computer.
Clear all data for a specific website in Firefox
- In the top right corner of the Firefox browser, click on the three dots to open the menu.
- From the menu, select “Options.”
- On the options page, select “Privacy & Security” from the left-hand sidebar.
- Scroll down to the “History” section and click on “Clear History.”
- A new window will pop up. Select “Time range” and choose “All Time.”
- Make sure that only the “Cookies and Site Data” option is selected, then click on “Clear Now.”
- Close the window and you’re done! All of the cookies and site data for that specific website will have been cleared from your Firefox browser.
If you’re still having trouble accessing websites after following these steps, there may be an issue with your DNS settings. Try changing your DNS server to 8.8.8.8 (Google’s public DNS) and see if that helps.
Final thoughts
If you’re still having trouble accessing websites on your Windows 10 computer, there are a few other things you can try. First, make sure that your antivirus software is up-to-date and running a full scan of your system. If that doesn’t help, you can try resetting your Winsock settings. We hope this article has helped you understand the Access Denied error and how to fix it. If you have any questions or comments, please feel free to leave them below.
Expert Tip: This repair tool scans the repositories and replaces corrupt or missing files if none of these methods have worked. It works well in most cases where the problem is due to system corruption. This tool will also optimize your system to maximize performance. It can be downloaded by Clicking Here
Frequently Asked Questions
How do I fix the Access Denied website?
- Disable the VPN software.
- Disable VPN extensions.
- Use a premium VPN service.
- Disable the proxy server option.
- Delete browser data.
- Delete all data for a specific website in Firefox.
- Reload the browser.
What does Access Denied mean on a website?
The problem occurs when Firefox uses proxy or VPN settings that are different than the settings on your Windows computer. If the website detects that something is wrong with your network, browser cookies, etc., it will block you.
Why does Access Denied occur on a website?
There are a few possible reasons:
- The website is down or not responding.
- The website is blocking your IP address.
- Your ISP is blocking the website.
- You have malware on your computer.
