Updated April 2024: Stop getting error messages and slow down your system with our optimization tool. Get it now at this link
- Download and install the repair tool here.
- Let it scan your computer.
- The tool will then repair your computer.
Driving problems can occur at any time. The good news, however, is that they are usually easy to fix. This also applies to the “Windows does not detect network hardware” error, which occurs when your network card driver is not installed correctly. In this article, I will show you how to solve the “Windows did not detect network hardware” error message once and for all. But before we see the solution, we must first understand why this error occurs.
Why doesn’t Windows detect any networking hardware
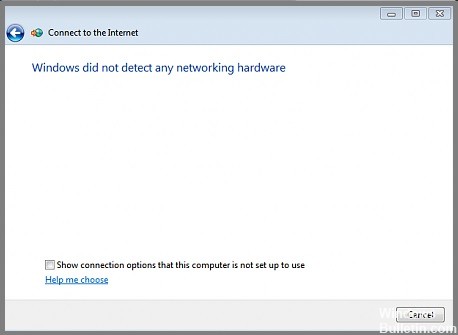
Windows may not detect network hardware due to a configuration error or an outdated device driver. In addition, this problem can also occur after installing the latest Windows update and drivers for your device.
Device drivers are responsible for the correct interaction between the operating system and your computer’s hardware components. Windows is designed to automatically install the default drivers for all your devices, which can cause this problem to occur unexpectedly without your action.
How to repair Windows that does not detect network hardware
Install network adapter driver manually
Installing a network adapter driver manually on Windows 10 can be a bit of a hassle, but it’s still doable. Here’s a quick rundown of the steps you need to take:
- Download the driver for your network adapter from the manufacturer’s website.
- Unzip the file and extract the files to a folder on your hard drive.
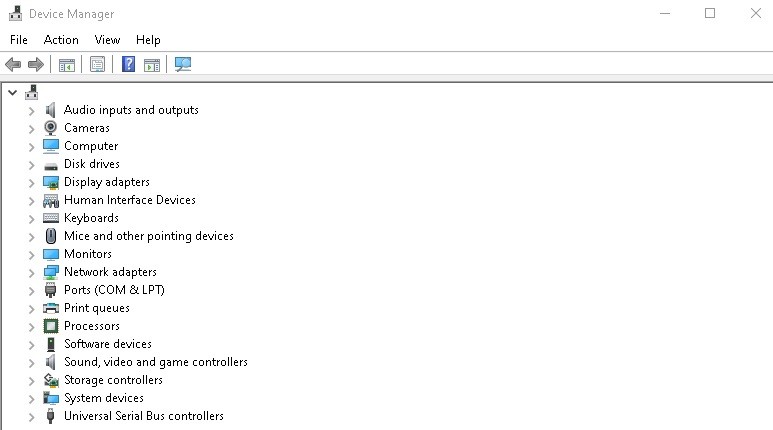
- Open Device Manager and find your network adapter under the “Network adapters” section.
- Right-click on your network adapter and select “Update Driver Software.”
- Select “Browse my computer for driver software.”
- Select “Let me pick from a list of device drivers on my computer.”
- Select the “Have Disk” button and browse to the folder where you extracted the files in step 2.
- Select the appropriate driver file and click “Open.”
- Click “OK” and then click “Next.”
- The driver should now be installed, and you should be able to connect to your network.
April 2024 Update:
You can now prevent PC problems by using this tool, such as protecting you against file loss and malware. Additionally it is a great way to optimize your computer for maximum performance. The program fixes common errors that might occur on Windows systems with ease - no need for hours of troubleshooting when you have the perfect solution at your fingertips:
- Step 1 : Download PC Repair & Optimizer Tool (Windows 10, 8, 7, XP, Vista – Microsoft Gold Certified).
- Step 2 : Click “Start Scan” to find Windows registry issues that could be causing PC problems.
- Step 3 : Click “Repair All” to fix all issues.

Restore the computer to an earlier date
Are you having problems with your computer and want to restore it to an earlier date? Here’s how to do it on Windows 10:
- First, open the Control Panel. You can do this by searching for it in the Start menu.
- Next, click on the option for System and Security.
- Under the heading of Backup and Restore, click on the link that says “Restore system files and settings.”
- On the next page, click on the button that says “Advanced Restore.”
- You will then be given the option to select a restore point. Choose the date that you want to restore your computer to and then click “Next.”
- Follow the prompts to complete the restoration process. Restart your system when prompted.
By following these simple steps, you can restore your computer to an earlier date.
Update your windows system
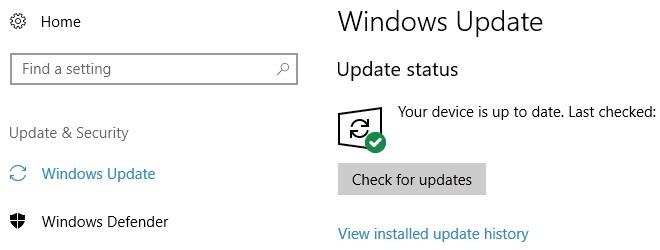
Updating your Windows 10 computer is a simple process that can usually be completed in just a few minutes. Here’s a step-by-step guide to updating your Windows 10 computer:
- Click on the Start button, then select Settings.
- In the Settings window, click on Update & Security.
- In the Update & Security window, click on Check for Updates.
- If any updates are available, they will be downloaded and installed automatically.
- Once the updates have been installed, you will be prompted to restart your computer. Simply follow the instructions on the screen to complete the restart process.
By following these simple steps, you can ensure that your Windows 10 computer is always up-to-date with the latest security patches and software improvements.
Run internet connections troubleshooter
Windows 10 offers a built-in troubleshooter for network problems that can help you identify and fix some common issues. Here’s how to run it:
- First, open the Settings app by clicking on the Start button and then selecting the Settings cog icon.
- In the Settings app, click on the “Update & security” category.
- On the next page, select the “Troubleshoot” option on the left side of the window.
- On the right side of the window, find the “Internet Connections” troubleshooter and click on it.
- Finally, click on the “Run the troubleshooter” button and follow any instructions that appear on your screen.
By doing so, you should be able to fix some common internet connection problems in Windows 10.
Run network adapter troubleshooter
Windows 10 offers a built-in network adapter troubleshooter that can help you identify and fix common problems. Here’s a step-by-step guide on how to run the troubleshooter:
- Click the Start menu and type “troubleshoot”.
- Select “Troubleshoot” from the list of results.
- Under “Get up and running,” select “Network adapters.”
- The troubleshooter will now begin scanning for problems. When it’s finished, it will show a list of any problems it found and whether or not they were fixed.
- If the troubleshooter was unable to fix a problem, you can try manually resetting your network adapters.
Expert Tip: This repair tool scans the repositories and replaces corrupt or missing files if none of these methods have worked. It works well in most cases where the problem is due to system corruption. This tool will also optimize your system to maximize performance. It can be downloaded by Clicking Here
Frequently Asked Questions
How do I restore my network hardware?
- On the Start menu, go to Settings.
- Click on Network and Internet.
- By default, you should be in the Status tab.
- Click the Reset Now button.
- Click Yes to confirm and restart your computer.
- The computer will now reboot and the network adapters and configuration will be reset.
Why is my network adapter not working?
If your network adapter is not working, it could be because of a problem with the driver. You can try updating the driver to see if that fixes the problem. If that doesn't work, you can try resetting the network adapter.
How do I install a network adapter in Windows 10?
- Click on the Start button, then type "device manager" into the Search field.
- Click on Device Manager from the list of results.
- In the Device Manager window, find the network adapters category and expand it.
- Right-click on the network adapter that you want to install and select "Update Driver."
- Click on "Search automatically for updated driver software" and follow the instructions on your screen.
