Updated April 2024: Stop getting error messages and slow down your system with our optimization tool. Get it now at this link
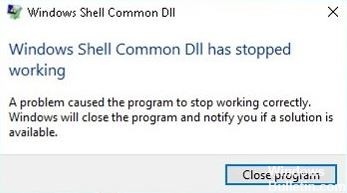
Windows programs run based on DLL files. If the DLL file is not working, your program may not work and you will get the error message “Windows Shell Common Dll stopped working”. In this quick guide, you will find the solution to this error. Please take the time to follow these simple steps and try to resolve this error on your computer.
What causes the ‘Windows Shell Common DLL has stopped working’ error message?
There can be several reasons for this problem on your PC, but usually, it is related to the audio and touchpad drivers. In some cases, this error occurs only temporarily and a simple reboot can solve the problem, but if it has been bothering you for a long time, you can find some very effective solutions below.
How to resolve the “Windows Shell Common DLL has stopped working” error?
You can now prevent PC problems by using this tool, such as protecting you against file loss and malware. Additionally it is a great way to optimize your computer for maximum performance.
The program fixes common errors that might occur on Windows systems with ease - no need for hours of troubleshooting when you have the perfect solution at your fingertips:
April 2024 Update:

Reinstall the audio drivers
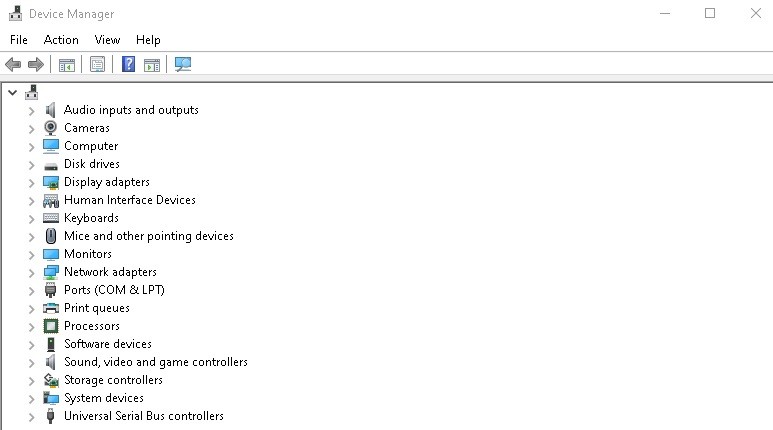
- Press the Windows + X keys to open the Win + X menu, and select Device Manager from the list.
- When Device Manager opens, find your audio driver and right-click it.
- Select Uninstall Device from the menu.
- A confirmation dialog box will appear. If available, enable the Uninstall driver software for this device option.
- Click Uninstall to remove the driver.
- After uninstalling the driver, click the Verify Hardware Changes icon.
Make sure the Windows Time service is running
- Press the Windows + R keys and type services.MSC. Now press Enter or click OK.
- The Services window is now displayed. Locate the Windows Time service, right-click it, and select Run from the menu.
Disable the hardware graphics gas pedal in Microsoft Office
- Open Outlook or another Office application.
- Choose File -> Options -> Advanced.
- Now find the Hardware Graphics Accelerator option and disable it.
Remove unnecessary audio devices from the Device Manager
- Open the Device Manager.
- Now go to View -> Show Hidden Devices.
- Locate all unknown audio devices and remove them.
Launch the SFC scan
- Press the Windows + X key and select Command Prompt (Admin) from the list.
- If the command line is not available, you can select PowerShell (Admin).
- When the command line starts, type: sfc /scannow.
- Press the Enter key to run it.
- The scan will now begin. Remember that the sfc scan may take about 10-15 minutes, so do not interrupt it.
Expert Tip: This repair tool scans the repositories and replaces corrupt or missing files if none of these methods have worked. It works well in most cases where the problem is due to system corruption. This tool will also optimize your system to maximize performance. It can be downloaded by Clicking Here
Frequently Asked Questions
What is a normal Windows shell DLL?
DLL files contain important information about Windows and your PC's hardware configuration. If you open these files, experienced users may be able to solve Windows problems. However, inexperienced users should not, as they can easily make a mistake and damage their operating system.
How to solve “Windows Shell Common DLL not working anymore” problem?
- Make sure that the Windows Time service is running.
- Use third-party software.
- Use another application to change the microphone settings.
- Reinstall the audio drivers.
- Change the security permissions for the User Select button.
- Update the touchpad driver.
What causes the “Windows Shell Common DLL stops working” error?
There can be several reasons for this problem on your PC, but it is usually related to the audio and touchpad drivers. In some cases, this error may be temporary and a simple reboot may solve the problem.
