Updated April 2024: Stop getting error messages and slow down your system with our optimization tool. Get it now at this link

If you get the error message WslRegisterDistribution failed with error: 0x800701bc, it is a kernel problem that can be fixed relatively quickly. Make sure you have an administrator account with sufficient rights to update your Linux kernel.
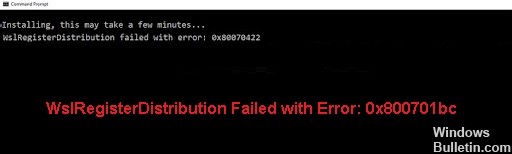
Here is the full error message:
Installation may take a few minutes.
WslRegisterDistribution failed with error: 0x800701bc
Error: 0x800701bc
What causes the ‘wslregisterdistribution failed with error: 0x800701bc‘?
The error occurs because the latest build of Windows 10 defaults to WSL 2, the successor to WSL1, and requires a kernel update. As we know, Microsoft has implemented a full Linux kernel in WSL 2, so the old kernel needs to be updated.
How to Repair ‘wslregisterdistribution failed with error: 0x800701bc‘?
You can now prevent PC problems by using this tool, such as protecting you against file loss and malware. Additionally it is a great way to optimize your computer for maximum performance.
The program fixes common errors that might occur on Windows systems with ease - no need for hours of troubleshooting when you have the perfect solution at your fingertips:
April 2024 Update:

Scanning your computer for malware
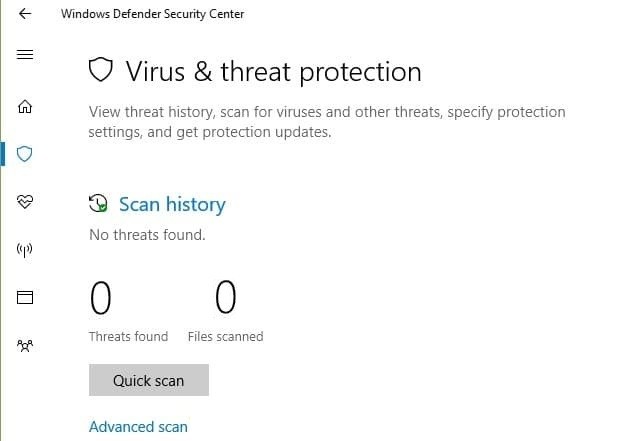
- Press Win + I to open settings.
- Click on the “Update and Security” tab.
- Click on “Windows Security” in the left pane.
- Then click on “Virus and Threat Protection” in the list of options.
- Find the “Scanning Options” link and click on it.
- Select the “Full scan” option and click “Scan now”.
- Continue scanning until it is complete. Be patient as this process may take some time.
Solving the file permission problem
- Press Win + R to open the “Run” dialog box.
- Type this command: “%localappdata%\Packages\” and press Enter.
- Find the distro folder name in the folder list.
- When you find the distro folder, right-click on it and select Properties.
- Now switch to the Security tab.
- Click on the “Advanced” button.
- Make sure that your account is listed in the account list.
Reset the LxssManager service
- Press Win + R to open the “Run” command field.
- Type “Services.MSC” and press Enter.
- Find “LxssManager” in the list of services.
- Right-click on it and click “Stop”.
- Wait a while (two minutes), right-click again, and click “Run”.
- Now restart WSL and check if error 0x800701bc has been fixed.
Installing the virtual machine
- Click the Windows start button.
- Enter “Enable Windows features.”
- Click on the “Enable or Disable Windows Features” application to open it.
- Then find “Virtual Machine Platform” and check the box next to it. This will allow it to.
- Then click the Ok button.
Expert Tip: This repair tool scans the repositories and replaces corrupt or missing files if none of these methods have worked. It works well in most cases where the problem is due to system corruption. This tool will also optimize your system to maximize performance. It can be downloaded by Clicking Here
Frequently Asked Questions
How do I fix the WSLRegisterDistribution failure with error code 0x800701bc?
- Press Win + I to open settings.
- Click on the "Update and Security" tab.
- Click on "Windows Security" in the left pane.
- Then click on "Virus and Threat Protection" in the list of options.
- Find the "Management Options" link and click it.
- Select the "Full scan" option and click "Scan now".
- Continue scanning until it is complete. Be patient, as this process may take some time.
How do I solve the file authorization problem?
- Press Win + R to open the "Run" dialog box.
- Type this command: "%localappdata%\Packages\" and press Enter.
- Find the distro folder name in the directory list.
- Once you find the distro folder, right-click on it and select Properties.
- Now switch to the Security tab.
- Click on the "Advanced" button.
- Make sure that your account is on the list of accounts.
Why am I getting the error message “wslregisterdistribution failed with error code: 0x800701bc”?
This is because the latest build of Windows 10 originally shipped with WSL 2, the successor to WSL1, and requires a kernel update. As we know, Microsoft has implemented a full Linux kernel in WSL 2, so the old kernel needs to be updated.
